# Credenco Business Wallet Documentation
> Documentation for the Credenco Business Wallet: issue, hold, and verify digital
> verifiable credentials through an intuitive UI and powerful REST APIs.
> Full text of every page listed in https://docs.credenco.com/llms.txt.
## Overview
### Business Wallet Documentation
https://docs.credenco.com/
Documentation for the Credenco Business Wallet. Issue, verify, and manage verifiable credentials with eIDAS 2.0 compatible APIs, a CLI and AI agents.
### Business Wallet
https://docs.credenco.com/docs/api/api-intro/
#### Business Wallet
The Credenco Business Wallet lets your organization issue, hold, and verify verifiable credentials.
Everything you can do in the web UI is also available through the REST API.
Credentials are exchanged over OpenID4VC and follow the W3C Verifiable Credentials data model, so they work with other wallets that implement the same standards.
The wallet has three modules:
| Module | What it does |
|---|---|
| **Issuer** | Issues credentials, such as certificates or registrations, to people, organizations, or products. |
| **Holder** | Stores the credentials your organization has received and presents them when asked. |
| **Verifier** | Requests credentials from other parties and checks that they are valid, unrevoked, and from a trusted issuer. |
##### Use cases
Each use case follows one real-world scenario from start to finish and shows the Issuer, Holder, and Verifier modules working together.
- [BIG Register](https://docs.credenco.com/docs/use-case/big-register/intro/): verify a healthcare professional's BIG registration.
- [Mortgage](https://docs.credenco.com/docs/use-case/mortgage/intro/): collect and verify the documents for a mortgage application.
- [Supplier Onboarding](https://docs.credenco.com/docs/use-case/supplier-onboarding/intro/): qualify a supplier by requesting their company credentials.
##### Guides
| Guide | Covers |
|---|---|
| [Issue Credentials](https://docs.credenco.com/docs/guide/credential-issue/intro/) | Set up issuer and credential templates, then issue credentials manually or from your backend. |
| [Direct Issue](https://docs.credenco.com/docs/guide/direct-issue/intro/) | Issue a credential straight into a trusted contact's wallet inbox, without a QR code. |
| [Credential Status](https://docs.credenco.com/docs/guide/credential-status/status-lists/) | Suspend and revoke issued credentials with status lists. |
| [Receive Credentials](https://docs.credenco.com/docs/guide/verifier-template/intro/) | Create verifier templates and receive credentials from other parties. |
| [Public Profile](https://docs.credenco.com/docs/guide/public-profile/public-profile/) | Publish your organization's public profile so others can recognize you. |
| [Catalog Sources](https://docs.credenco.com/docs/guide/catalog-sources/catalog-sources/) | Connect credential catalogs to reuse existing credential type definitions. |
| [API Access](https://docs.credenco.com/docs/guide/api-access/intro/) | Create Client IDs and API keys for programmatic access. |
| [Identifiers & Keys](https://docs.credenco.com/docs/guide/import-pkcs12-key/) | Import keys and connect an external key management service. |
| [User Management](https://docs.credenco.com/docs/guide/user-management/overview/) | Manage users and roles, and send password reset emails. |
| [Integrations](https://docs.credenco.com/docs/guide/integrations/intro/) | Receive wallet events as CloudEvents over a webhook, or over Kafka or JMS on-premise. |
##### API reference
The API section documents every Business Wallet REST endpoint, grouped as follows:
| Group | Includes |
|---|---|
| **Credentials** | Issuing credentials, issuance status and revocation; OpenID4VP authorization requests and presentation status. |
| **Wallet administration** | Wallets, identifiers and keys, stored credentials, users (including email verification) and roles. |
| **Profile & contacts** | Your public profile and your trusted contacts. |
| **Applications** | Sending invoices and delivering credentials to a DID inbox. |
| **Integration** | Outbound integration channels and their event deliveries. |
| **Deprecated** | Endpoints that still work but have a supported replacement. |
Start with [Authentication](https://docs.credenco.com/docs/api/authentication/) to get an access token or API key.
The same reference is also available in [Swagger UI](https://wallet.acc.credenco.com/api/public/swagger-ui/index.html).
##### Deployment
Credenco hosts and maintains the Business Wallet as a SaaS service. You don't need to run any infrastructure, and updates are applied for you.
If your organization needs data residency, network isolation, or full control over its infrastructure, you can run the Business Wallet on-premise with the same features and APIs.
See [On-premise Deployment](https://docs.credenco.com/docs/onpremise/intro/) for installation and configuration.
##### Standards
Issuance and verification follow these interoperability profiles:
- [DIIP](https://fidescommunity.github.io/DIIP/) V3, V4, and V5, from the FIDES Community.
- [HAIP](https://openid.net/specs/openid4vc-high-assurance-interoperability-profile-1_0.html) (OpenID4VC High Assurance Interoperability Profile), from the OpenID Foundation.
Any wallet or verifier that implements the same profile can exchange credentials with the Business Wallet.
### Frequently Asked Questions
https://docs.credenco.com/docs/faq/
#### Frequently Asked Questions
What is the difference between an issuer template and a credential template?
An issuer template groups related credential templates under a single issuer identity. A credential template defines a single credential type - its format, attributes, validity period, and how the credential card is displayed. Every credential template belongs to an issuer template.
Which credential formats does the Business Wallet support?
Credential templates support SD-JWT VC, VC-JWT, and JSON-LD credential formats.
Can I issue a credential without integrating my backend?
Yes. From a credential template you can open the Issue tab and issue a credential directly from the UI, either to a web wallet endpoint or by scanning a QR code with a personal wallet app - useful for verifying a template end-to-end before wiring up backend integration.
What is the difference between an OAuth client and an API key?
Both grant an external system programmatic access to your wallet with a configurable set of permissions and an expiry date. An OAuth client uses the OAuth 2.0 Client Credentials flow to exchange a client ID and secret for a short-lived access token. An API key is a simpler Bearer token that is used directly, without an OAuth token exchange step.
Can I deploy the Business Wallet on-premise?
Yes. The Business Wallet can be deployed in your own Kubernetes infrastructure using the provided Helm templates, giving you full control over your data and deployment environment. This requires a Kubernetes platform, a PostgreSQL database cluster, Helm 3.8.0 or later, and an OAuth 2.0 identity provider (tested with Keycloak).
How do I get help or contact Credenco?
You can reach the Credenco team at info@credenco.com.
How do I revoke a credential I have already issued?
Create a credential status list and link it to a credential template before you issue the credential. Verifiers check the status list when they verify a credential, and revoking flips that entry so the credential is no longer accepted. Only credentials issued while the template was linked to a status list can be revoked; credentials issued without one stay valid forever.
What is a verifier template?
A verifier template (called "Receive credential configuration" in the UI) defines which credentials you want to receive from a customer in a single verification flow, for example the Deed of Incorporation, LPID, and Tax Registration Statement for a KYC onboarding flow. You can create a different template for each use case, then trigger a verification request from your backend whenever you need those credentials.
What is direct issue, and what is a trusted contact?
Direct issue pushes a verifiable credential straight into a Business Wallet without the holder scanning a QR code or tapping Accept, useful when provisioning a wallet during onboarding or when issuer and wallet already share enough trust. It only works from a trusted contact: an issuer that the receiving wallet has explicitly authorised, with a directIssueAllowed flag, to push credentials into it unattended.
What are catalog sources?
A catalog source is an external registry, such as Fides, WeBuild, or the EU catalogue (TS11), that publishes credential type definitions. Selecting a source on the Catalog sources screen makes its credential types available when you build issuer templates or verifier templates; deselecting it hides those types again without deleting anything already issued.
How do I get notified when something happens in my wallet?
Configure an integration channel - webhook, Kafka, JMS, or a custom adapter - and subscribe it to one or more event types from the event catalog. The wallet then pushes a signed CloudEvents message to your system as soon as the event happens, so you no longer have to poll the REST API. Every outbound message can be inspected in the Deliveries view, and failed deliveries can be replayed after fixing the receiver.
How do I control what different users in my organization can do?
Create authorization roles, each a named group of permissions, and assign them to users under Settings. Anyone assigned to a role inherits every permission it grants, so updating a role updates access for everyone who holds it - this is how you control what different users can see and do in the wallet.
What is a DID, and how do I manage signing keys?
A DID (decentralized identifier) is backed by a cryptographic signing key that the wallet uses to sign credentials and DID-based operations. You can import a key from a PKCS12 file or connect an external key management service such as Google Cloud KMS, with software or hardware (HSM) protection, so the private key never has to live inside the wallet itself.
What is the public profile?
The public profile is the identity other parties see when you share credentials or expose service endpoints. It holds your organisation's logo, name, contact details, and address, and lets you publish chosen credentials - for example a Chamber of Commerce registration - so a contact who looks up your identifier finds it already attached, without asking first.
## BIG Register
### BIG Register
https://docs.credenco.com/docs/use-case/big-register/intro/
#### BIG Register
The BIG register is the Dutch registry for healthcare professionals. Every doctor, nurse, physiotherapist, and pharmacist in the Netherlands must be registered before they can practice. For decades, this registration has lived on paper - certificates mailed to professionals, manually checked by employers, and filed away in cabinets.
With verifiable credentials, the BIG register enters the digital age. Registrations become cryptographically signed digital credentials that professionals carry in their personal wallet - always available, instantly verifiable, and fully under their control.
This use case follows Sophie, a physiotherapist, through two key moments in her career: receiving her BIG registration and using it to start a new job.
---
##### Part 1: Sophie Receives Her BIG Registration
Sophie has completed her training and passed all her examinations. She is ready to become a registered physiotherapist.
She logs into the BIG register portal to complete her registration. After filling in her details, something new happens - instead of being told to wait for a letter in the mail, a QR code appears on her screen.
Sophie pulls out her phone, opens her personal wallet app, and scans the code. Within seconds, a new credential slides into her wallet: her official BIG registration. It contains her name, her BIG number, her profession, and her specialism - all cryptographically signed by the BIG register.
No envelope, no waiting, no paper. Her registration is digital, tamper-proof, and always with her.
For Sophie
She receives her registration instantly. It's stored safely in her wallet, always accessible, and she decides who gets to see it.
For the BIG register
Registrations are issued digitally via a simple API call. No printing, no postage, no delays. Every credential is cryptographically verifiable.
Want to build this? See the full technical guide: [**Issue BIG Registration**](https://docs.credenco.com/docs/use-case/big-register/receive-credential/)
---
##### Part 2: Sophie Uses Her Credential
A few months later, Sophie applies for a position at Amsterdam UMC, one of the largest academic hospitals in the Netherlands.
In the past, onboarding would have been a bureaucratic maze - printed copies of certificates, manual checks against government databases, days of waiting. But Amsterdam UMC has modernized their process.
During the online application, the hospital portal asks Sophie to prove her BIG registration. A QR code appears. Sophie opens her wallet app, scans the code, and sees exactly what the hospital is requesting: her BIG registration credential. She reviews the request, taps **"Share"**, and that's it.
Within seconds, Amsterdam UMC's system has cryptographically verified that Sophie is a registered physiotherapist. Her qualifications are confirmed. No phone calls, no paperwork, no waiting.
Sophie is approved on the spot. She can start treating patients next Monday.
For Sophie
She stays in full control. She sees exactly what is requested and chooses what to share. No one accesses her data without her consent.
For Amsterdam UMC
Credential verification is instant and cryptographic. No manual checks, no risk of forged documents, and onboarding takes minutes instead of days.
Want to build this? See the full technical guide: [**Verify BIG Registration**](https://docs.credenco.com/docs/use-case/big-register/use-credential/)
---
##### Why use verifiable credentials for BIG registration?
Verifiable credentials let the BIG register issue registrations that are instantly available, cryptographically signed, and fully controlled by the professional who holds them. Instead of waiting for a mailed certificate, healthcare professionals like Sophie get a tamper-proof digital credential in seconds, and employers can verify it in seconds too.
30s
Instant Issuance
From registration to credential in the wallet - no postal delays
1 tap
User Consent
Sophie decides who sees her credentials - full privacy control
0 paper
Tamper-Proof
Cryptographically signed - impossible to forge or alter
Open
Standards Based
Built on OpenID4VCI and OpenID4VP - works with any compliant wallet
### Receive a BIG Register Credential
https://docs.credenco.com/docs/use-case/big-register/receive-credential/
#### Issue a BIG Registration to a Personal Wallet
The Story
Imagine Sophie, a physiotherapist who has completed her training and passed all her examinations. Before she can start treating patients, she needs to be registered in the BIG register - the Dutch registry for healthcare professionals. This registration proves that she is qualified and legally authorized to practice.
In the old world, Sophie would receive a paper certificate in the mail, weeks after her registration was processed. Every time a hospital or clinic wanted to verify her qualifications, they would have to validate her paper certificates - a process that is slow, error-prone, and doesn't give Sophie any control over her own professional identity.
But the BIG register has modernized. Using verifiable credentials powered by the Credenco Business Wallet, Sophie's registration now comes to life digitally. She logs into the BIG register portal, and within seconds a QR code appears on her screen. She pulls out her phone, opens her personal wallet app, and scans the code. A new credential - her official BIG registration - slides into her wallet. It is cryptographically signed by the BIG register, tamper-proof, and instantly verifiable by any healthcare institution in the Netherlands. The whole process takes less than 30 seconds.
From now on, when Sophie starts at a new hospital, she simply presents her BIG credential from her wallet. No more waiting, no more manual lookups - just instant, trusted proof of her qualifications.
This guide shows you how to build that experience.
---
##### How does BIG registration credential issuance work?
Issuing a BIG registration credential involves three parties: the BIG register portal, the BIG register backend, and the Credenco Business Wallet, which creates and signs the credential. The healthcare professional simply scans a QR code with their personal wallet app - no special software or extra passwords required - and the credential appears within seconds.
Key Concepts
| Concept | Description |
|---------|-------------|
| **Personal Wallet App** | A mobile app on the user's phone that stores verifiable credentials (e.g., a wallet compliant with the EUDI Wallet standard) |
| **QR Code** | The bridge between your web application and the user's mobile wallet - encodes the credential offer |
| **OpenID4VCI** | The open standard protocol used for credential issuance between the wallet app and your Credenco Business Wallet |
| **Correlation ID** | A business key you provide to track the issuance process and check its status |
---
##### Sequence Diagram
The diagram below shows the complete interaction between all parties - from the moment Sophie completes her registration to the moment the BIG credential appears in her wallet.
```mermaid
sequenceDiagram
actor User as Sophie (Healthcare Professional)
participant Browser as BIG Register Portal
participant Backend as BIG Register Backend
participant Credenco as Credenco Business Wallet
participant Wallet as Personal Wallet App
User->>Browser: 1. Complete registration
Browser->>Backend: 2. Request BIG credential issuance
Backend->>Credenco: 3. POST /api/v2/credential/issue
Note right of Backend: Include template_id, claims, and qr_code options
Credenco-->>Backend: 4. Return QR code + correlation_id
Backend-->>Browser: 5. Send QR code to frontend
Browser-->>User: 6. Display QR code on screen
User->>Wallet: 7. Scan QR code with wallet app
Wallet->>Credenco: 8. Retrieve credential offer (OpenID4VCI)
Credenco-->>Wallet: 9. Issue signed credential
Wallet-->>User: 10. Show new credential in wallet
Note over Backend,Credenco: Optional: check issuance status
Backend->>Credenco: 11. GET /api/v2/credential/issue/{correlationId}
Credenco-->>Backend: 12. Return status + revocation_uuid
```
---
##### Step-by-Step Integration
Integrate credential issuance from your backend to a user's personal wallet app using a QR code and the OpenID4VCI protocol.
Your backend calls the Start issue Credential API to begin issuing the credential.
Display the QR code returned in the response in your frontend.
The user scans the QR code with their personal wallet app, which exchanges the credential offer with Credenco using the OpenID4VCI protocol and accepts it.
Poll the Get issue status API to confirm the credential was issued.
###### Prerequisites
Before you begin, make sure you have:
- A **Credenco Business Wallet** account ([sign up here](https://wallet.acc.credenco.com))
- An **Issuer Template** configured - [Create Issuer Template](https://docs.credenco.com/docs/guide/credential-issue/create-issuer-template/)
- A **Credential Template** configured - [Create Credential Template](https://docs.credenco.com/docs/guide/credential-issue/create-credential-template/)
- **API access** enabled - [Set up API authentication](https://docs.credenco.com/docs/api/authentication/)
---
###### Step 1: Start the Credential Issuance
When a healthcare professional completes their registration, the BIG register backend calls the [**Start issue Credential**](https://docs.credenco.com/docs/api-generated/start-credential-issuance/) API.
**Request:**
```bash
curl -X POST https://your-wallet.credenco.com/api/v2/credential/issue \
-H "Content-Type: application/json" \
-H "x-api-key: YOUR_API_KEY" \
-d '{
"correlation_id": "big-reg-sophie-2026",
"template_id": "big_registration",
"claims": {
"first_name": "Sophie",
"last_name": "de Vries",
"big_number": "29065432101",
"profession": "Physiotherapist",
"specialism": "Sports Physiotherapy",
"registration_date": "2026-03-19",
"valid_until": "2031-03-19"
},
"qr_code": {
"size": 400
}
}'
```
**Tip:** The `qr_code` object is what tells Credenco to generate a QR code for a personal wallet. Without it, the response will contain a deeplink URI instead, suitable for business wallets.
**Response:**
```json
{
"correlation_id": "big-reg-sophie-2026",
"request_uri": "openid-credential-offer://?credential_offer_uri=https://your-wallet.credenco.com/openid4vc/credentialOffer?id=e1a90dd6-7667-48c1-98a8-526079e76e24",
"status_uri": "https://your-wallet.credenco.com/api/v2/issue/big-reg-sophie-2026",
"qr_uri": "data:image/png;base64,iVBORw0KGgo..."
}
```
| Field | Description |
|-------|-------------|
| `correlation_id` | Your business key to track this issuance |
| `request_uri` | The OpenID4VCI credential offer URI (encoded in the QR code) |
| `status_uri` | Endpoint to poll for status updates |
| `qr_uri` | Base64-encoded PNG image of the QR code - ready to display |
---
###### Step 2: Display the QR Code
The `qr_uri` in the response is a [Data URI](https://developer.mozilla.org/en-US/docs/Web/URI/Reference/Schemes/data) containing the QR code as a PNG image. Display it directly in your frontend:
```html
Scan this QR code with your wallet app
Open your wallet app and scan the code to receive your BIG registration credential.
```
**Note:** The QR code is a one-time use code. Once scanned and the credential is issued, it cannot be reused. Generate a new one for each issuance.
---
###### Step 3: The User Scans the QR Code
This is where the magic happens - from Sophie's perspective:
1. Sophie opens her personal wallet app on her phone
2. She taps **"Scan QR code"** (or similar)
3. The wallet app reads the QR code and contacts the Credenco Business Wallet
4. The wallet and Credenco exchange the credential using the OpenID4VCI protocol
5. Sophie sees her new BIG registration credential in her wallet and accepts it
The BIG register portal doesn't need to do anything during this step - the wallet app and Credenco handle everything automatically.
---
###### Step 4: Check the Issuance Status
After the QR code is displayed, your backend can poll the [**Get issue status**](https://docs.credenco.com/docs/api-generated/get-credential-issuance-status/) API to track progress:
```bash
curl https://your-wallet.credenco.com/api/v2/credential/issue/big-reg-sophie-2026 \
-H "x-api-key: YOUR_API_KEY"
```
**Response (after credential is accepted):**
```json
{
"status": "issue_completed",
"correlation_id": "big-reg-sophie-2026",
"last_updated": 1751155200000,
"revocation_uuid": "0e2c1f62-3392-462e-a25e-483fa0e2a3a3"
}
```
| Status | Meaning |
|--------|---------|
| `issue_request_created` | The credential offer has been created, waiting for the wallet to pick it up |
| `credential_offer_retrieved` | The wallet app has retrieved the offer |
| `issue_completed` | The credential has been successfully issued and accepted |
| `error` | Something went wrong during the issuance process |
**Tip:** Save the `revocation_uuid` from the completed response. You'll need it if you ever want to [revoke the credential](https://docs.credenco.com/docs/api-generated/revoke-credential/) in the future.
---
###### Optional: Use Callbacks Instead of Polling
Instead of polling the status endpoint, you can provide a callback URL in the issue request. Credenco will notify your backend automatically when the status changes:
```json
{
"correlation_id": "big-reg-sophie-2026",
"template_id": "big_registration",
"claims": { ... },
"qr_code": { "size": 400 },
"callback": {
"url": "https://your-backend.com/webhooks/credential-status",
"status": ["issue_completed", "error"]
}
}
```
Your callback endpoint will receive a `POST` request with the status update whenever the issuance completes or fails.
---
##### Complete Flow at a Glance
BIG Register Backend
Calls the Issue API with the registration details and requests a QR code
Show QR Code
Display the returned QR code in the BIG register portal
User Scans
Sophie scans the QR code with her personal wallet app
BIG Credential Issued
The wallet and Credenco exchange the BIG registration via OpenID4VCI
---
##### API Reference
| API | Method | Endpoint | Description |
|-----|--------|----------|-------------|
| [Start issue Credential](https://docs.credenco.com/docs/api-generated/start-credential-issuance/) | `POST` | `/api/v2/credential/issue` | Start the credential issuance and get a QR code |
| [Get issue status](https://docs.credenco.com/docs/api-generated/get-credential-issuance-status/) | `GET` | `/api/v2/credential/issue/{correlationId}` | Check the status of an issuance process |
| [Revoke Credential](https://docs.credenco.com/docs/api-generated/revoke-credential/) | `POST` | `/api/v2/credential/revoke` | Revoke a previously issued credential |
---
##### What's Next?
Now that you understand how to issue credentials to a personal wallet, you might want to explore:
- [**Issue to a Business Wallet**](https://docs.credenco.com/docs/guide/credential-issue/issue-credential-from-your-backend/) - Issue credentials to another organization's web wallet instead of a mobile app
- [**Create Credential Templates**](https://docs.credenco.com/docs/guide/credential-issue/create-credential-template/) - Design the credential types your organization issues
- [**API Authentication**](https://docs.credenco.com/docs/api/authentication/) - Set up OAuth2 or API key authentication
- [**Verify Credentials**](https://docs.credenco.com/docs/guide/verifier-template/intro/) - Request and verify credentials from holders
### Use a BIG Register Credential
https://docs.credenco.com/docs/use-case/big-register/use-credential/
#### Use a BIG Register Credential
The Story
Sophie has been a registered physiotherapist for a few months now, and her BIG registration credential sits safely in her personal wallet. Today is a big day - she is applying for a position at Amsterdam UMC, one of the largest academic hospitals in the Netherlands.
In the past, the onboarding process would have been a bureaucratic maze. Sophie would bring printed copies of her BIG certificate, the HR department would manually check a government database, and days would pass before anyone could confirm her qualifications. Forms would get lost, staff would be delayed, and patients would wait longer for care.
But Amsterdam UMC has integrated verifiable credential verification into their onboarding portal, powered by the Credenco Business Wallet. When Sophie starts her application, the portal simply asks her to prove her BIG registration. A QR code appears on her screen. She opens her wallet app, scans the code, and with a single tap chooses to share her BIG credential. Within seconds, the hospital's system has cryptographically verified her registration - no phone calls, no paper, no waiting.
Sophie is approved on the spot. She can start treating patients next Monday.
This guide shows you how to build that verification experience.
---
##### How does BIG registration credential verification work?
Verifying a BIG registration credential involves three parties: the hospital's application, the hospital's backend, and the hospital's Credenco Business Wallet, which creates the verification request and validates the result. Sophie scans a QR code, reviews exactly what is being requested, and taps Share - the hospital confirms her qualifications cryptographically within seconds.
Key Concepts
| Concept | Description |
|---------|-------------|
| **Verifier Template** | A configuration in the Credenco Business Wallet that defines which credentials you want to request from a holder |
| **Authorization Request** | An OID4VP request that initiates the credential verification flow |
| **QR Code** | Presented to the user so they can scan it with their wallet app and share credentials |
| **OpenID4VP** | The open standard protocol used for credential presentation and verification |
| **Correlation ID** | A business key to track the verification session and retrieve results |
---
##### Sequence Diagram
The diagram below shows the complete interaction between all parties - from the moment the hospital requests Sophie's BIG credential to the moment her qualifications are verified.
```mermaid
sequenceDiagram
actor User as Sophie (Healthcare Professional)
participant Browser as Hospital Portal
participant Backend as Hospital Backend
participant Credenco as Credenco Business Wallet
participant Wallet as Personal Wallet App
User->>Browser: 1. Start onboarding / click "Verify credentials"
Browser->>Backend: 2. Request credential verification
Backend->>Credenco: 3. POST /api/v1/oid4vp/backend/auth/requests
Note right of Backend: Include verifier template key and qr_code options
Credenco-->>Backend: 4. Return QR code + correlation_id
Backend-->>Browser: 5. Send QR code to frontend
Browser-->>User: 6. Display QR code on screen
User->>Wallet: 7. Scan QR code with wallet app
Wallet->>Credenco: 8. Retrieve authorization request (OpenID4VP)
Wallet-->>User: 9. Show which credentials are requested
User->>Wallet: 10. Approve sharing BIG credential
Wallet->>Credenco: 11. Present credential
Credenco->>Credenco: 12. Verify signature & validity
Note over Backend,Credenco: Check verification status
Backend->>Credenco: 13. GET /api/v1/oid4vp/backend/auth/requests/{correlationId}
Credenco-->>Backend: 14. Return status + verified credential data
Backend-->>Browser: 15. Show verification result
Browser-->>User: 16. Onboarding approved
```
---
##### Step-by-Step Integration
Verify a BIG registration credential from a professional's personal wallet using the Business Wallet API.
Your backend calls the verification API to create a verification request.
Display the QR code returned in the response in your frontend.
The user scans the QR code with their personal wallet app and shares the requested credential.
Poll the verification status endpoint to confirm the credential was shared and is valid.
###### Prerequisites
Before you begin, make sure you have:
- A **Credenco Business Wallet** account ([sign up here](https://wallet.acc.credenco.com))
- A **Verifier Template** configured - [Create Verifier Template](https://docs.credenco.com/docs/guide/verifier-template/create-verifier-template/)
- **API access** enabled - [Set up API authentication](https://docs.credenco.com/docs/api/authentication/)
---
###### Step 1: Create a Verification Request
When a user triggers credential verification (e.g., clicking "Verify credentials" during onboarding), the hospital backend calls the [**Create authorization request**](https://docs.credenco.com/docs/api-generated/start-oid-4-vp-authorization-request/) API.
**Request:**
```bash
curl -X POST https://your-wallet.credenco.com/api/v1/oid4vp/backend/auth/requests \
-H "Content-Type: application/json" \
-H "x-api-key: YOUR_API_KEY" \
-d '{
"correlation_id": "onboarding-sophie-2026",
"query_id": "verify_big_registration",
"qr_code": {
"size": 400
}
}'
```
**Tip:** The `query_id` must match the Verifier template key configured in the Credenco Business Wallet. This template defines which credential types and attributes you want to verify.
**Response:**
```json
{
"correlation_id": "onboarding-sophie-2026",
"auth_request_uri": "openid4vp://authorize?request_uri=https://your-wallet.credenco.com/oid4vp/auth/request/abc123",
"status_uri": "https://your-wallet.credenco.com/api/v1/oid4vp/backend/auth/requests/onboarding-sophie-2026",
"qr_uri": "data:image/png;base64,iVBORw0KGgo..."
}
```
| Field | Description |
|-------|-------------|
| `correlation_id` | Your business key to track this verification session |
| `auth_request_uri` | The OpenID4VP authorization request URI (encoded in the QR code) |
| `status_uri` | Endpoint to poll for verification status |
| `qr_uri` | Base64-encoded PNG image of the QR code - ready to display |
---
###### Step 2: Display the QR Code
Display the `qr_uri` directly in your frontend. The user needs to scan it with their wallet app:
```html
Verify your BIG registration
Open your wallet app and scan the code to share your BIG credential.
```
**Note:** The QR code is single-use. Each verification session requires a new QR code.
---
###### Step 3: The User Shares Their Credential
From Sophie's perspective:
1. Sophie opens her personal wallet app on her phone
2. She taps **"Scan QR code"**
3. The wallet app reads the QR code and contacts the hospital's Credenco Business Wallet
4. The wallet shows which credentials Amsterdam UMC is requesting - her BIG registration
5. Sophie reviews the request and taps **"Share"**
6. The wallet sends the credential to the hospital's Credenco Business Wallet using the OpenID4VP protocol
7. The hospital's Business Wallet cryptographically verifies the signature and checks the credential's validity
Sophie stays in full control - she sees exactly what is being requested and can deny the request at any time.
---
###### Step 4: Check the Verification Status
After the QR code is displayed, your backend polls the [**Get authorization session status**](https://docs.credenco.com/docs/api-generated/get-oid-4-vp-request-status/) API to track progress and retrieve results:
```bash
curl "https://your-wallet.credenco.com/api/v1/oid4vp/backend/auth/requests/onboarding-sophie-2026?includeData=true" \
-H "x-api-key: YOUR_API_KEY"
```
**Response (after credential is verified):**
```json
{
"status": "verified",
"correlation_id": "onboarding-sophie-2026",
"last_updated": 1751155200000,
"data": {
"first_name": "Sophie",
"last_name": "de Vries",
"big_number": "29065432101",
"profession": "Physiotherapist",
"specialism": "Sports Physiotherapy",
"registration_date": "2026-03-19",
"valid_until": "2031-03-19"
}
}
```
| Status | Meaning |
|--------|---------|
| `created` | The authorization request has been created, waiting for the wallet to respond |
| `request_retrieved` | The wallet app has retrieved the authorization request |
| `verified` | The credential has been successfully presented and verified |
| `error` | Something went wrong during the verification process |
**Tip:** Use the `includeData=true` query parameter to include the actual credential data in the response. Without it, you only get the status.
---
###### Optional: Use Callbacks Instead of Polling
Instead of polling, provide a callback URL in the verification request:
```json
{
"correlation_id": "onboarding-sophie-2026",
"query_id": "verify_big_registration",
"qr_code": { "size": 400 },
"callback": {
"url": "https://your-backend.com/webhooks/verification-status",
"status": ["verified", "error"]
}
}
```
Your callback endpoint will receive a `POST` request when the verification completes or fails.
---
##### Complete Flow at a Glance
Hospital Backend
Calls the Verification API and requests a QR code
Show QR Code
Display the QR code in the hospital's onboarding portal
Sophie Shares
She scans the QR code and approves sharing her BIG credential
Instantly Verified
The hospital's Business Wallet verifies the credential - onboarding is approved
---
##### API Reference
| API | Method | Endpoint | Description |
|-----|--------|----------|-------------|
| [Create authorization request](https://docs.credenco.com/docs/api-generated/start-oid-4-vp-authorization-request/) | `POST` | `/api/v1/oid4vp/backend/auth/requests` | Create a verification request and get a QR code |
| [Get authorization session status](https://docs.credenco.com/docs/api-generated/get-oid-4-vp-request-status/) | `GET` | `/api/v1/oid4vp/backend/auth/requests/{correlationId}` | Check verification status and retrieve credential data |
---
##### What's Next?
Now that you understand how to verify credentials from a personal wallet, you might want to explore:
- [**Receive a BIG Register Credential**](https://docs.credenco.com/docs/use-case/big-register/receive-credential/) - See how the credential gets into Sophie's wallet in the first place
- [**Create Verifier Templates**](https://docs.credenco.com/docs/guide/verifier-template/create-verifier-template/) - Define which credentials your organization wants to verify
- [**API Authentication**](https://docs.credenco.com/docs/api/authentication/) - Set up OAuth2 or API key authentication
- [**Issue Credentials**](https://docs.credenco.com/docs/guide/credential-issue/intro/) - Issue your own credentials to users
## Mortgage
### Mortgage Application
https://docs.credenco.com/docs/use-case/mortgage/intro/
#### Mortgage Application
Applying for a mortgage in the Netherlands means gathering documents from half a dozen different sources - your municipality, your pension fund, your bank, DUO, BKR, and a notary. You download PDFs, scan paper statements, upload files to a portal, and wait days for manual verification. Documents get lost, formats differ, and the bank has no way to instantly confirm authenticity.
With verifiable credentials, the entire process becomes digital. Each institution issues a cryptographically signed credential directly to the applicant's personal wallet. The bank verifies all documents in seconds with a single QR code scan - no uploads, no manual checks, no waiting.
This use case follows Thomas, a software developer buying his first apartment, through two key moments: collecting his mortgage documents and sharing them with the bank.
---
##### Part 1: Thomas Collects His Documents
Thomas is buying an apartment in Utrecht for EUR 385,000. His mortgage advisor at Tulip Trust Bank gives him a checklist of six required documents. Thomas already has four of these as verifiable credentials in his personal wallet - collected over time from various institutions:
1. **Identity document** - issued by Municipality of Utrecht
2. **Pension overview** - issued via mijnpensioenoverzicht.nl
3. **Purchase contract** - issued by the notary handling the sale
4. **Student debt statement** - issued by DUO
Two documents are still missing:
5. **Savings statement** - to be collected from his bank (ING)
6. **Loan overview** - to be collected from BKR (Bureau Krediet Registratie)
Thomas visits each portal. A QR code appears, he scans it with his wallet app, and the credential slides in - cryptographically signed, tamper-proof, and instantly verifiable. Within minutes, his wallet is complete.
For Thomas
All his mortgage documents are in one place - his wallet. No more hunting for PDFs, no lost emails, no expired downloads. He controls who sees what.
For the issuers
Each institution issues credentials digitally via a simple API call. No printing, no postage, no helpdesk calls about missing documents.
Want to build this? See the full technical guide: [**Collect Mortgage Documents**](https://docs.credenco.com/docs/use-case/mortgage/receive-credentials/)
---
##### Part 2: Thomas Applies for His Mortgage
With all six credentials in his wallet, Thomas goes to the Tulip Trust Bank mortgage portal. In the past, he would upload six separate files and wait days for the bank to manually verify each one.
Now, the portal shows a single QR code. Thomas opens his wallet app, scans the code, and sees exactly what the bank is requesting: all six of his mortgage documents. He reviews the request, taps **"Share"**, and that's it.
Within seconds, Tulip Trust Bank's system has cryptographically verified all six credentials. Thomas's identity is confirmed, his financial situation is clear, and the purchase contract is authentic. No phone calls, no paper, no waiting.
The portal shows: **"All required documents received and verified"** - and a button to view his mortgage offer.
For Thomas
One scan, one tap - all documents shared. He stays in full control and sees exactly what the bank receives. No data is shared without his explicit consent.
For Tulip Trust Bank
All six documents are verified instantly and cryptographically. No risk of forged documents, no manual checks, and the mortgage process takes minutes instead of days.
Want to build this? See the full technical guide: [**Verify Mortgage Documents**](https://docs.credenco.com/docs/use-case/mortgage/verify-credentials/)
---
##### Why use verifiable credentials for a mortgage application?
Verifiable credentials let banks verify all required mortgage documents in a single cryptographic check instead of manually reviewing files from six different institutions. Applicants like Thomas collect signed, tamper-proof credentials once and reuse them for every application, while banks confirm authenticity instantly and cut mortgage processing from days to minutes.
6 in 1
Single Verification
All mortgage documents verified in one scan - no more uploading files one by one
1 tap
User Consent
Thomas decides which credentials to share - full privacy control
0 paper
Tamper-Proof
Every document is cryptographically signed - impossible to forge or alter
Open
Standards Based
Built on OpenID4VCI and OpenID4VP - works with any compliant wallet
### Collect Mortgage Documents
https://docs.credenco.com/docs/use-case/mortgage/receive-credentials/
#### Issue Mortgage Documents to a Personal Wallet
The Story
Imagine Thomas, a software developer who is buying his first apartment in Utrecht for EUR 385,000. To apply for a mortgage, he needs to provide six documents from six different sources: an identity document, a pension overview, a purchase contract, a savings statement, a loan overview, and a student debt statement.
Thomas already has four of these credentials in his personal wallet - his identity document, pension overview, purchase contract, and student debt statement - collected over time from various government and institutional portals. But two are still missing: his savings statement from ING and his loan overview from BKR.
In the old world, Thomas would download PDFs, scan paper statements, and upload files to the bank's portal. But ING and BKR have integrated verifiable credential issuance powered by the Credenco Business Wallet. Thomas visits each portal, a QR code appears, he scans it with his wallet app, and the credential slides in - cryptographically signed, tamper-proof, and instantly verifiable.
The best part? Every institution uses the exact same integration pattern - a single API call. Whether you're a bank, a credit bureau, or any other institution, the process is identical.
This guide shows you how to build that experience.
---
##### How does mortgage document issuance work?
Issuing a mortgage document as a credential involves three parties: the issuing institution's portal, its backend, and the Credenco Business Wallet, which creates and signs the credential. Thomas scans a QR code with his personal wallet app and the signed document - whether a savings statement or loan overview - appears within seconds, ready to reuse.
Key Concepts
| Concept | Description |
|---------|-------------|
| **Personal Wallet App** | A mobile app on the user's phone that stores verifiable credentials (e.g., a wallet compliant with the EUDI Wallet standard) |
| **QR Code** | The bridge between the web application and the user's mobile wallet - encodes the credential offer |
| **OpenID4VCI** | The open standard protocol used for credential issuance between the wallet app and the Credenco Business Wallet |
| **Correlation ID** | A business key you provide to track the issuance process and check its status |
---
##### Sequence Diagram
The diagram below shows the complete interaction between all parties - from the moment Thomas requests a credential to the moment it appears in his wallet. This flow is identical for every credential type.
```mermaid
sequenceDiagram
actor User as Thomas (Home Buyer)
participant Browser as Issuer Portal (e.g. ING)
participant Backend as Issuer Backend
participant Credenco as Credenco Business Wallet
participant Wallet as Personal Wallet App
User->>Browser: 1. Request credential (e.g. savings statement)
Browser->>Backend: 2. Request credential issuance
Backend->>Credenco: 3. POST /api/v2/credential/issue
Note right of Backend: Include template_id, claims, and qr_code options
Credenco-->>Backend: 4. Return QR code + correlation_id
Backend-->>Browser: 5. Send QR code to frontend
Browser-->>User: 6. Display QR code on screen
User->>Wallet: 7. Scan QR code with wallet app
Wallet->>Credenco: 8. Retrieve credential offer (OpenID4VCI)
Credenco-->>Wallet: 9. Issue signed credential
Wallet-->>User: 10. Show new credential in wallet
Note over Backend,Credenco: Optional: check issuance status
Backend->>Credenco: 11. GET /api/v2/credential/issue/{correlationId}
Credenco-->>Backend: 12. Return status + revocation_uuid
```
---
##### Step-by-Step Integration
Integrate credential issuance from your backend to a user's personal wallet app using a QR code and the OpenID4VCI protocol.
Your backend calls the Start issue Credential API to begin issuing the credential.
Display the QR code returned in the response in your frontend.
The user scans the QR code with their personal wallet app, which exchanges the credential offer with Credenco using the OpenID4VCI protocol and accepts it.
Poll the Get issue status API to confirm the credential was issued.
###### Prerequisites
Before you begin, make sure you have:
- A **Credenco Business Wallet** account ([sign up here](https://wallet.acc.credenco.com))
- An **Issuer Template** configured - [Create Issuer Template](https://docs.credenco.com/docs/guide/credential-issue/create-issuer-template/)
- A **Credential Template** configured - [Create Credential Template](https://docs.credenco.com/docs/guide/credential-issue/create-credential-template/)
- **API access** enabled - [Set up API authentication](https://docs.credenco.com/docs/api/authentication/)
---
###### Step 1: Start the Credential Issuance
When a user requests a credential from your portal, your backend calls the [**Start issue Credential**](https://docs.credenco.com/docs/api-generated/start-credential-issuance/) API.
**Example: Issuing a savings statement credential**
**Request:**
```bash
curl -X POST https://your-wallet.credenco.com/api/v2/credential/issue \
-H "Content-Type: application/json" \
-H "x-api-key: YOUR_API_KEY" \
-d '{
"correlation_id": "savings-thomas-2026",
"template_id": "savings_statement",
"claims": {
"bank_name": "ING",
"account_holder": "Thomas van den Berg",
"balance": "47.250",
"balance_date": "2026-03-15"
},
"qr_code": {
"size": 400
}
}'
```
**Tip:** The `qr_code` object is what tells Credenco to generate a QR code for a personal wallet. Without it, the response will contain a deeplink URI instead, suitable for business wallets.
**Response:**
```json
{
"correlation_id": "savings-thomas-2026",
"request_uri": "openid-credential-offer://?credential_offer_uri=https://your-wallet.credenco.com/openid4vc/credentialOffer?id=a3b7c9d1-4e5f-6a7b-8c9d-0e1f2a3b4c5d",
"status_uri": "https://your-wallet.credenco.com/api/v2/issue/savings-thomas-2026",
"qr_uri": "data:image/png;base64,iVBORw0KGgo..."
}
```
| Field | Description |
|-------|-------------|
| `correlation_id` | Your business key to track this issuance |
| `request_uri` | The OpenID4VCI credential offer URI (encoded in the QR code) |
| `status_uri` | Endpoint to poll for status updates |
| `qr_uri` | Base64-encoded PNG image of the QR code - ready to display |
---
###### Step 2: Display the QR Code
The `qr_uri` in the response is a [Data URI](https://developer.mozilla.org/en-US/docs/Web/URI/Reference/Schemes/data) containing the QR code as a PNG image. Display it directly in your frontend:
```html
Scan this QR code with your wallet app
Open your wallet app and scan the code to receive your savings statement credential.
```
**Note:** The QR code is a one-time use code. Once scanned and the credential is issued, it cannot be reused. Generate a new one for each issuance.
---
###### Step 3: The User Scans the QR Code
From Thomas's perspective:
1. Thomas opens his personal wallet app on his phone
2. He taps **"Scan QR code"** (or similar)
3. The wallet app reads the QR code and contacts the Credenco Business Wallet
4. The wallet and Credenco exchange the credential using the OpenID4VCI protocol
5. Thomas sees his new credential in his wallet and accepts it
The issuer's portal doesn't need to do anything during this step - the wallet app and Credenco handle everything automatically.
---
###### Step 4: Check the Issuance Status
After the QR code is displayed, your backend can poll the [**Get issue status**](https://docs.credenco.com/docs/api-generated/get-credential-issuance-status/) API to track progress:
```bash
curl https://your-wallet.credenco.com/api/v2/credential/issue/savings-thomas-2026 \
-H "x-api-key: YOUR_API_KEY"
```
**Response (after credential is accepted):**
```json
{
"status": "issue_completed",
"correlation_id": "savings-thomas-2026",
"last_updated": 1751155200000,
"revocation_uuid": "7f3a2b1c-9d8e-4f5a-6b7c-8d9e0f1a2b3c"
}
```
| Status | Meaning |
|--------|---------|
| `issue_request_created` | The credential offer has been created, waiting for the wallet to pick it up |
| `credential_offer_retrieved` | The wallet app has retrieved the offer |
| `issue_completed` | The credential has been successfully issued and accepted |
| `error` | Something went wrong during the issuance process |
**Tip:** Save the `revocation_uuid` from the completed response. You'll need it if you ever want to [revoke the credential](https://docs.credenco.com/docs/api-generated/revoke-credential/) in the future.
---
###### Optional: Use Callbacks Instead of Polling
Instead of polling the status endpoint, you can provide a callback URL in the issue request. Credenco will notify your backend automatically when the status changes:
```json
{
"correlation_id": "savings-thomas-2026",
"template_id": "pension_overview",
"claims": { ... },
"qr_code": { "size": 400 },
"callback": {
"url": "https://your-backend.com/webhooks/credential-status",
"status": ["issue_completed", "error"]
}
}
```
Your callback endpoint will receive a `POST` request with the status update whenever the issuance completes or fails.
---
##### Credential Examples
Each institution issues a different credential type. Below are example `claims` payloads for each of the six mortgage documents.
###### Identity Document
Issued by the municipality (e.g., Municipality of Utrecht).
```json
{
"template_id": "identity_document",
"claims": {
"full_name": "Thomas van den Berg",
"date_of_birth": "1994-02-18",
"bsn": "123456789",
"document_number": "IDNLD12345",
"valid_until": "2031-02-18"
}
}
```
###### Pension Overview
Issued by the pension overview portal (mijnpensioenoverzicht.nl).
```json
{
"template_id": "pension_overview",
"claims": {
"full_name": "Thomas van den Berg",
"pension_provider": "ABP Pensioenfonds",
"annual_accrual": "2.450",
"total_accrued": "42.150",
"retirement_date": "2059-06-15"
}
}
```
###### Purchase Contract
Issued by the notary handling the property sale.
```json
{
"template_id": "purchase_contract",
"claims": {
"property_address": "Oudegracht 42, 3511 AR Utrecht",
"purchase_price": "385000",
"buyer_name": "Thomas van den Berg",
"seller_name": "Maria Jansen",
"signing_date": "2026-03-01"
}
}
```
###### Savings Statement
Issued by the applicant's bank (e.g., ING).
```json
{
"template_id": "savings_statement",
"claims": {
"bank_name": "ING",
"account_holder": "Thomas van den Berg",
"balance": "47.250",
"balance_date": "2026-03-15"
}
}
```
###### Loan Overview
Issued by BKR (Bureau Krediet Registratie).
```json
{
"template_id": "loan_overview",
"claims": {
"full_name": "Thomas van den Berg",
"total_debt": "2.800",
"monthly_obligations": "150",
"number_of_loans": "1",
"registration_date": "2026-03-10"
}
}
```
###### Student Debt Statement
Issued by DUO (Dienst Uitvoering Onderwijs).
```json
{
"template_id": "student_debt_statement",
"claims": {
"full_name": "Thomas van den Berg",
"original_debt": "28.000",
"remaining_debt": "18.500",
"monthly_payment": "185",
"expected_end_date": "2034-09-01"
}
}
```
---
##### Complete Flow at a Glance
Issuer Backend
Calls the Issue API with the credential details and requests a QR code
Show QR Code
Display the returned QR code in the issuer's portal
User Scans
Thomas scans the QR code with his personal wallet app
Credential Issued
The wallet and Credenco exchange the credential via OpenID4VCI
---
##### API Reference
| API | Method | Endpoint | Description |
|-----|--------|----------|-------------|
| [Start issue Credential](https://docs.credenco.com/docs/api-generated/start-credential-issuance/) | `POST` | `/api/v2/credential/issue` | Start the credential issuance and get a QR code |
| [Get issue status](https://docs.credenco.com/docs/api-generated/get-credential-issuance-status/) | `GET` | `/api/v2/credential/issue/{correlationId}` | Check the status of an issuance process |
| [Revoke Credential](https://docs.credenco.com/docs/api-generated/revoke-credential/) | `POST` | `/api/v2/credential/revoke` | Revoke a previously issued credential |
---
##### What's Next?
Now that you understand how to issue mortgage credentials to a personal wallet, you might want to explore:
- [**Verify Mortgage Documents**](https://docs.credenco.com/docs/use-case/mortgage/verify-credentials/) - See how the bank verifies all six credentials at once
- [**Create Credential Templates**](https://docs.credenco.com/docs/guide/credential-issue/create-credential-template/) - Design the credential types your organization issues
- [**API Authentication**](https://docs.credenco.com/docs/api/authentication/) - Set up OAuth2 or API key authentication
- [**Verify Credentials**](https://docs.credenco.com/docs/guide/verifier-template/intro/) - Request and verify credentials from holders
### Verify Mortgage Documents
https://docs.credenco.com/docs/use-case/mortgage/verify-credentials/
#### Verify Mortgage Documents
The Story
Thomas has collected all six mortgage documents as verifiable credentials in his personal wallet: his identity document, pension overview, purchase contract, savings statement, loan overview, and student debt statement. Today he is ready to apply for a mortgage at Tulip Trust Bank.
In the past, Thomas would upload six separate PDF files to the bank's portal. The bank's back office would then spend days manually checking each document - calling institutions to verify authenticity, cross-referencing names and amounts, and flagging inconsistencies. Thomas would wait anxiously, only to receive follow-up requests for missing or expired documents.
But Tulip Trust Bank has integrated verifiable credential verification into their mortgage portal, powered by the Credenco Business Wallet. When Thomas starts his application, the portal shows a single QR code. Thomas opens his wallet app, scans the code, and sees the bank is requesting all six credentials. He taps **"Share"**, and within seconds the bank has cryptographically verified every document.
The portal shows: **"All required documents received and verified"** - and Thomas can view his mortgage offer.
This guide shows you how to build that verification experience.
---
##### How does mortgage document verification work?
Verifying mortgage documents involves three parties: the bank's mortgage portal, the bank's backend, and the bank's Credenco Business Wallet, which creates the verification request and validates the credentials. Unlike single-credential checks, the verifier template requests all six document types at once, so Thomas shares everything in one scan while staying in full control of what he approves.
Key Concepts
| Concept | Description |
|---------|-------------|
| **Verifier Template** | A configuration in the Credenco Business Wallet that defines which credentials you want to request - for mortgages, this includes all six document types |
| **Authorization Request** | An OID4VP request that initiates the credential verification flow |
| **QR Code** | Presented to the user so they can scan it with their wallet app and share credentials |
| **OpenID4VP** | The open standard protocol used for credential presentation and verification |
| **Correlation ID** | A business key to track the verification session and retrieve results |
---
##### Sequence Diagram
The diagram below shows the complete interaction - from the moment Tulip Trust Bank requests Thomas's mortgage documents to the moment all credentials are verified.
```mermaid
sequenceDiagram
actor User as Thomas (Home Buyer)
participant Browser as Bank Mortgage Portal
participant Backend as Bank Backend
participant Credenco as Credenco Business Wallet
participant Wallet as Personal Wallet App
User->>Browser: 1. Start mortgage application
Browser->>Backend: 2. Request document verification
Backend->>Credenco: 3. POST /api/v1/oid4vp/backend/auth/requests
Note right of Backend: Include verifier template key requesting all 6 credential types
Credenco-->>Backend: 4. Return QR code + correlation_id
Backend-->>Browser: 5. Send QR code to frontend
Browser-->>User: 6. Display QR code on screen
User->>Wallet: 7. Scan QR code with wallet app
Wallet->>Credenco: 8. Retrieve authorization request (OpenID4VP)
Wallet-->>User: 9. Show which credentials are requested (6 types)
User->>Wallet: 10. Approve sharing all 6 credentials
Wallet->>Credenco: 11. Present all credentials
Credenco->>Credenco: 12. Verify signatures & validity of all 6
Note over Backend,Credenco: Check verification status
Backend->>Credenco: 13. GET /api/v1/oid4vp/backend/auth/requests/{correlationId}
Credenco-->>Backend: 14. Return status + all verified credential data
Backend->>Backend: 15. Cross-reference data across credentials
Backend-->>Browser: 16. Show verification result
Browser-->>User: 17. All documents verified - show mortgage offer
```
---
##### Step-by-Step Integration
Verify all mortgage application documents from an applicant's personal wallet in a single step using the Business Wallet API.
Your backend calls the verification API to create a verification request.
Display the QR code returned in the response in your frontend.
The user scans the QR code with their personal wallet app and shares the requested credentials.
Poll the verification status endpoint to confirm the credentials were shared and are valid.
Once all required credentials are verified, show the applicant a success message.
###### Prerequisites
Before you begin, make sure you have:
- A **Credenco Business Wallet** account ([sign up here](https://wallet.acc.credenco.com))
- A **Verifier Template** configured that requests all six mortgage credential types - [Create Verifier Template](https://docs.credenco.com/docs/guide/verifier-template/create-verifier-template/)
- **API access** enabled - [Set up API authentication](https://docs.credenco.com/docs/api/authentication/)
---
###### Step 1: Create a Verification Request
When a mortgage applicant clicks "Provide required documents", the bank's backend calls the [**Create authorization request**](https://docs.credenco.com/docs/api-generated/start-oid-4-vp-authorization-request/) API.
**Request:**
```bash
curl -X POST https://your-wallet.credenco.com/api/v1/oid4vp/backend/auth/requests \
-H "Content-Type: application/json" \
-H "x-api-key: YOUR_API_KEY" \
-d '{
"correlation_id": "mortgage-thomas-2026",
"query_id": "verify_mortgage_documents",
"qr_code": {
"size": 400
}
}'
```
**Tip:** The `query_id` must match the Verifier template key configured in the Credenco Business Wallet. This template defines all six credential types and the specific attributes you want to verify for each.
**Response:**
```json
{
"correlation_id": "mortgage-thomas-2026",
"auth_request_uri": "openid4vp://authorize?request_uri=https://your-wallet.credenco.com/oid4vp/auth/request/xyz789",
"status_uri": "https://your-wallet.credenco.com/api/v1/oid4vp/backend/auth/requests/mortgage-thomas-2026",
"qr_uri": "data:image/png;base64,iVBORw0KGgo..."
}
```
| Field | Description |
|-------|-------------|
| `correlation_id` | Your business key to track this verification session |
| `auth_request_uri` | The OpenID4VP authorization request URI (encoded in the QR code) |
| `status_uri` | Endpoint to poll for verification status |
| `qr_uri` | Base64-encoded PNG image of the QR code - ready to display |
---
###### Step 2: Display the QR Code
Display the `qr_uri` directly in your frontend. The user needs to scan it with their wallet app:
```html
Share your mortgage documents
Open your wallet app and scan the code to share all required documents.
```
**Note:** The QR code is single-use. Each verification session requires a new QR code.
---
###### Step 3: The User Shares Their Credentials
From Thomas's perspective:
1. Thomas opens his personal wallet app on his phone
2. He taps **"Scan QR code"**
3. The wallet app reads the QR code and contacts the bank's Credenco Business Wallet
4. The wallet shows which credentials Tulip Trust Bank is requesting - all six mortgage documents
5. Thomas reviews the request and taps **"Share"**
6. The wallet sends all six credentials to the bank's Credenco Business Wallet using the OpenID4VP protocol
7. The bank's Business Wallet cryptographically verifies the signatures and checks each credential's validity
Thomas stays in full control - he sees exactly what is being requested and can deny the request at any time.
---
###### Step 4: Check the Verification Status
After the QR code is displayed, your backend polls the [**Get authorization session status**](https://docs.credenco.com/docs/api-generated/get-oid-4-vp-request-status/) API to track progress and retrieve results:
```bash
curl "https://your-wallet.credenco.com/api/v1/oid4vp/backend/auth/requests/mortgage-thomas-2026?includeData=true" \
-H "x-api-key: YOUR_API_KEY"
```
**Response (after all credentials are verified):**
```json
{
"status": "verified",
"correlation_id": "mortgage-thomas-2026",
"last_updated": 1751155200000,
"data": {
"identity_document": {
"full_name": "Thomas van den Berg",
"date_of_birth": "1994-02-18",
"bsn": "123456789",
"document_number": "IDNLD12345",
"valid_until": "2031-02-18"
},
"pension_overview": {
"full_name": "Thomas van den Berg",
"pension_provider": "ABP Pensioenfonds",
"annual_accrual": "2.450",
"total_accrued": "42.150",
"retirement_date": "2059-06-15"
},
"purchase_contract": {
"property_address": "Oudegracht 42, 3511 AR Utrecht",
"purchase_price": "385000",
"buyer_name": "Thomas van den Berg",
"seller_name": "Maria Jansen",
"signing_date": "2026-03-01"
},
"savings_statement": {
"bank_name": "ING",
"account_holder": "Thomas van den Berg",
"balance": "47.250",
"balance_date": "2026-03-15"
},
"loan_overview": {
"full_name": "Thomas van den Berg",
"total_debt": "2.800",
"monthly_obligations": "150",
"number_of_loans": "1",
"registration_date": "2026-03-10"
},
"student_debt_statement": {
"full_name": "Thomas van den Berg",
"original_debt": "28.000",
"remaining_debt": "18.500",
"monthly_payment": "185",
"expected_end_date": "2034-09-01"
}
}
}
```
| Status | Meaning |
|--------|---------|
| `created` | The authorization request has been created, waiting for the wallet to respond |
| `request_retrieved` | The wallet app has retrieved the authorization request |
| `verified` | All credentials have been successfully presented and verified |
| `error` | Something went wrong during the verification process |
**Tip:** Use the `includeData=true` query parameter to include the actual credential data in the response. Without it, you only get the status.
---
###### Step 5: Show the Result
Once all six credentials are verified, show the applicant a success message:
```html
All required documents received and verified
6 of 6 credentials verified successfully.
```
---
###### Optional: Use Callbacks Instead of Polling
Instead of polling, provide a callback URL in the verification request:
```json
{
"correlation_id": "mortgage-thomas-2026",
"query_id": "verify_mortgage_documents",
"qr_code": { "size": 400 },
"callback": {
"url": "https://your-backend.com/webhooks/verification-status",
"status": ["verified", "error"]
}
}
```
Your callback endpoint will receive a `POST` request when the verification completes or fails.
---
##### What the Bank Can Do After Verification
Once all six credentials are verified, the bank's backend has cryptographically confirmed data from six independent sources. This enables automated checks:
| Check | Description |
|-------|-------------|
| **Identity consistency** | Verify that the name on the identity document matches the name on all other credentials |
| **Financial capacity** | Calculate affordability based on savings, pension, debts, and student loans |
| **Property match** | Confirm the purchase contract details match the mortgage application |
| **Document freshness** | Check that all credentials are still within their validity period |
All of this is automated and based on cryptographically verified data - no manual document review needed.
---
##### Complete Flow at a Glance
Bank Backend
Calls the Verification API requesting all 6 credential types
Show QR Code
Display a single QR code in the mortgage portal
Thomas Shares
He scans the QR code and shares all 6 credentials at once
All Verified
The bank's Business Wallet verifies all credentials - mortgage offer is ready
---
##### API Reference
| API | Method | Endpoint | Description |
|-----|--------|----------|-------------|
| [Create authorization request](https://docs.credenco.com/docs/api-generated/start-oid-4-vp-authorization-request/) | `POST` | `/api/v1/oid4vp/backend/auth/requests` | Create a verification request and get a QR code |
| [Get authorization session status](https://docs.credenco.com/docs/api-generated/get-oid-4-vp-request-status/) | `GET` | `/api/v1/oid4vp/backend/auth/requests/{correlationId}` | Check verification status and retrieve credential data |
---
##### What's Next?
Now that you understand how to verify mortgage credentials from a personal wallet, you might want to explore:
- [**Collect Mortgage Documents**](https://docs.credenco.com/docs/use-case/mortgage/receive-credentials/) - See how each institution issues credentials to Thomas's wallet
- [**Create Verifier Templates**](https://docs.credenco.com/docs/guide/verifier-template/create-verifier-template/) - Define which credentials your organization wants to verify
- [**API Authentication**](https://docs.credenco.com/docs/api/authentication/) - Set up OAuth2 or API key authentication
- [**Issue Credentials**](https://docs.credenco.com/docs/guide/credential-issue/intro/) - Issue your own credentials to users
## Supplier Onboarding
### Supplier Onboarding
https://docs.credenco.com/docs/use-case/supplier-onboarding/intro/
#### Supplier Onboarding
Onboarding a new supplier in the Netherlands means requesting and validating documents from multiple sources - a Chamber of Commerce (KVK) registration extract, insurance certificates, tax authority statements, VAT registration, and bank account details. Today, these arrive as PDFs or scanned paper copies. Authenticity and origin remain uncertain, leading to delayed onboarding, compliance risks, and administrative overhead.
With verifiable credentials, the entire process becomes digital. Each trusted authority issues a cryptographically signed credential directly to the supplier's business wallet. The broker or buyer verifies all documents in seconds - no uploads, no manual checks, no waiting.
This use case follows SecureStaff BV, a staffing company registering on a procurement portal, through two key moments: collecting their business credentials and sharing them with the broker for verification.
---
##### The Practical Example
A supplier wants to register on a staffing procurement portal. Three parties are involved:
| Party | Role | Example |
|-------|------|---------|
| **Client (Buyer)** | The organization seeking staff | Rijkswaterstaat |
| **Broker (Intermediary)** | Manages the procurement process and performs checks | FlexProcure |
| **Supplier (Service Provider)** | Provides staff, must submit proof documents | SecureStaff BV |
---
##### Part 1: SecureStaff BV Collects Its Credentials
Before SecureStaff BV can register on FlexProcure's portal, it needs five verified business credentials. The company visits each authority's portal, authenticates, and the credential is issued directly to their business wallet in the browser - no app needed, no QR codes.
1. **KVK Registration Extract** - issued by the Chamber of Commerce (KVK)
2. **Tax Compliance Statement** - issued by the Tax Authority (Belastingdienst)
3. **VAT Registration** - issued by the Tax Authority (Belastingdienst)
4. **Bank Account Details** - issued by ABN AMRO
5. **Insurance Certificate** - issued by Allianz
SecureStaff BV visits each portal. After authentication, the portal redirects the browser to the business wallet. The credential appears, SecureStaff BV accepts it, and it's stored - cryptographically signed, tamper-proof, and instantly verifiable. Within minutes, all five credentials are collected.
For SecureStaff BV
All business credentials are in one place - the business wallet. No more emailing PDFs, no lost documents, no expired scans. The company controls what it shares and with whom.
For the issuers
Each authority issues credentials digitally via a simple API call. No printing, no postage, no helpdesk calls about missing documents.
Want to build this? See the full technical guide: [**Issue Supplier Credentials**](https://docs.credenco.com/docs/use-case/supplier-onboarding/issue-credentials/)
---
##### Part 2: SecureStaff BV Registers on the Procurement Portal
With all five credentials in its business wallet, SecureStaff BV visits FlexProcure's procurement portal. In the past, the company would upload five separate PDFs and wait days for the broker to manually verify each one.
Now, FlexProcure's portal requests all required credentials at once. The portal redirects SecureStaff BV's browser to their business wallet, which shows exactly what FlexProcure is requesting: all five business documents. SecureStaff BV reviews the request, clicks **"Share"**, and that's it.
Within seconds, FlexProcure's system has cryptographically verified all five credentials. The company's registration is confirmed, its compliance is clear, and the insurance coverage is authentic. No phone calls, no paper, no waiting.
The portal shows: **"All required documents received and verified"** - and SecureStaff BV is approved as a supplier.
For SecureStaff BV
One click - all documents shared. The company stays in full control and sees exactly what the broker receives. No data is shared without explicit consent.
For FlexProcure / Rijkswaterstaat
All five documents are verified instantly and cryptographically. No risk of forged documents, no manual checks, and the onboarding process takes minutes instead of weeks.
Want to build this? See the full technical guide: [**Verify Supplier Credentials**](https://docs.credenco.com/docs/use-case/supplier-onboarding/verify-credentials/)
---
##### Why use verifiable credentials for supplier onboarding?
Verifiable credentials let brokers verify all five supplier documents in a single cryptographic check instead of manually reviewing PDFs from separate authorities. Suppliers like SecureStaff BV collect signed, tamper-proof credentials once and reuse them for every procurement portal, cutting onboarding time from weeks to minutes while preventing document fraud.
5 in 1
Single Verification
All supplier documents verified at once - no more collecting files one by one
Instant
Efficiency
Automated supplier verification reduces onboarding time from weeks to minutes
0 fraud
Fraud Prevention
Digital signatures and revocation mechanisms ensure documents cannot be falsified
Open
Standards Based
Built on OpenID4VCI and OpenID4VP - works with any compliant wallet
---
##### The Company Passport Initiative
Credenco, through its Business Wallet technology and as part of the Company Passport initiative, collaborates with the Chamber of Commerce (KVK), the Tax Authority (Belastingdienst), the Royal Dutch Association of Civil-law Notaries (KNB), and the banking sector (NVB). Together, we deliver all the essential components to issue, exchange, and verify supplier credentials in practice.
- Suppliers request credentials directly from trusted authorities (KVK, banks, insurers, tax authorities)
- Organizations instantly verify authenticity via their Business Wallet - no PDFs, no manual checks
- New businesses can establish themselves more efficiently, including secure and verifiable bank account creation linked directly to the organization
### Issue Supplier Credentials
https://docs.credenco.com/docs/use-case/supplier-onboarding/issue-credentials/
#### Issue Supplier Credentials to a Business Wallet
The Story
Imagine SecureStaff BV, a staffing company that wants to register on the FlexProcure procurement portal. To complete their registration, they need to provide five documents from five different sources: a KVK registration extract, a tax compliance statement, a VAT registration, bank account details, and an insurance certificate.
In the old world, SecureStaff BV would download PDFs, scan paper certificates, and email files to the broker. The broker would then spend days manually checking each document - calling institutions to verify authenticity and flagging inconsistencies.
But KVK, the Tax Authority, ABN AMRO, and Allianz have integrated verifiable credential issuance powered by the Credenco Business Wallet. SecureStaff BV visits each authority's portal, authenticates, and clicks "Issue credential". The browser redirects to their business wallet, where the credential appears - ready to accept.
The best part? Every authority uses the exact same integration pattern - a single API call. Whether you're a chamber of commerce, a bank, or an insurance company, the process is identical.
This guide shows you how to build that experience.
---
##### How does supplier credential issuance work?
Issuing a supplier credential involves three parties: the issuing authority's portal, its backend, and the Credenco Business Wallet, which creates and signs the credential. Unlike personal wallet issuance, this works entirely in the browser - the authority's portal redirects SecureStaff BV to the credential offer, and the company accepts it with a single click.
Key Concepts
| Concept | Description |
|---------|-------------|
| **Business Wallet** | A browser-based wallet that stores verifiable credentials for organizations - no mobile app required |
| **Credential Offer URL** | The URL returned by the API that the user navigates to in their browser to accept the credential |
| **OpenID4VCI** | The open standard protocol used for credential issuance between the business wallet and the Credenco platform |
| **Correlation ID** | A business key you provide to track the issuance process and check its status |
---
##### Sequence Diagram
The diagram below shows the complete interaction between all parties - from the moment SecureStaff BV requests a credential to the moment it appears in their business wallet. This flow is identical for every credential type.
```mermaid
sequenceDiagram
actor User as SecureStaff BV
participant Authority as Authority Portal (e.g. KVK)
participant Backend as Authority Backend
participant Credenco as Credenco Business Wallet
participant Wallet as SecureStaff BV Business Wallet
User->>Authority: 1. Request credential (e.g. KVK extract)
Authority->>Backend: 2. Request credential issuance
Backend->>Credenco: 3. POST /api/v2/credential/issue
Note right of Backend: Include template_id and claims (no qr_code parameter)
Credenco-->>Backend: 4. Return credential offer URL + correlation_id
Backend-->>Authority: 5. Send credential offer URL to frontend
Authority-->>User: 6. Redirect browser to credential offer URL
User->>Wallet: 7. Browser navigates to business wallet
Wallet->>Credenco: 8. Retrieve credential offer (OpenID4VCI)
Credenco-->>Wallet: 9. Issue signed credential
Wallet-->>User: 10. Show new credential - accept or decline
Note over Backend,Credenco: Optional: check issuance status
Backend->>Credenco: 11. GET /api/v2/credential/issue/{correlationId}
Credenco-->>Backend: 12. Return status + revocation_uuid
```
---
##### Step-by-Step Integration
Integrate credential issuance from your backend to a supplier's business wallet using a browser redirect and the Start Issue Credential API.
Your backend calls the Start issue Credential API to begin issuing the credential.
Redirect the supplier’s browser to the request_uri returned in the response so they can review and accept the credential.
Poll the Get issue status API to confirm the credential was issued.
###### Prerequisites
Before you begin, make sure you have:
- A **Credenco Business Wallet** account ([sign up here](https://wallet.acc.credenco.com))
- An **Issuer Template** configured - [Create Issuer Template](https://docs.credenco.com/docs/guide/credential-issue/create-issuer-template/)
- A **Credential Template** configured - [Create Credential Template](https://docs.credenco.com/docs/guide/credential-issue/create-credential-template/)
- **API access** enabled - [Set up API authentication](https://docs.credenco.com/docs/api/authentication/)
---
###### Step 1: Start the Credential Issuance
When a supplier requests a credential from your portal, your backend calls the [**Start issue Credential**](https://docs.credenco.com/docs/api-generated/start-credential-issuance/) API.
**Example: Issuing a KVK registration extract credential**
**Request:**
```bash
curl -X POST https://your-wallet.credenco.com/api/v2/credential/issue \
-H "Content-Type: application/json" \
-H "x-api-key: YOUR_API_KEY" \
-d '{
"correlation_id": "kvk-securestaff-2026",
"template_id": "kvk_registration_extract",
"claims": {
"kvk_number": "12345678",
"legal_name": "SecureStaff BV",
"legal_form": "Besloten Vennootschap",
"registration_date": "2018-04-15",
"address": "Herengracht 100, 1015 BS Amsterdam",
"authorized_signatory": "Jan van der Berg"
}
}'
```
**Note:** There is no `qr_code` parameter in the request. When `qr_code` is omitted, the response returns a `request_uri` - a URL that the user navigates to in their browser. This is the standard flow for business wallets.
**Response:**
```json
{
"correlation_id": "kvk-securestaff-2026",
"request_uri": "openid-credential-offer://?credential_offer_uri=https://your-wallet.credenco.com/openid4vc/credentialOffer?id=a3b7c9d1-4e5f-6a7b-8c9d-0e1f2a3b4c5d",
"status_uri": "https://your-wallet.credenco.com/api/v2/issue/kvk-securestaff-2026"
}
```
| Field | Description |
|-------|-------------|
| `correlation_id` | Your business key to track this issuance |
| `request_uri` | The credential offer URL - redirect the user's browser to this URL |
| `status_uri` | Endpoint to poll for status updates |
---
###### Step 2: Redirect the User to the Credential Offer
The `request_uri` in the response is a URL that opens the credential in the supplier's business wallet. Redirect the user's browser to this URL:
```javascript
// In your frontend, after receiving the response from your backend:
window.location.href = response.request_uri;
```
Or render it as a link:
```html
Open in your Business Wallet
```
The supplier's browser navigates to their business wallet, which displays the credential details. The supplier reviews and clicks **"Accept"** to store the credential.
---
###### Step 3: Check the Issuance Status
After the redirect, your backend can poll the [**Get issue status**](https://docs.credenco.com/docs/api-generated/get-credential-issuance-status/) API to track progress:
```bash
curl https://your-wallet.credenco.com/api/v2/credential/issue/kvk-securestaff-2026 \
-H "x-api-key: YOUR_API_KEY"
```
**Response (after credential is accepted):**
```json
{
"status": "issue_completed",
"correlation_id": "kvk-securestaff-2026",
"last_updated": 1751155200000,
"revocation_uuid": "7f3a2b1c-9d8e-4f5a-6b7c-8d9e0f1a2b3c"
}
```
| Status | Meaning |
|--------|---------|
| `issue_request_created` | The credential offer has been created, waiting for the wallet to pick it up |
| `credential_offer_retrieved` | The business wallet has retrieved the offer |
| `issue_completed` | The credential has been successfully issued and accepted |
| `error` | Something went wrong during the issuance process |
**Tip:** Save the `revocation_uuid` from the completed response. You'll need it if you ever want to [revoke the credential](https://docs.credenco.com/docs/api-generated/revoke-credential/) in the future.
---
###### Optional: Use Callbacks Instead of Polling
Instead of polling the status endpoint, you can provide a callback URL in the issue request. Credenco will notify your backend automatically when the status changes:
```json
{
"correlation_id": "kvk-securestaff-2026",
"template_id": "kvk_registration_extract",
"claims": { ... },
"callback": {
"url": "https://your-backend.com/webhooks/credential-status",
"status": ["issue_completed", "error"]
}
}
```
Your callback endpoint will receive a `POST` request with the status update whenever the issuance completes or fails.
---
##### Credential Examples
Each authority issues a different credential type. Below are example `claims` payloads for each of the five supplier onboarding documents.
###### KVK Registration Extract
Issued by the Chamber of Commerce (KVK).
```json
{
"template_id": "kvk_registration_extract",
"claims": {
"kvk_number": "12345678",
"legal_name": "SecureStaff BV",
"legal_form": "Besloten Vennootschap",
"registration_date": "2018-04-15",
"address": "Herengracht 100, 1015 BS Amsterdam",
"authorized_signatory": "Jan van der Berg"
}
}
```
###### Tax Compliance Statement
Issued by the Tax Authority (Belastingdienst).
```json
{
"template_id": "tax_compliance_statement",
"claims": {
"rsin": "987654321",
"company_name": "SecureStaff BV",
"compliance_status": "compliant",
"valid_from": "2026-01-01",
"valid_until": "2026-12-31"
}
}
```
###### VAT Registration
Issued by the Tax Authority (Belastingdienst).
```json
{
"template_id": "vat_registration",
"claims": {
"vat_number": "NL123456789B01",
"company_name": "SecureStaff BV",
"registration_date": "2018-04-20"
}
}
```
###### Bank Account Details
Issued by the supplier's bank (e.g., ABN AMRO).
```json
{
"template_id": "bank_account_details",
"claims": {
"bank_name": "ABN AMRO",
"iban": "NL91ABNA0417164300",
"account_holder": "SecureStaff BV",
"bic": "ABNANL2A"
}
}
```
###### Insurance Certificate
Issued by the insurer (e.g., Allianz).
```json
{
"template_id": "insurance_certificate",
"claims": {
"insurer": "Allianz",
"policy_number": "AVB-2026-00412",
"coverage_type": "Professional Liability",
"insured_party": "SecureStaff BV",
"valid_from": "2026-01-01",
"valid_until": "2027-01-01",
"coverage_amount": "2.500.000"
}
}
```
---
##### Complete Flow at a Glance
Authority Backend
Calls the Issue API with the credential details - no QR code parameter
Redirect Browser
The portal redirects the supplier's browser to the credential offer URL
Supplier Accepts
The business wallet shows the credential - the supplier clicks Accept
Credential Stored
The credential is stored in the business wallet via OpenID4VCI
---
##### API Reference
| API | Method | Endpoint | Description |
|-----|--------|----------|-------------|
| [Start issue Credential](https://docs.credenco.com/docs/api-generated/start-credential-issuance/) | `POST` | `/api/v2/credential/issue` | Start the credential issuance and get a credential offer URL |
| [Get issue status](https://docs.credenco.com/docs/api-generated/get-credential-issuance-status/) | `GET` | `/api/v2/credential/issue/{correlationId}` | Check the status of an issuance process |
| [Revoke Credential](https://docs.credenco.com/docs/api-generated/revoke-credential/) | `POST` | `/api/v2/credential/revoke` | Revoke a previously issued credential |
---
##### What's Next?
Now that you understand how to issue supplier credentials to a business wallet, you might want to explore:
- [**Verify Supplier Credentials**](https://docs.credenco.com/docs/use-case/supplier-onboarding/verify-credentials/) - See how the broker verifies all five credentials at once
- [**Create Credential Templates**](https://docs.credenco.com/docs/guide/credential-issue/create-credential-template/) - Design the credential types your organization issues
- [**API Authentication**](https://docs.credenco.com/docs/api/authentication/) - Set up OAuth2 or API key authentication
- [**Verify Credentials**](https://docs.credenco.com/docs/guide/verifier-template/intro/) - Request and verify credentials from holders
### Verify Supplier Credentials
https://docs.credenco.com/docs/use-case/supplier-onboarding/verify-credentials/
#### Verify Supplier Credentials
The Story
SecureStaff BV has collected all five business credentials in their business wallet: a KVK registration extract, a tax compliance statement, a VAT registration, bank account details, and an insurance certificate. Today they are ready to register as a supplier on FlexProcure's procurement portal.
In the past, SecureStaff BV would email five separate PDF files to the broker. FlexProcure's compliance team would then spend days manually checking each document - calling institutions to verify authenticity, cross-referencing company names and registration numbers, and flagging inconsistencies. SecureStaff BV would wait anxiously, only to receive follow-up requests for missing or expired documents.
But FlexProcure has integrated verifiable credential verification into their supplier portal, powered by the Credenco Business Wallet. When SecureStaff BV starts their registration, the portal requests all required credentials. The browser redirects to SecureStaff BV's business wallet, which shows exactly what FlexProcure is requesting - all five business documents. SecureStaff BV reviews the request, clicks **"Share"**, and within seconds FlexProcure has cryptographically verified every document.
The portal shows: **"All required documents received and verified"** - and SecureStaff BV is approved as a supplier.
This guide shows you how to build that verification experience.
---
##### How does supplier credential verification work?
Verifying supplier credentials involves three parties: the broker's portal, the broker's backend, and the broker's Credenco Business Wallet, which creates the verification request and validates the results. The verifier template requests all five document types at once, and unlike personal wallets this happens entirely in the browser - SecureStaff BV reviews the request and shares everything with a single click.
Key Concepts
| Concept | Description |
|---------|-------------|
| **Verifier Template** | A configuration in the Credenco Business Wallet that defines which credentials you want to request - for supplier onboarding, this includes all five document types |
| **Authorization Request** | An OID4VP request that initiates the credential verification flow |
| **Authorization Request URL** | The URL the supplier navigates to in their browser to review and approve the credential sharing request |
| **OpenID4VP** | The open standard protocol used for credential presentation and verification |
| **Correlation ID** | A business key to track the verification session and retrieve results |
---
##### Sequence Diagram
The diagram below shows the complete interaction - from the moment FlexProcure requests SecureStaff BV's supplier documents to the moment all credentials are verified.
```mermaid
sequenceDiagram
actor User as SecureStaff BV
participant Portal as FlexProcure Portal
participant Backend as Broker Backend
participant Credenco as Credenco Business Wallet
participant Wallet as SecureStaff BV Business Wallet
User->>Portal: 1. Start supplier registration
Portal->>Backend: 2. Request document verification
Backend->>Credenco: 3. POST /api/v1/oid4vp/backend/auth/requests
Note right of Backend: Include verifier template key requesting all 5 credential types (no qr_code parameter)
Credenco-->>Backend: 4. Return authorization request URL + correlation_id
Backend-->>Portal: 5. Send authorization request URL to frontend
Portal-->>User: 6. Redirect browser to authorization request URL
User->>Wallet: 7. Browser navigates to business wallet
Wallet->>Credenco: 8. Retrieve authorization request (OpenID4VP)
Wallet-->>User: 9. Show which credentials are requested (5 types)
User->>Wallet: 10. Approve sharing all 5 credentials
Wallet->>Credenco: 11. Present all credentials
Credenco->>Credenco: 12. Verify signatures & validity of all 5
Note over Backend,Credenco: Check verification status
Backend->>Credenco: 13. GET /api/v1/oid4vp/backend/auth/requests/{correlationId}
Credenco-->>Backend: 14. Return status + all verified credential data
Backend->>Backend: 15. Cross-reference data across credentials
Backend-->>Portal: 16. Show verification result
Portal-->>User: 17. All documents verified - supplier approved
```
---
##### Step-by-Step Integration
Verify all supplier onboarding documents from a business wallet in a single step using the Business Wallet verification API.
Your backend calls the Create authorization request API to create a verification request.
Redirect the supplier’s browser to the auth_request_uri returned in the response.
The supplier reviews the requested credentials in their business wallet and shares them using the OpenID4VP protocol.
Poll the Get authorization session status API to track progress and retrieve results.
Once all required credentials are verified, show the supplier a success message.
###### Prerequisites
Before you begin, make sure you have:
- A **Credenco Business Wallet** account ([sign up here](https://wallet.acc.credenco.com))
- A **Verifier Template** configured that requests all five supplier credential types - [Create Verifier Template](https://docs.credenco.com/docs/guide/verifier-template/create-verifier-template/)
- **API access** enabled - [Set up API authentication](https://docs.credenco.com/docs/api/authentication/)
---
###### Step 1: Create a Verification Request
When a supplier clicks "Provide required documents", the broker's backend calls the [**Create authorization request**](https://docs.credenco.com/docs/api-generated/start-oid-4-vp-authorization-request/) API.
**Request:**
```bash
curl -X POST https://your-wallet.credenco.com/api/v1/oid4vp/backend/auth/requests \
-H "Content-Type: application/json" \
-H "x-api-key: YOUR_API_KEY" \
-d '{
"correlation_id": "onboarding-securestaff-2026",
"query_id": "verify_supplier_documents"
}'
```
**Note:** There is no `qr_code` parameter in the request. When `qr_code` is omitted, the response returns an `auth_request_uri` - a URL that the supplier navigates to in their browser. This is the standard flow for business wallets.
**Tip:** The `query_id` must match the Verifier template key configured in the Credenco Business Wallet. This template defines all five credential types and the specific attributes you want to verify for each.
**Response:**
```json
{
"correlation_id": "onboarding-securestaff-2026",
"auth_request_uri": "openid4vp://authorize?request_uri=https://your-wallet.credenco.com/oid4vp/auth/request/xyz789",
"status_uri": "https://your-wallet.credenco.com/api/v1/oid4vp/backend/auth/requests/onboarding-securestaff-2026"
}
```
| Field | Description |
|-------|-------------|
| `correlation_id` | Your business key to track this verification session |
| `auth_request_uri` | The authorization request URL - redirect the supplier's browser to this URL |
| `status_uri` | Endpoint to poll for verification status |
---
###### Step 2: Redirect the Supplier to the Verification Request
The `auth_request_uri` in the response is a URL that opens the verification request in the supplier's business wallet. Redirect the supplier's browser to this URL:
```javascript
// In your frontend, after receiving the response from your backend:
window.location.href = response.auth_request_uri;
```
Or render it as a link:
```html
Open in your Business Wallet to share documents
```
---
###### Step 3: The Supplier Reviews and Shares
From SecureStaff BV's perspective:
1. The browser navigates to their business wallet
2. The wallet shows which credentials FlexProcure is requesting - all five supplier documents
3. SecureStaff BV reviews the request and clicks **"Share"**
4. The wallet sends all five credentials to the broker's Credenco Business Wallet using the OpenID4VP protocol
5. The broker's Business Wallet cryptographically verifies the signatures and checks each credential's validity
SecureStaff BV stays in full control - they see exactly what is being requested and can decline the request at any time.
---
###### Step 4: Check the Verification Status
After the redirect, your backend polls the [**Get authorization session status**](https://docs.credenco.com/docs/api-generated/get-oid-4-vp-request-status/) API to track progress and retrieve results:
```bash
curl "https://your-wallet.credenco.com/api/v1/oid4vp/backend/auth/requests/onboarding-securestaff-2026?includeData=true" \
-H "x-api-key: YOUR_API_KEY"
```
**Response (after all credentials are verified):**
```json
{
"status": "verified",
"correlation_id": "onboarding-securestaff-2026",
"last_updated": 1751155200000,
"data": {
"kvk_registration_extract": {
"kvk_number": "12345678",
"legal_name": "SecureStaff BV",
"legal_form": "Besloten Vennootschap",
"registration_date": "2018-04-15",
"address": "Herengracht 100, 1015 BS Amsterdam",
"authorized_signatory": "Jan van der Berg"
},
"tax_compliance_statement": {
"rsin": "987654321",
"company_name": "SecureStaff BV",
"compliance_status": "compliant",
"valid_from": "2026-01-01",
"valid_until": "2026-12-31"
},
"vat_registration": {
"vat_number": "NL123456789B01",
"company_name": "SecureStaff BV",
"registration_date": "2018-04-20"
},
"bank_account_details": {
"bank_name": "ABN AMRO",
"iban": "NL91ABNA0417164300",
"account_holder": "SecureStaff BV",
"bic": "ABNANL2A"
},
"insurance_certificate": {
"insurer": "Allianz",
"policy_number": "AVB-2026-00412",
"coverage_type": "Professional Liability",
"insured_party": "SecureStaff BV",
"valid_from": "2026-01-01",
"valid_until": "2027-01-01",
"coverage_amount": "2.500.000"
}
}
}
```
| Status | Meaning |
|--------|---------|
| `created` | The authorization request has been created, waiting for the wallet to respond |
| `request_retrieved` | The business wallet has retrieved the authorization request |
| `verified` | All credentials have been successfully presented and verified |
| `error` | Something went wrong during the verification process |
**Tip:** Use the `includeData=true` query parameter to include the actual credential data in the response. Without it, you only get the status.
---
###### Step 5: Show the Result
Once all five credentials are verified, show the supplier a success message:
```html
All required documents received and verified
5 of 5 credentials verified successfully.
```
---
###### Optional: Use Callbacks Instead of Polling
Instead of polling, provide a callback URL in the verification request:
```json
{
"correlation_id": "onboarding-securestaff-2026",
"query_id": "verify_supplier_documents",
"callback": {
"url": "https://your-backend.com/webhooks/verification-status",
"status": ["verified", "error"]
}
}
```
Your callback endpoint will receive a `POST` request when the verification completes or fails.
---
##### What the Broker Can Do After Verification
Once all five credentials are verified, the broker's backend has cryptographically confirmed data from five independent sources. This enables automated checks:
| Check | Description |
|-------|-------------|
| **KVK validity** | Confirm the supplier has an active registration at the Chamber of Commerce |
| **Tax compliance** | Verify the supplier's fiscal standing with the Tax Authority |
| **VAT registration** | Confirm the supplier is registered for VAT and the number is valid |
| **Bank account ownership** | Verify that the bank account belongs to the registered company |
| **Insurance coverage** | Confirm adequate professional liability coverage and validity period |
| **Cross-reference** | Match company names and registration numbers across all five credentials for consistency |
All of this is automated and based on cryptographically verified data - no manual document review needed.
---
##### Complete Flow at a Glance
Broker Backend
Calls the Verification API requesting all 5 credential types
Redirect Browser
The portal redirects the supplier's browser to the authorization request URL
Supplier Shares
SecureStaff BV reviews and shares all 5 credentials at once
All Verified
The broker's Business Wallet verifies all credentials - supplier is approved
---
##### API Reference
| API | Method | Endpoint | Description |
|-----|--------|----------|-------------|
| [Create authorization request](https://docs.credenco.com/docs/api-generated/start-oid-4-vp-authorization-request/) | `POST` | `/api/v1/oid4vp/backend/auth/requests` | Create a verification request and get an authorization request URL |
| [Get authorization session status](https://docs.credenco.com/docs/api-generated/get-oid-4-vp-request-status/) | `GET` | `/api/v1/oid4vp/backend/auth/requests/{correlationId}` | Check verification status and retrieve credential data |
---
##### What's Next?
Now that you understand how to verify supplier credentials from a business wallet, you might want to explore:
- [**Issue Supplier Credentials**](https://docs.credenco.com/docs/use-case/supplier-onboarding/issue-credentials/) - See how each authority issues credentials to the supplier's business wallet
- [**Create Verifier Templates**](https://docs.credenco.com/docs/guide/verifier-template/create-verifier-template/) - Define which credentials your organization wants to verify
- [**API Authentication**](https://docs.credenco.com/docs/api/authentication/) - Set up OAuth2 or API key authentication
- [**Issue Credentials**](https://docs.credenco.com/docs/guide/credential-issue/intro/) - Issue your own credentials to users
## Issue Credential
### How to Issue Verifiable Credentials
https://docs.credenco.com/docs/guide/credential-issue/intro/
#### Credential Issuance Guide
##### How do I issue a verifiable credential?
Issuing a verifiable credential from the Business Wallet always follows the same three-step process, whether you issue manually from the UI or automate it from your own backend: define who is issuing (the issuer template), define what is being issued (the credential template), then trigger the actual issuance. Each step is covered in its own guide below.
The three steps are:
1. [Create an issuer template](#create-an-issuer-template): the shared issuer identity used by every credential it issues
2. [Create a credential template](#create-a-credential-template): the specific credential type, attributes, and display configuration
3. [Issue a credential](#issue-a-credential): manually from the UI, or programmatically from your backend
##### Create an issuer template
An **issuer template** defines the general issuer configuration that is shared between all credentials issued under it. It holds the issuer name, logo, technical configuration name, supported interoperability profile, and supported languages.
See [Create Issuer Template](https://docs.credenco.com/docs/guide/credential-issue/create-issuer-template/) for the full walkthrough.
##### Create a credential template
A **credential template** defines a single credential type. It captures the credential format (SD-JWT VC, VC-JWT, JSON-LD), the credential type identifier, the attributes that make up the credential, the validity period, and how the credential card is displayed to the user.
Every credential template belongs to an issuer template.
See [Create Credential Template](https://docs.credenco.com/docs/guide/credential-issue/create-credential-template/) for the full walkthrough.
##### Issue a credential
There are two ways to issue a credential:
###### Issue a credential manually
From the credential template, open the **Issue** tab to fill in attribute values and issue a credential to a wallet (a web wallet via URL, or a personal wallet via QR code).
See [Issue credential manually](https://docs.credenco.com/docs/guide/credential-issue/issue-credential-manually/) for details.
###### Issue a credential from your backend
Call the issuance API from your backend system to issue credentials in an automated flow.
See [Issue credential from your backend](https://docs.credenco.com/docs/guide/credential-issue/issue-credential-from-your-backend/) for details.
###### Issue a credential directly into a wallet
For wallets you provision yourself (such as during onboarding), you can push a credential
**directly** into a Business Wallet (no QR scan and no accept step) using the trusted-contact
and direct-issue mechanism.
See [Direct Issue into a Wallet](https://docs.credenco.com/docs/guide/direct-issue/intro/) for details.
### Configure an Issuer Template
https://docs.credenco.com/docs/guide/credential-issue/create-issuer-template/
#### Create Issuer Template
An **issuer template** (called **Credential Issuer definition** in the UI) holds the general configuration shared by every credential template grouped under it.
##### What is an issuer template?
An issuer template is the shared identity every credential of that issuer is issued under: its name, logo, technical configuration key, supported interoperability profile, and supported languages. You create one issuer template per issuing identity, then attach one or more credential templates to it, so every credential of that issuer looks and behaves consistently.
##### Navigate to issuer templates
Go to **Settings → Templates** (under **Issuer**).
The table lists all configured issuer templates with their **Name**, **Description**, and **Technical key**. Click any row to open the issuer template, or click **Add** to create a new one.
##### Issuer template form
An issuer template has two tabs:
- **Issuer configuration** - identity, OpenID parameters, and display settings
- **Credential templates** - the credential templates that use this issuer
##### Issuer settings
Configure how this issuer identifies itself.
- **Name** - A logical name of the configuration. Shown in the UI only. Not included in the credentials.
- **Description** - A short description that helps you find the configuration later. Shown in the UI only.
- **Domain name** - The domain name used by this issuer.
- **Technical configuration name** - The name used in the public configuration URL of this issuer (e.g. the OpenID credential issuer well-known endpoint).
- **Interop profile** - The interoperability profile that defines the protocol versions used between the issuer and the wallet. Pick from:
- `DIIP V3`
- `DIIP V4`
- `DIIP V5`
- `HAIP`
See the [DIIP specification](https://fidescommunity.github.io/DIIP/) for details on the DIIP profiles, or the [OpenID4VC High Assurance Interoperability Profile](https://openid.net/specs/openid4vc-high-assurance-interoperability-profile-1_0.html) for HAIP. Use the latest version unless you have specific requirements to choose an older one.
- **Select languages** - Pick the extra languages you want to provide specific translations for. The default language is always present and is used when no specific translation is configured.
##### Display settings
Display settings control how the issuer appears on the credential card. They can be configured per language; the **Default language** tab is always present.
- **Name credential issuer** - The issuer name as shown on the credential card.
- **Logo** - Upload an image or provide a URL. The logo may be shown on the credential card.
- **Logo alt text** - The alternative text for the logo, used for [accessibility](https://www.w3schools.com/TAGS/att_img_alt.asp).
##### Save or delete
Click **Save configuration** at the bottom of the form to apply your changes, or **Cancel** to discard them.
To remove an issuer template entirely, click **Delete** in the top right. Deleting an issuer template removes all credential templates grouped under it.
:::info[Required permission]
You need the **Issuer templates (Change)** permission to add, edit, or delete issuer templates.
:::
### Create a Verifiable Credential Template
https://docs.credenco.com/docs/guide/credential-issue/create-credential-template/
#### Create Credential Template
A **credential template** defines a single credential type: its format, attributes, validity period, and how the credential card is displayed. When you issue a credential - manually or via the API - you pick a credential template; the actual credential is created based on its configuration.
Every credential template belongs to an [issuer template](https://docs.credenco.com/docs/guide/credential-issue/create-issuer-template/).
##### What is a credential template?
A credential template is the configuration that determines what a specific verifiable credential looks like and contains: its format (SD-JWT VC, VC-JWT, or JSON-LD), its type identifier, the attributes it carries, how long it stays valid, and how its card is displayed to the holder. Every time you issue that credential type, the wallet applies this configuration.
##### Open the credential templates list
Navigate to the credential templates list of an issuer template before creating a new credential template.
1. Go to **Settings → Templates** (under **Issuer**).
2. Open the issuer template you want to add a credential template to.
3. Switch to the **Credential templates** tab.
From here you can:
- **Create new template** - start from a blank credential template
- **Import template** - import a credential template that was previously exported
Existing credential templates are shown as cards displaying the issuer name, credential type, and credential format.
##### Credential configuration
The top of the credential template form sets the identifier and supported languages.
- **Credential Issue template key** *(required)* - A unique key for this template. Issuance clients pass this key to the [Start Issue Credential API](https://docs.credenco.com/docs/api-generated/start-credential-issuance/) to identify the template.
- **Select languages** - Pick the languages for which you want to provide specific translations.
##### Type tab
Configure what kind of credential this template issues.
- **Credential format** - Pick from `SD-JWT VC`, `VC-JWT`, or `JSON-LD`.
- **Type** - The credential type identifier, e.g. `BankAccountCredential`.
- **Validity period** - A number and a time unit (`Seconds`, `Minutes`, `Days`, `Months`, `Years`).
- **Store issued credential** - When enabled, the credential is stored in your wallet after issuance. Stored credentials can be viewed under **Issuer → Issued**.
The **Export** and **Delete** buttons at the top of the form let you export the credential template to JSON (for re-import into another wallet) or remove it entirely.
##### Display tab
Define how the credential card is displayed. Settings can be configured per language; the **Default language** is used as a fallback.
- **Type of credential** - The type or label shown on the credential card (e.g. `IBAN`).
- **Background Image URL** - Optional URL of a background image for the credential card.
- **Background Color** - Used when no background image is provided.
- **Text Color** - Color of the text on the card.
A live preview of the card is shown next to the settings.
##### Attributes tab
Define the attributes that make up the credential.
Each attribute has:
- **Attribute Name** - The key used in the credential, e.g. `currency`.
- **Attribute Type** - One of `Complex Type`, `String`, `Integer`, `Number`, `Boolean`.
- **Disclosable** - Whether the attribute can be selectively disclosed.
- **Is Array** - Whether the attribute can contain multiple values.
- **Required** - Whether the attribute must be included in the credential.
You can add or remove attributes, or import the attribute set directly from a JSON Schema to speed up configuration and stay consistent with an external definition.
##### Translations tab
Configure translations for the attribute display names. These are the labels shown on the credential card.
All attributes defined on the **Attributes** tab appear here. For each language, enter the display name that should appear on the credential card.
###### Suggest translations
Click **Suggest translations** to auto-fill the **Translated label** column for the currently selected language tab. The button derives a human-readable label from each attribute's technical name (for example, `companyname` → `Company name`) and translates it into the language of the active tab.
Use it to bootstrap a new language tab - empty fields are filled in one click - and then refine any labels that need a more domain-specific wording.
##### Template tab
The **Template** tab lets you configure a custom credential template. Use it only when you need to customize the credential and the automatic template generation isn't sufficient for your use case.
##### Status tab
The **Status** tab links the credential to a status list, which is used to communicate the credential's status (e.g. valid, revoked) after issuance. Configure status lists under **Settings → Credential status** before linking them here.
##### Issue tab
Use the **Issue** tab to manually issue a credential and verify the configuration end-to-end. See [Issue a credential manually](https://docs.credenco.com/docs/guide/credential-issue/issue-credential-manually/).
##### Save
Click **Save configuration** at the bottom of the form to save changes across all tabs. A "Save to apply changes across all tabs" hint appears when you have unsaved changes.
:::info[Required permission]
You need the **Issuer templates (Change)** permission to create, edit, or delete credential templates.
:::
### Issue a Credential Manually
https://docs.credenco.com/docs/guide/credential-issue/issue-credential-manually/
#### Issue a Credential Manually
Step-by-step guide to manually issuing a verifiable credential from the Credenco Business Wallet user interface.
Go to Settings → Templates (under Issuer), open the issuer template that contains the credential template you want to use, switch to the Credential templates tab and open the credential template, then select the Issue tab.
Enter a value for each attribute listed in the Credential data panel that should be included in the credential.
In the Issue a credential panel, optionally provide a wallet endpoint and PIN code, then click Issue to start the issuance flow. Open the generated link to accept the credential in a web wallet, or scan the QR code with a personal wallet app.
Go to Holder → Wallet in the main menu to see credentials stored in your wallet, and click any credential card to view its details.
You can issue a credential straight from the UI to verify a credential template end-to-end without involving your backend.
##### How do I issue a credential manually from the UI?
Open the credential template's **Issue** tab, fill in the attribute values you want on the credential, and click **Issue**. The wallet generates a link (for a web wallet) or a QR code (for a personal wallet app) that the holder opens or scans to accept the credential - no backend integration needed.
##### Open the Issue tab
1. Go to **Settings → Templates** (under **Issuer**).
2. Open the issuer template that contains the credential template you want to use.
3. Switch to the **Credential templates** tab and open the credential template.
4. Select the **Issue** tab.
##### Fill in the credential data
The **Credential data** panel lists every attribute defined on the **Attributes** tab. Enter a value for each attribute that should be included in the credential.
##### Issue to a wallet
The **Issue a credential** panel on the right controls where the credential is delivered.
- **Wallet endpoint** - The URL of the web wallet that should receive the credential. Required when issuing to a web wallet.
- **PIN code** *(optional)* - A numeric PIN that the wallet user must enter to accept the credential.
Click **Issue** to start the issuance flow.
###### Issue to a web wallet
When a wallet endpoint is provided, a link is generated that opens the receiving wallet. Open the link, then accept the credential in the wallet.
After acceptance the credential is stored in that wallet.
###### Issue to a personal wallet
When no wallet endpoint is provided, a QR code is shown. Scan the QR code with the personal wallet app to receive the credential.
##### View the credential after issuance
To see credentials stored in your wallet, go to **Holder → Wallet** in the main menu.
Click any credential card to view its details.
:::info[Required permission]
You need the **Issue credentials (Change)** permission to issue credentials. Storing the issued credential in your wallet also requires the **Holder credentials (Change)** permission.
:::
### Issue Credentials via API from Your Backend
https://docs.credenco.com/docs/guide/credential-issue/issue-credential-from-your-backend/
#### Issue a Credential from your backend
##### How do I issue a credential from my own backend?
Call the Business Wallet's issuance API from your backend, authenticated with OAuth2 or an API key, to trigger issuance automatically instead of doing it manually from the UI. You provide the credential template key, the attribute values, and a target wallet address; the wallet handles the OpenID4VCI issuance flow and delivers the credential to the holder.
##### Preconditions
- a [credential template](https://docs.credenco.com/docs/guide/credential-issue/create-credential-template/) is configured
- [oAuth2](https://docs.credenco.com/docs/api/authentication/) or an [API key](https://docs.credenco.com/docs/api/authentication/) is enabled
##### Issue to Business Wallet
Integrate credential issuance from your backend to a customer's Business Wallet via the Start Issue Credential API.
Your backend sends a request to your Credenco Business Wallet to issue a credential by calling the Start issue Credential API, providing the Credential Issue Template Key, the credential attributes and the address of the customer’s Business Wallet.
Your backend can now use the Get issue status API to retrieve the status of the credential issuance process, including the revocation_uuid used to revoke the credential later.
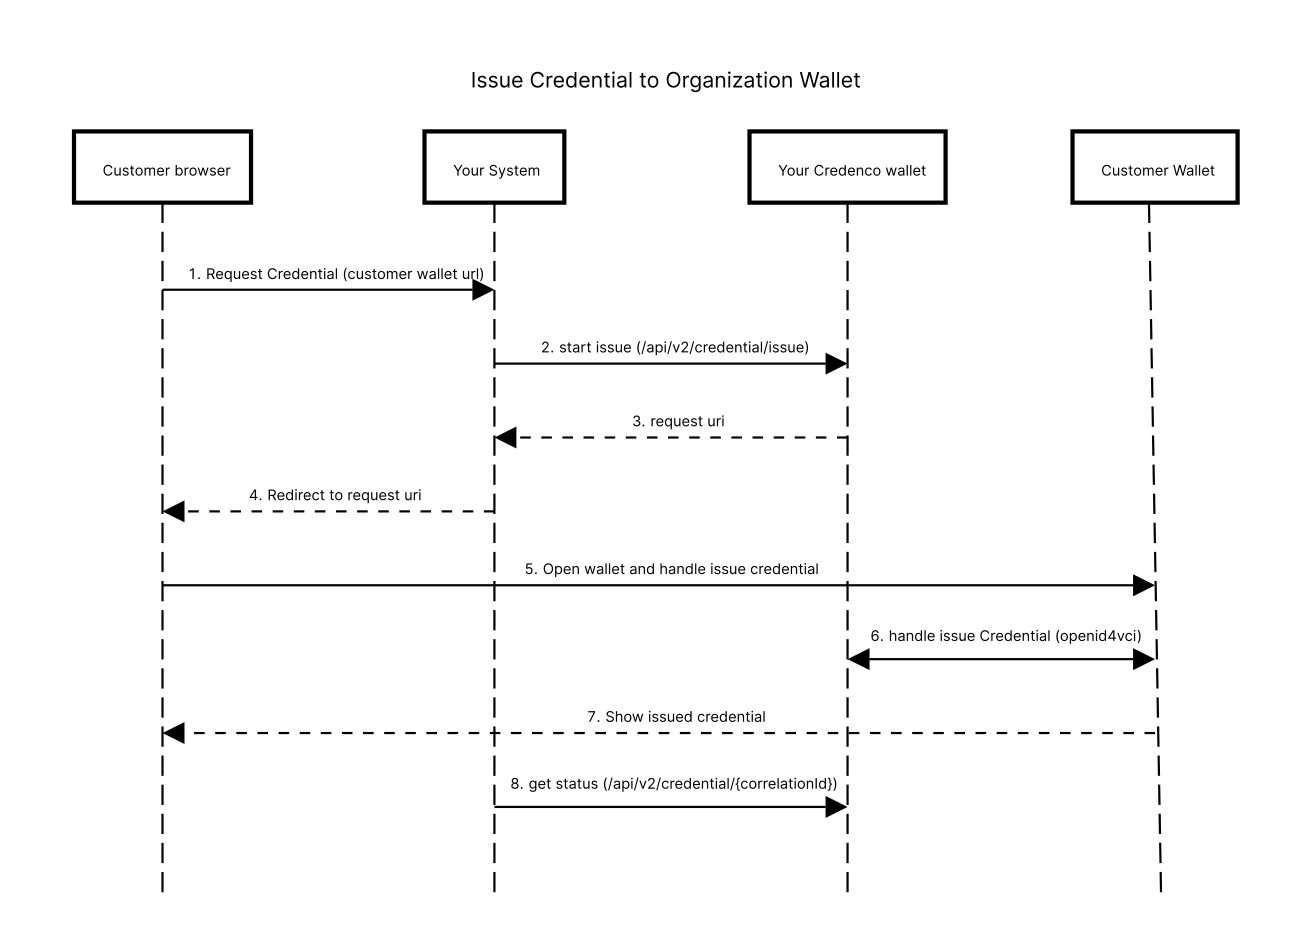
1. The end user initiates the credential issuance flow by sending a request to your backend.
2. Your backend sends a request to your Credenco Business Wallet to issue a credential by calling the [Start issue Credential](https://docs.credenco.com/docs/api-generated/start-credential-issuance/) API.
In the request, you need to provide the [Credential Issue Template Key](https://docs.credenco.com/docs/guide/credential-issue/create-credential-template/#credential-configuration), the credential attributes and the address of the organization wallet of the customer.
```json
{
"correlation_id": "89cba89",
"template_id": "issue_iban",
"claims": {
"companyname": "CoolSoft B.V.",
"currency": "EUR",
"iban": "NL12TUL25708789078",
"bic": "TULINL2A",
"acccount_type": "Business Checking Account"
},
"request_uri_base": "https://customerwallet.com"
}
```
3. The response of the Start issue Credential API call contains the credential request URI.
```json
{
"correlation_id": "89cba89",
"request_uri": "https://customerwallet.com/?credential_offer_uri=https..",
"status_uri": "https://wallet.credenco.com/api/v2/issue/89cba89"
}
```
4. The browser of the customer must be redirected to the request_uri.
5. The Wallet of the customer is opened in the browser.
6. The Wallet of the customer and your Credenco wallet will handle the credential issuance flow via the OpenID4vci protocol.
7. After acceptance of the credential by the customer the customer wallet will hold the new Credential.
8. Your backend can now use the [Get issue status](https://docs.credenco.com/docs/api-generated/get-credential-issuance-status/) API to retrieve the status of the credential issuance process. in the response you will find the status and the revocation_uuid. With this uuid you can revoke the credential at a later time. (you need the have a statusList configured for revocation to work)
```json
{
"status": "issue_request_created",
"correlation_id": "89cba89",
"revocation_uuid": "0e2c1f62-3392-462e-a25e-483fa0e2a3a3"
}
```
##### Issue to Personal Wallet
Integrate credential issuance from your backend to a customer's Personal Wallet app via a QR code and the Start Issue Credential API.
Your backend sends a request to your Credenco Business Wallet to issue a credential by calling the Start issue Credential API, providing the Credential Issue Template Key, the credential attributes and the size of the QR code to be generated.
The response of the Start issue Credential API call contains the Data URI of the QR code in PNG format.
The browser of the customer must show the QR code in the UI of your application.
Your backend can now use the Get issue status API to retrieve the status of the credential issuance process, including the revocation_uuid used to revoke the credential later.
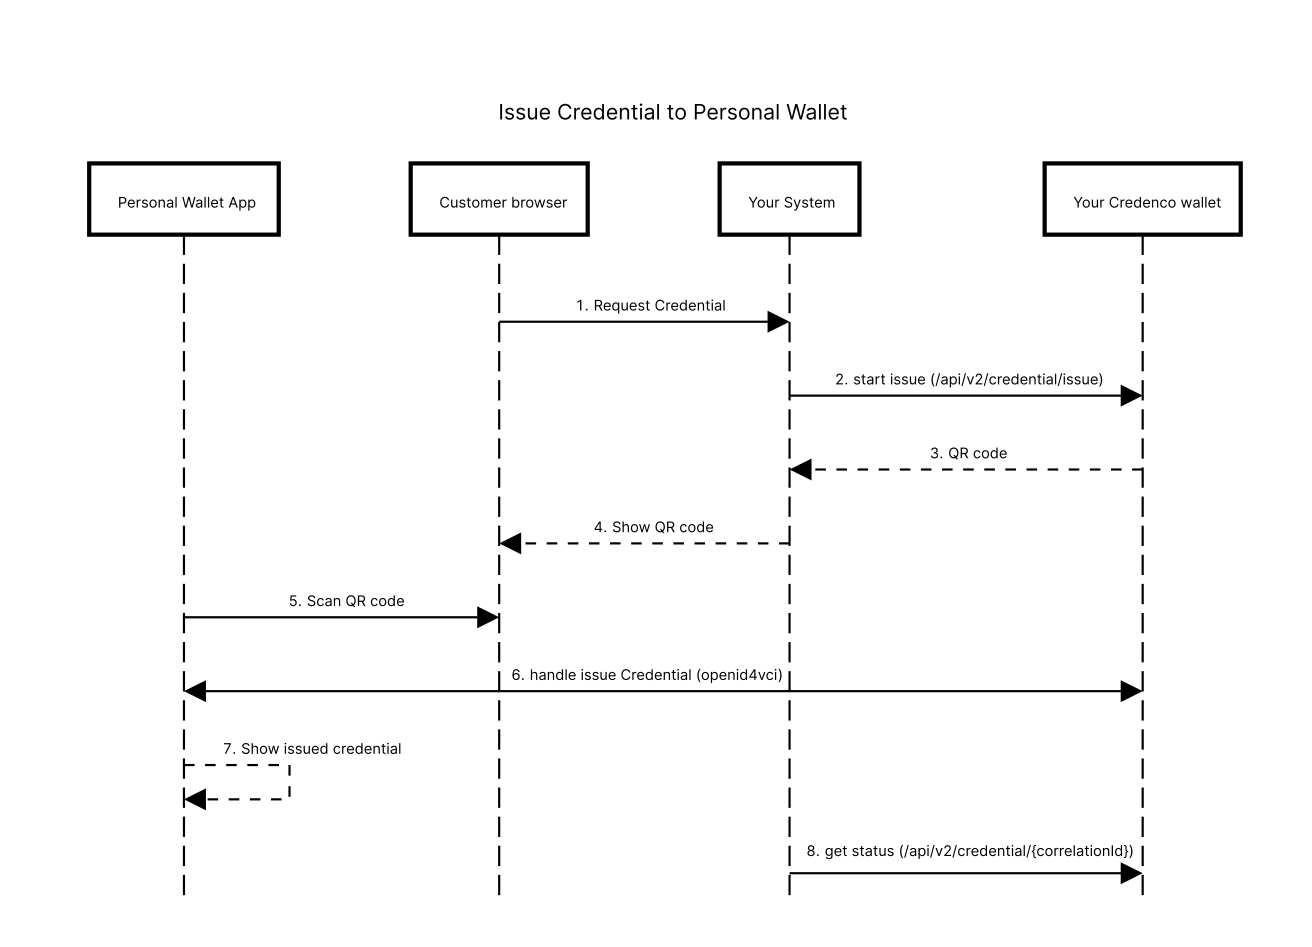
1. The end user initiates the credential issuance flow by sending a request to your backend.
2. Your backend sends a request to your Credenco Business Wallet to issue a credential by calling the [Start issue Credential](https://docs.credenco.com/docs/api-generated/start-credential-issuance/) API.
In the request, you need to provide the [Credential Issue Template Key](https://docs.credenco.com/docs/guide/credential-issue/create-credential-template/#credential-configuration), the credential attributes and the size of the QR code to be generated by your Credenco wallet.
```json
{
"correlation_id": "89cba89",
"template_id": "issue_iban",
"claims": {
"companyname": "CoolSoft B.V.",
"currency": "EUR",
"iban": "NL12TUL25708789078",
"bic": "TULINL2A",
"acccount_type": "Business Checking Account"
},
"qr_code": {"size": 400}
}
```
3. The response of the Start issue Credential API call contains the [Data URI](https://developer.mozilla.org/en-US/docs/Web/URI/Reference/Schemes/data) of the QR code in PNG format.
```json
{
"correlation_id": "89cba89",
"request_uri": "openid-credential-offer://?credential_offer_uri=..",
"status_uri": "https://wallet.credenco.com/api/v2/issue/89cba89",
"qr_uri": "data:image/png;base64,iVBORw0f....="
}
```
4. The browser of the customer must sow the QR code in the UI of your application.
5. The customer scans the QR code on his/her phone. The Personal Wallet App will open.
6. The Personal Wallet App and your Credenco wallet will handle the credential issuance flow via the OpenID4vci protocol.
7. After acceptance of the credential by the customer the Personal Wallet App will hold the new Credential.
8. Your backend can now use the [Get issue status](https://docs.credenco.com/docs/api-generated/get-credential-issuance-status/) API to retrieve the status of the credential issuance process. in the response you will find the status and the revocation_uuid. With this uuid you can revoke the credential at a later time. (you need the have a statusList configured for revocation to work)
```json
{
"status": "issue_request_created",
"correlation_id": "89cba89",
"revocation_uuid": "0e2c1f62-3392-462e-a25e-483fa0e2a3a3"
}
```
## Direct Issue
### Issue a Credential Directly into a Wallet
https://docs.credenco.com/docs/guide/direct-issue/intro/
#### Direct Issue into a Wallet
This guide explains how to issue a verifiable credential **directly into a Business Wallet**,
without the holder having to scan a QR code or tap **Accept**. The credential simply
appears in the wallet.
A typical use case is the direct issuance of a credential by a trusted party you have
authorized to add credentials to your wallet, for example the Tax Authority. With the Tax
Authority registered as a trusted contact, it can deliver new credentials to your Business
Wallet as soon as they become available, without any action on your part.
##### When should you use direct issue instead of the standard flow?
Use direct issue when there is no one available to actively accept a credential offer, for
example while provisioning a wallet during onboarding, or when the issuer and wallet already
share enough trust that an explicit accept step only adds friction. The
[standard issuance flow](https://docs.credenco.com/docs/guide/credential-issue/intro/) stays the right choice whenever a
human holder should consciously review and accept an offer.
Direct issue is **unattended**. It is the right choice when:
- You are provisioning a wallet you control or just created (e.g. during onboarding) and there
is no human present to accept a QR code.
- The issuer and the wallet belong to the same trust domain, and an explicit accept step adds
friction without adding value.
- You want the credential to be present the moment the user first opens their wallet.
:::warning[Direct issue requires explicit trust]
A credential can only be pushed into a wallet unattended if the issuer has first been
registered in that wallet as a **trusted contact** with direct issue allowed. Without that, the
credential is accepted and then **immediately discarded** by the wallet. See
[Trusted Contacts](https://docs.credenco.com/docs/guide/direct-issue/trusted-contacts/).
:::
##### The three building blocks
Direct issue combines three pieces. Read them in order:
1. **[Trusted Contacts](https://docs.credenco.com/docs/guide/direct-issue/trusted-contacts/)**: register the issuer's DID in the target
wallet and flag it as allowed to issue directly. This is the security gate that makes
unattended issuance safe. The owner of the holder wallet can add the trusted contact via
the UI or with the [Create a trusted contact](https://docs.credenco.com/docs/api-generated/create-trusted-contact/) API.
2. **[Issue Directly to a Wallet](https://docs.credenco.com/docs/guide/direct-issue/issue-directly-to-wallet/)**: the two API calls that
create a credential offer and push it into the wallet with `directIssue=true`.
3. **[The Inbox](https://docs.credenco.com/docs/guide/direct-issue/inbox/)**: the *attended* alternative. When you push an offer **without**
`directIssue`, it lands in the wallet's inbox for the user to accept later.
##### How it works end to end
###### The direct issue flow (`directIssue=true`)
```mermaid
sequenceDiagram
participant App as Your backend
participant Issuer as Issuer Wallet
participant Holder as Holder wallet
App->>Issuer: POST /api/v2/credential/issue { template_id, claims }
Issuer-->>App: { correlation_id, request_uri }
App->>Holder: POST /api/oidc/offer/{holderKey}?directIssue=true &credential_offer_uri=...
Holder->>Issuer: Resolve credential offer
Holder->>Issuer: POST token endpoint
Holder->>Issuer: POST credential endpoint
Issuer-->>Holder: Credential
Holder->>Holder: Verify the issuer is a trusted contact with direct issue allowed
Note over Holder: Trusted contact, direct issue allowed: credential created in the holder wallet Otherwise: credential discarded
```
The key difference from the standard flow is step three: instead of redirecting a browser or
showing a QR code, you post the credential offer to the **holder** wallet's OIDC offer
endpoint with `directIssue=true`. The holder wallet then completes the OpenID4VCI exchange
against the issuer on the holder's behalf (resolve offer, token endpoint, credential
endpoint) and applies the trust check: if the issuer is a trusted contact with direct issue
allowed, the credential is created in the wallet; otherwise it is discarded.
Posting the same offer **without** `directIssue=true` is the *attended* path: the offer is
not pulled automatically but stored in the holder wallet's [inbox](https://docs.credenco.com/docs/guide/direct-issue/inbox/) for the user
to accept later.
:::info[The inbox defers the pull]
The diagram above shows the `directIssue=true` flow only. In the inbox path the wallet does
**not** run the OpenID4VCI exchange at offer time. It stores just the credential offer URI
and no credential exists yet. The token and credential endpoint calls, and therefore the
trust check, are deferred until the user accepts the offer from the inbox.
:::
###### The inbox flow (`directIssue` omitted)
When you post the offer without `directIssue=true`, the wallet stores the offer and waits.
The pull only happens later, when the user accepts the offer from the inbox.
```mermaid
sequenceDiagram
participant App as Your backend
participant Issuer as Issuer Wallet
participant Holder as Holder wallet
participant User as Wallet user
App->>Issuer: POST /api/v2/credential/issue { template_id, claims }
Issuer-->>App: { correlation_id, request_uri }
App->>Holder: POST /api/oidc/offer/{holderKey} ?credential_offer_uri=...
Holder->>Holder: Store credential offer in the inbox (no pull, no credential yet)
Note over Holder,User: Later, attended
User->>Holder: Open inbox, accept offer POST /api/exchange/acceptOfferRequest
Holder->>Issuer: Resolve credential offer
Holder->>Issuer: POST token endpoint
Holder->>Issuer: POST credential endpoint
Issuer-->>Holder: Credential
Holder->>Holder: Credential created in the holder wallet
```
Because the user explicitly accepts, the inbox flow has no automatic trust check: the user is
the gate, applied before the pull rather than after it.
### Trusted Contacts
https://docs.credenco.com/docs/guide/direct-issue/trusted-contacts/
#### Trusted Contacts
A **trusted contact** is an issuer that a wallet has explicitly authorised. It is the security
gate that makes [direct issue](https://docs.credenco.com/docs/guide/direct-issue/issue-directly-to-wallet/) safe: a wallet will only **keep**
a credential that was pushed in unattended if it came from an issuer registered as a trusted
contact with direct issue allowed.
##### What is a trusted contact?
A trusted contact is an issuer that a wallet has explicitly authorised to push credentials into it unattended. It belongs to a single wallet and pairs the issuer's DID with a `directIssueAllowed` flag; only credentials from a matching, allowed issuer are kept, everything else is discarded on arrival.
Each trusted contact records:
| Field | Description |
|-------|-------------|
| `did` | The **DID of the issuer** that is allowed to issue into this wallet. This is matched against the issuer of every directly-issued credential. |
| `name` | A human-readable name for the issuer, shown in the wallet. |
| `directIssueAllowed` | Whether this issuer may push credentials **directly** (unattended) into the wallet. Must be `true` for direct issue to succeed. |
A trusted contact always belongs to a single wallet, it authorises an issuer for **that
wallet only**.
##### Register a trusted contact
Add a trusted contact to a wallet before issuing directly into it:
```http
POST /api/wallets/{walletExternalKey}/trusted-contacts
Content-Type: application/json
```
```json
{
"did": "did:web:wallet.credenco.com:issuer:credenco",
"name": "Credenco",
"directIssueAllowed": true
}
```
The response echoes the stored contact:
```json
{
"id": 42,
"did": "did:web:wallet.credenco.com:issuer:credenco",
"name": "Credenco",
"directIssueAllowed": true,
"createdAt": "2026-06-07T10:15:30",
"lastModifiedAt": "2026-06-07T10:15:30"
}
```
See the [Create Trusted Contact API reference](https://docs.credenco.com/docs/api-generated/create-trusted-contact/) for the full
schema and status codes.
:::info[Which DID do I register?]
Register the **issuer DID**, the DID configured on the issuer template that mints the
credential, not the holder wallet's DID. When the wallet receives a directly-issued
credential, it reads the credential's issuer (`iss`) and looks for a matching trusted contact.
:::
##### How the trust check protects the wallet
The OIDC offer endpoint is reachable by any caller, so direct issue cannot rely on the caller's
identity alone. Instead the wallet validates the credential **after** the unattended OpenID4VCI
exchange completes:
1. The credential offer is accepted unattended and a credential is issued into the wallet.
2. The wallet extracts the **issuer DID** from the newly issued credential.
3. It looks up the trusted contacts for that wallet and checks whether any of them matches the
issuer DID **and** has `directIssueAllowed = true`.
4. If a match is found, the credential is **kept**. If not, the credential is **immediately
deleted** and never becomes visible to the holder.
```mermaid
flowchart TD
A[Credential issued unattended] --> B{Issuer DID matches a trusted contact?}
B -- No --> D[Credential deleted]
B -- Yes --> C{directIssueAllowed = true?}
C -- No --> D
C -- Yes --> E[Credential kept in wallet]
```
This means the trust decision lives entirely with the **receiving wallet**. An issuer cannot
force a credential into a wallet that has not opted in by registering it as a trusted contact.
##### Next step
With the issuer registered as a trusted contact, you can
[issue a credential directly into the wallet](https://docs.credenco.com/docs/guide/direct-issue/issue-directly-to-wallet/).
### Issue a Credential Directly to a Wallet
https://docs.credenco.com/docs/guide/direct-issue/issue-directly-to-wallet/
#### Issue a Credential Directly to a Wallet
Push a verifiable credential unattended into a Business Wallet using the directIssue REST API endpoint.
Call the Start Issue Credential API with the template key and the credential attributes, without requesting a qr_code, to obtain a credential_offer_uri.
Post the offer to the wallet’s OIDC offer endpoint with directIssue=true, passing the credential_offer_uri you extracted.
Use the Get Issue Status API with your correlation_id to confirm issuance and retrieve the revocation_uuid.
This page walks through pushing a credential into a Business Wallet **unattended**, no QR
code, no redirect, no accept step. It is a two-call sequence:
1. Create a credential offer with the **Start Issue Credential** API.
2. Push that offer into the target wallet with `directIssue=true`.
##### What is direct issue?
Direct issue is a way to place a verifiable credential straight into a wallet through two API calls, without the holder scanning a QR code or tapping accept. The credential appears immediately, but only if the issuer was first registered in the target wallet as a trusted contact with direct issue allowed; otherwise the wallet silently discards it.
##### Preconditions
- A [credential template](https://docs.credenco.com/docs/guide/credential-issue/create-credential-template/) is configured for
the credential you want to issue.
- [OAuth2 or an API key](https://docs.credenco.com/docs/api/authentication/) is enabled for your backend.
- The issuer is registered in the **target wallet** as a
[trusted contact](https://docs.credenco.com/docs/guide/direct-issue/trusted-contacts/) with `directIssueAllowed = true`. Without this, the
credential is accepted and then discarded.
- You know the **`walletExternalKey`** of the target wallet.
##### Step 1: Create the credential offer
Call the [Start Issue Credential](https://docs.credenco.com/docs/api-generated/start-credential-issuance/) API with the template key and the
credential attributes. Unlike the QR flow, you do **not** request a `qr_code`.
```http
POST /api/v2/credential/issue
Content-Type: application/json
```
```json
{
"correlation_id": "89cba89",
"template_id": "ebw_oid",
"claims": {
"id": "90004760",
"name": "CoolSoft B.V.",
"issuing_authority": "Credenco",
"issuing_country": "NL"
}
}
```
The response contains the credential offer URI:
```json
{
"correlation_id": "89cba89",
"request_uri": "openid-credential-offer://?credential_offer_uri=https://wallet.credenco.com/api/oidc/credential-offer/abc123",
"status_uri": "https://wallet.credenco.com/api/v2/issue/89cba89"
}
```
You only need the **`credential_offer_uri`** query parameter from `request_uri` for the next
step. Parse it out of the `request_uri` and URL-decode it.
##### Step 2: Push the offer into the wallet
Post the offer to the wallet's OIDC offer endpoint with `directIssue=true`, passing the
`credential_offer_uri` you extracted:
```http
POST /api/oidc/offer/{walletExternalKey}?directIssue=true&credential_offer_uri=https%3A%2F%2Fwallet.credenco.com%2Fapi%2Foidc%2Fcredential-offer%2Fabc123
```
| Parameter | In | Description |
|-----------|----|-------------|
| `walletExternalKey` | path | External key of the **target** wallet. |
| `directIssue` | query | Set to `true` for unattended issue. Omit it to drop the offer in the [inbox](https://docs.credenco.com/docs/guide/direct-issue/inbox/) instead. |
| `credential_offer_uri` | query | The URL-encoded `credential_offer_uri` extracted from the `request_uri` in step 1. |
The endpoint responds with `201 Created`. Behind it, the wallet:
1. Completes the OpenID4VCI exchange on the holder's behalf, with no user interaction.
2. Verifies the issuer DID against the wallet's [trusted contacts](https://docs.credenco.com/docs/guide/direct-issue/trusted-contacts/).
3. Keeps the credential if the issuer is trusted, or discards it if not.
:::info[Why two calls?]
The first call mints the credential offer from your issuer. The second call delivers that offer
to a specific wallet. Splitting them lets the same offer mechanism serve both the attended
(QR / redirect) flows and this unattended one, the only difference is `directIssue=true`.
:::
##### Step 3: Check the result
Use the [Get Issue Status](https://docs.credenco.com/docs/api-generated/get-credential-issuance-status/) API with your `correlation_id` to
confirm issuance and retrieve the `revocation_uuid` (needed later to revoke the credential, if
a status list is configured):
```json
{
"status": "issue_request_created",
"correlation_id": "89cba89",
"revocation_uuid": "0e2c1f62-3392-462e-a25e-483fa0e2a3a3"
}
```
:::warning[Trust is enforced silently]
If the issuer is not a trusted contact of the target wallet, the OIDC offer endpoint still
returns `201` and issuance still reports success, but the wallet discards the credential, so
it never appears to the holder. Always register the [trusted contact](https://docs.credenco.com/docs/guide/direct-issue/trusted-contacts/)
first.
:::
##### Worked example: a company credential
This sequence places the `ebw_oid` company
credential into a new Business Wallet:
1. The backend collects the official company info (CoC number, legal name).
2. It calls `POST /api/v2/credential/issue` with `template_id: "ebw_oid"` and the company
claims (`id`, `name`, `issuing_authority: "Credenco"`, `issuing_country: "NL"`).
3. It extracts the `credential_offer_uri` from the response and posts it to
`POST /api/oidc/offer/{walletExternalKey}?directIssue=true`.
4. Because Credenco is a trusted contact of the wallet, the credential is retained and is
present the first time the user opens their wallet.
### The Wallet Inbox
https://docs.credenco.com/docs/guide/direct-issue/inbox/
#### The Wallet Inbox
The **inbox** is the *attended* counterpart to [direct issue](https://docs.credenco.com/docs/guide/direct-issue/issue-directly-to-wallet/).
When you push a credential offer to a wallet **without** `directIssue=true`, the wallet does
not accept it automatically. Instead it stores the offer as an inbox item that the holder can
review and accept later.
##### How does the inbox differ from direct issue?
Both paths push a credential offer to the same OIDC offer endpoint; the only difference is the `directIssue` flag. With `directIssue=true` the wallet pulls and accepts the credential automatically, no holder action needed. Without it, the offer waits in the inbox until the holder reviews and accepts it themselves.
| | Direct issue | Inbox |
|---|---|---|
| Request | `POST /api/oidc/offer/{key}?directIssue=true&credential_offer_uri=...` | `POST /api/oidc/offer/{key}?credential_offer_uri=...` |
| User interaction | None, accepted unattended | Holder reviews and accepts in the wallet |
| Trust requirement | Issuer must be a [trusted contact](https://docs.credenco.com/docs/guide/direct-issue/trusted-contacts/) with `directIssueAllowed = true` | None, the holder decides |
| Result | Credential appears immediately (if trusted) | Offer waits in the inbox until the holder acts |
Choose **direct issue** when provisioning a wallet you control (such as during onboarding).
Choose the **inbox** when the holder should stay in control of what enters their wallet.
##### Item lifecycle
When an offer is delivered without `directIssue`, the wallet stores it as an inbox item that
moves through these states:
```mermaid
flowchart LR
NEW -->|holder opens the item| READ
READ -->|holder accepts or dismisses| PROCESSED
```
- **NEW**, just received, not yet viewed. Counts towards the unread badge.
- **READ**, the holder has opened the item.
- **PROCESSED**, the offer has been accepted (or dismissed) and needs no further action.
## Credential Status
### Credential status and revocation
https://docs.credenco.com/docs/guide/credential-status/status-lists/
#### Credential status and revocation
A credential is signed once and then lives in the holder's wallet. If the credential later becomes untrue, for example because an employee leaves or a registration is withdrawn, you cannot take it back. A **credential status list** solves this. The wallet publishes a list that verifiers check while verifying a credential, and you flip an entry on that list when a credential should no longer be accepted.
Revocation therefore requires two things:
1. A status list configured in this wallet.
2. A credential template that is linked to that status list, **before** the credential is issued.
:::warning[Link the status list first]
Only credentials issued while the template was linked to a status list can be revoked. Existing credentials issued without a status list stay valid forever and show no revoke action.
:::
##### How to access
1. Open the left sidebar.
2. Click **Settings**.
3. Under **Issuer**, click **Credential status**.
##### Status lists overview
The **Credential Status Lists** screen lists every status list configured for this wallet, with its **Name**, **Type**, and **Purpose**. Click a row to open and edit a list.
As long as no list is configured, the screen shows an empty state with a **Create status list** button.
##### Create a status list
1. Click **Create status list**.
2. Enter a **Name**, a logical name so you can recognise the list later.
3. Choose the **Type** of list.
4. Choose the **Purpose** of the list.
5. Choose the **Identifier that signs the list**.
6. Click **Save configuration**.
**Key elements:**
- **Type**: the status list format published to verifiers. Choose **Token Status List** or **Status List 2021**, see [Choosing a status list type](#choosing-a-status-list-type) below.
- **Purpose**: **Revocation** for a permanent withdrawal, or **Suspension** for a status that can be lifted again.
- **Identifier that signs the list**: the identifier of this wallet whose key signs the published list. Verifiers use it to confirm the list really comes from you.
###### Choosing a status list type
Both types work the same way. The wallet publishes one compressed list at a public URL, every issued credential points at that list plus its own position in it, and a verifier fetches the list and reads the entry at that position. They differ in the format of the published list and in which specification defines it, so the choice depends on what the wallets and verifiers in your ecosystem support.
| | Token Status List | Status List 2021 |
|---|---|---|
| Specification | [OAuth Status List](https://datatracker.ietf.org/doc/html/draft-ietf-oauth-status-list) (IETF) | [Status List 2021](https://w3c-ccg.github.io/vc-status-list-2021/) (W3C CCG) |
| Published as | A signed JWT containing a `status_list` object | A verifiable credential with a `StatusList2021` credential subject |
| Reference in the credential | A `status_list` entry with the list `uri` and the index `idx` | A `credentialStatus` entry with the list URL and the index |
| Entry size | 1 bit for revocation, 2 bits for suspension | 1 bit |
**Token Status List** is the newer of the two and is the format used by SD-JWT VC and the interoperability profiles built on it, such as DIIP and HAIP. Choose it unless you have a reason not to.
**Status List 2021** is the older W3C Credentials Community Group format, used by ecosystems built around W3C JSON-LD verifiable credentials. Choose it when you issue to verifiers that expect that format. Note that its successor at W3C is [Bitstring Status List](https://www.w3.org/TR/vc-bitstring-status-list/), which the Business Wallet does not offer.
:::info[Required permission]
You need the **Status list (Change)** permission to create or edit status lists.
:::
##### Link a status list to a credential template
A status list does nothing until a credential template uses it.
1. Go to **Settings → Templates** under **Issuer**.
2. Open the issuer template and then the credential template you want to make revocable.
3. Open the **Status** tab.
4. Select the credential status list.
5. Click **Save configuration**.
Every credential issued from this template from now on carries a reference to the list, so its status can be changed later. See also [Create Credential Template](https://docs.credenco.com/docs/guide/credential-issue/create-credential-template/).
##### Revoke an issued credential
1. Open **Issued** in the left sidebar under **Issuer**.
2. Click the credential you want to revoke.
3. Click **Revoke credential**.
4. Confirm with **Yes**.
The confirmation dialog warns that the action cannot be undone.
After revoking, the credential's **Status** changes from **Valid** to **Invalid**.
:::info[Required permission]
You need the **Issue credentials (Change)** permission to revoke a credential.
:::
##### Revoke from your backend
Revocation is also available through the API.
When you issue a credential from a template that is linked to a status list, the issue response contains a `revocation_uuid`. Store it together with your own administration, because it is the handle you need later.
To revoke the credential, call:
```
POST /api/credential/revoke/{revocationUuid}
```
A `200` response means the credential was revoked. A `404` means no credential was found for that UUID.
See the [Revoke Credential](https://docs.credenco.com/docs/api-generated/revoke-credential/) API reference for the full specification.
##### What the holder and verifier see
- The credential stays in the holder's wallet. Revoking does not delete it.
- A verifier that checks the credential against the published status list sees that it is no longer valid and rejects it.
##### Notes and limitations
- A credential can only be revoked if it was issued with a status list linked to its template. For credentials without one, the **Revoke credential** action is not shown.
- Revocation cannot be undone. Use a status list with purpose **Suspension** if you need a status that can be lifted again.
- Each status list is signed by one identifier. If that identifier is removed or its key is replaced, verifiers can no longer validate the published list.
## Receive Credentials
### How to Receive Credentials
https://docs.credenco.com/docs/guide/verifier-template/intro/
#### Receive Credentials Guide
##### How do I receive verifiable credentials from a customer?
Receiving credentials in the Business Wallet always follows the same two-step process: first define which credentials you want to receive by creating a verifier template, then trigger a verification request from your backend whenever you need a customer to share those credentials. Each step is covered in its own guide below.
The two steps are:
1. [Create a verifier template](#create-a-verifier-template) - define which credentials you want to receive
2. [Receive credentials](#receive-credentials) - start a verification request from your backend
##### Create a verifier template
A **verifier template** (called **Receive credential configuration** in the UI) defines which credentials you want to receive from a customer in a single verification flow. You can create a different template for each use case.
For a Know Your Customer (KYC) onboarding flow you may want to receive credentials that prove:
- The Deed of Incorporation of the customer
- The LPID of the customer
- The Tax Registration Statement of the customer
See [Create Verifier Template](https://docs.credenco.com/docs/guide/verifier-template/create-verifier-template/) for the full walkthrough.
##### Receive credentials
Once you have a verifier template, call the [Universal OIDC4VP API](https://docs.credenco.com/docs/api-generated/start-oid-4-vp-authorization-request/) from your backend with the **Verifier template key** to start a verification request. The customer is redirected to their wallet, picks the matching credentials, and is returned to your **Success URL** when the credentials are received - or to your **Error URL** if something goes wrong.
Received credentials and their attributes are visible in the wallet under **Verifier → Received data**.
### Create a Verifier Template
https://docs.credenco.com/docs/guide/verifier-template/create-verifier-template/
#### Create Verifier Template
A **verifier template** (shown as **Receive credential configuration** in the UI) defines which credentials you want to receive from a customer in a single verification flow. You can create a different template for each use case.
Assume you want to onboard a new customer. For your Know Your Customer (KYC) use case, you need to receive credentials to prove:
- The Deed of Incorporation of the customer
- The LPID of the customer
- The Tax Registration Statement of the customer
##### What is a verifier template?
A verifier template is the configuration that defines which credentials, and which attributes of those credentials, you want to receive from a customer in a single verification flow. You create one template per use case - for example, one for KYC onboarding and a different one for a mortgage application - and reference it by key when you start a verification request.
##### Open the verifier templates list
Navigate to the verifier templates list before creating a new verifier template.
1. Open **Settings**.
2. Under **Verifier**, select **Templates**.
The table lists the existing templates with their **Name**, **Description**, and **Technical key**. Use the **Search** box above the table to filter the list by name, description, or technical key.
From here you can:
- **Create new**: start from a blank template
- **Import**: import a verifier template that was previously exported
Click a row to open and edit an existing template.
##### Verifier template form
A verifier template is grouped into four sections: **Technical details**, **Technical configuration**, **Policies**, and **Configure Credentials**.
The top-right actions let you switch the template to a custom definition with **Customize definition…**, **Test** the template, **Export** it to JSON, or **Delete** it.
##### Technical details
Describe what this template is for. These fields are only used in the UI and in the consent screen shown to the wallet user.
- **Name** *(required)*: A logical name of the configuration.
- **Description**: A short description that helps you find the template later.
- **Purpose** *(required)*: The text shown to the wallet user explaining why you are asking for the credential(s).
##### Technical configuration
Configure the protocol details used during the credential exchange.
- **Interop profile** *(required)*: The interoperability profile that defines the protocol versions used between the verifier and the wallet. Pick from:
- `DIIP V3`
- `DIIP V4`
- `DIIP V5`
- `HAIP`
See the [DIIP specification](https://fidescommunity.github.io/DIIP/) for details on the DIIP profiles, or the [OpenID4VC High Assurance Interoperability Profile](https://openid.net/specs/openid4vc-high-assurance-interoperability-profile-1_0.html) for HAIP.
- **Response mode** *(optional)*: How the wallet sends its answer back. Leave this empty to let the calling application decide. Choose `direct_post.jwt` when the wallet requires an encrypted response; some wallets, such as France Identité, refuse to answer otherwise.
- **Verifier template key** *(required)*: A unique key for this template. Pass this key to the [Universal OIDC4VP API](https://docs.credenco.com/docs/api-generated/start-oid-4-vp-authorization-request/) to identify which template to use.
- **Success URL** *(required)*: The URL the user is navigated to after the credential(s) are successfully received.
- **Error URL** *(required)*: The URL the user is navigated to when something went wrong receiving the credential(s).
- **Client identifier** *(required)*: The identifier used to authenticate the verifier to the wallet. Pick one of the identifiers configured under **Settings → Identifiers**.
:::note
Only DID and X.509 identifiers can be used as a client identifier. JWK identifiers are not supported.
:::
##### Policies
The **Policies** section decides which checks are applied to the credentials and the presentation you receive. Checks marked **Recommended** are switched on by default.
Each group shows a summary, either "All recommended checks active" or "*N* recommended checks not active". Click **Show details** to open a group and change the individual checks.
:::info[Signature check]
The signature check is always applied to both the credential and the presentation. It cannot be switched off.
:::
###### Credential policies (VC)
Checks applied to each individual credential you receive.
- **Expiration check** *(recommended)*: Checks that the credential has not expired based on its validity date.
- **Not yet valid check** *(recommended)*: Checks that the credential is already valid and not dated in the future.
- **Revocation check** *(recommended)*: Checks that the credential has not been revoked by the issuer.
- **Trusted issuer check** *(recommended)*: Checks that the credential's issuer is on the list of trusted issuers. Maintain that list under **Settings → Trusted issuers**.
###### Presentation policies (VP)
Checks applied to the presentation as a whole.
- **Expiration check** *(recommended)*: Checks that the presentation has not expired.
- **Holder binding check**: Checks that the presentation was submitted by the same party the credential was issued to.
##### Configure Credentials
The **Configure Credentials** section lists every credential the template requests. Click **Add Credential** to add one.
Search the catalogue and pick a credential. Each credential you add gets its own card showing the issuer, the credential name, and which credentials it matches, for example "Select all Credentials of type *OprichtingsAkte* and format *jwt_vc_json*".
For each credential you can configure:
- **Required**: Whether the customer must provide a credential of this type. When not set, the credential is optional.
- **Multiple**: Whether the customer may provide multiple credentials of this type (for example, multiple `Diploma` credentials). When not set, only one credential of this type can be provided.
- **Requested attributes**: For credential formats that support selective disclosure, pick which attributes you want to receive. Attributes not selected may still be provided but are optional.
Use the **Delete** button on a credential card to remove it from the template.
##### Edit the presentation definition directly
The visual builder covers most use cases. When you need something it cannot express, click **Customize definition…** in the top-right of the form and confirm.
The **Configure Credentials** section is then replaced by a `presentation-definition.json` editor. The editor shows whether the document is currently **Valid JSON** or **Invalid JSON**.
While a custom definition is active, the top-right button changes to **Use visual builder…**.
:::warning[Switching back discards your JSON]
Switching back to the visual builder regenerates the presentation definition from the selected credentials and discards your custom JSON when you save. This cannot be undone.
:::
##### Save
Click **Save configuration** at the bottom of the form to apply your changes, or **Cancel** to discard them. A "Save to apply changes" hint appears when you have unsaved edits.
##### Test the template
Once the template is saved, use **Test** in the top-right of the form to run a real verification request against it, without writing any code.
The test screen offers two ways to present credentials:
- **Cross-device flow**: scan the QR code with a wallet on another device, typically a phone.
- **Same-device flow**: click **Test configuration** to open the request in a wallet on this device.
**Your wallet URL** controls which wallet the request is sent to. It defaults to the wallet you are signed in to. That wallet must actually hold the credentials your template asks for, otherwise there is nothing to present.
###### Present the credentials
The wallet shows a consent screen listing every credential it holds that matches the template.
Each card shows the issuer, a **Valid** badge, and the credential details. Tick the credential(s) you want to present, then click **Accept**. **Accept** stays disabled until you select at least one credential.
For credentials that support selective disclosure, the individual attributes have their own checkboxes. The attributes your template marked as requested are pre-selected and locked; the rest are optional and you can add them. Use **Show more** to see the remaining attributes.
Click **Reject** to refuse the request instead.
###### Read the result
After accepting, the test screen reports the outcome.
**Credential(s) successfully received** means the presentation passed every policy you enabled. Below the message the full `authorization_response` is shown, including the raw `vp_token` and the decoded `credential_claims`. This is the same payload your own backend receives from the [Universal OIDC4VP API](https://docs.credenco.com/docs/api-generated/start-oid-4-vp-authorization-request/), so it is a good way to check which attribute names and values you will actually get.
A test run is a real verification. The result is stored like any other, under **Verifier → Received data**.
:::note
Testing does not use your **Success URL** or **Error URL**. Those apply only when a verification is started from your own application.
:::
:::info[Required permission]
You need the **Verifier templates (Change)** permission to create, edit, or delete verifier templates.
:::
## Trusted Issuers
### Trusted Issuers
https://docs.credenco.com/docs/guide/trusted-issuers/trusted-issuers/
#### Trusted issuers
Anyone can issue a credential. Whether you should trust it depends on who issued it.
The **Trusted issuers** screen holds the answer for this wallet. Credentials in your wallet are checked against it, and a credential from an issuer that is not on the list is marked as untrusted.
:::caution[Defaults differ per credential format]
**mdoc credentials are never trusted by default.** An mdoc is only trusted once an **MDoc trust anchor** covers the certificate authority behind it.
**All other credentials are trusted by default, but only while nothing is configured.** As soon as a trusted issuer list is configured, every non-mdoc credential is checked against it and its issuer must appear on the list.
:::
##### Open the screen
1. Open **Settings**.
2. Under **Generic**, select **Trusted issuers**.
Trust is configured in three places, one per tab. The badge next to each tab name is the number of entries it holds.
- **ETSI trusted lists**: trust everything on a list somebody else publishes and maintains.
- **Local issuer lists**: trust a handful of issuers you name yourself, per credential type.
- **MDoc trust anchors**: trust the certificate authorities behind mdoc credentials.
The button in the top right follows the tab you are on: **New ETSI list**, **New issuer list**, or **New trust anchor**.
##### ETSI trusted lists
An ETSI TS 119 612 Trusted List is a signed, published catalog of issuers, maintained by a scheme operator such as a national supervisory body. Pointing your wallet at one means you trust every issuer on it, and you stay in step as the operator adds and removes entries.
Click **New ETSI list**.
- **URL** *(required)*: where the trusted list is published. The list itself is fetched from this address, so there is nothing else to fill in.
Click **Save configuration** to add it. Open an existing list from the table to change its URL or delete it.
Only entries the list publishes as granted attestation services are taken from it.
:::note
An ETSI trusted list is not scoped to a credential type: its issuers are trusted for every credential type. Use a local issuer list when you need trust limited to one type.
:::
##### Local issuer lists
Use a local issuer list when no published list covers your case: you know exactly which issuers you accept, and you want to say so yourself.
Each list is scoped to one credential type, so trusting an issuer for company certificates does not silently trust it for diplomas.
The table shows the **Name** and the **Credential type** of each list. Use the **Search** box to filter it, and click a row to open the list.
Click **New issuer list** to create one.
Under **List details**:
- **Name** *(required)*: a free format name, for your own use only.
- **Credential type** *(required)*: the type this list applies to, written exactly as it appears in the credential. For an SD-JWT credential that is its type identifier, for example `urn:eudi:eucc:1`. For a JSON-LD or JWT credential it is the last entry of the credential's type, for example `OprichtingsAkte`.
Under **Trusted issuer DIDs**, click **Add identifier** for every issuer you want to trust:
- **Name**: a free format name, so you can tell the identifiers apart.
- **Identifier**: the identifier (DID) of the issuer, for example `did:web:issuer.kvk.nl`.
Use the cross at the end of a row to remove an identifier. Click **Save** to apply the list.
:::tip[Where the credential type comes from]
Open a credential in your wallet and look at its type. That value, copied exactly, is what belongs in **Credential type**. A mismatch means the list never applies, and the credential stays untrusted.
:::
##### MDoc trust anchors
Mdoc credentials (ISO 18013-5, the format behind mobile driving licences and similar documents) do not name their issuer with an identifier. They are signed by a document signer, whose certificate chains up to the certificate of an issuing authority: the IACA certificate.
:::warning[No anchors means no mdocs]
Every mdoc presentation is rejected until an IACA certificate is trusted here. An empty tab is not a neutral setting.
:::
Click **New trust anchor**.
- **Name** *(required)*: a free format name for the issuing authority, for example `France Identité (preprod)`.
- **Certificate** *(required)*: the IACA certificate itself, pasted in PEM form, starting with `-----BEGIN CERTIFICATE-----`.
- **Active** *(on by default)*: whether this anchor counts. Switch it off to stop trusting an authority without deleting the certificate, which is useful while you are testing.
Click **Save** to add the anchor.
##### How the list is used
Trusted issuers are not enforced everywhere by default. A verifier template applies the check only when its **Trusted issuer check** policy is switched on. See [Create Verifier Template](https://docs.credenco.com/docs/guide/verifier-template/create-verifier-template/) for that setting.
:::info[Required permission]
You need the **Trusted issuers (View)** permission to open this screen, and **Trusted issuers (Change)** to add, edit, or delete entries.
:::
## Public Profile
### Public profile
https://docs.credenco.com/docs/guide/public-profile/public-profile/
#### Public profile
Your Business Wallet has one **public profile**: the identity other parties see when you share credentials or expose service endpoints. It holds your organisation's logo, name, contact details, and address, and it can also carry credentials you have chosen to publish.
Publishing a credential on the profile is how you prove something about your organisation without being asked first. A contact who looks up your identifier finds, for example, your Chamber of Commerce registration already attached to it.
:::info[Required permission]
You need the **Public wallet profile (View)** permission to open the profile, and **Public wallet profile (Change)** to edit it or to publish and remove credentials. See [Roles](https://docs.credenco.com/docs/guide/user-management/roles/).
:::
##### How to access
1. Open the left sidebar.
2. Under **Holder**, click **Public profile**.
The screen has three sections:
- **Profile information**: your identifier and the contact details you publish.
- **Credentials**: the credentials you have chosen to publish on the profile.
- **Services**: the service endpoints exposed by your default identifier.
As long as nothing is published, the **Credentials** and **Services** sections show an empty state with an **Add credential** and an **Add service** button.
##### Profile information
**Key elements:**
- **Identifier**: the identifier of your wallet that carries the profile. Use the copy icon to copy it, or the link icon to open the published identifier document that other parties fetch.
- **Address**: street, postal code, city, and country.
- **Phone**: the phone number contacts can reach you on.
- **Email**: shown as a mail link.
- **Website**: shown as a link that opens in a new tab.
Only the fields you filled in are shown. Empty fields are left out of the profile.
:::warning[Everything here is public]
The profile is meant to be read by other parties. Do not put anything in these fields that you would not publish on your own website.
:::
##### Edit the profile
1. Click **Edit information** at the top right.
2. Update the fields you want to change.
3. Click **Save**.
The form is split into three sections:
###### Identity
- **Change image**: upload the logo shown next to your organisation name. Click the logo to pick a new image.
- **Organization name** *(required)*: the name contacts see. This is also the name shown in the header of your wallet.
- **Website**: must start with `http://` or `https://`.
###### Contact information
- **Phone number**
- **Email**: must be a valid email address.
###### Address
- **Street**
- **Postal code** and **City**
- **Country**
While you have unsaved changes, the bar at the bottom shows **You have unsaved changes**. Click **Cancel** to discard them, or **Save** to publish them.
##### Publish a credential on the profile
1. In the **Credentials** section, click **Add credential**.
2. Pick the credential you want to publish.
The list shows the credentials in your wallet that are held by your profile identifier, each with its status. Use **Search credentials** to narrow the list down.
3. Choose which details to share. Every attribute with a checkbox in front of it is optional: tick the box to publish that attribute, leave it unticked to keep it private.
4. Click **Add to public profile**.
You return to the profile, where the credential now appears in the **Credentials** section. Click a credential to expand it and see exactly which attributes are published.
:::note[Not every credential can be filtered]
Only credentials that support selective disclosure show checkboxes. For other credentials all details are published as they are, so publish such a credential only if you are comfortable sharing all of it.
:::
You can also publish straight from a credential: open it from **Wallet**, and click **Add to public profile** on the credential detail screen. The button only appears for credentials that may be published.
##### Remove a credential from the profile
1. Click the credential in the **Credentials** section to expand it.
2. Click **Delete**.
3. Confirm with **Yes**.
The credential stays in your wallet. Only its publication on the profile is withdrawn, so other parties can no longer read it there.
##### Services
The **Services** section lists the service endpoints published by your default identifier, for example an endpoint used for communication or credential exchange. Click **Add service** to manage them on the identifier itself. Published credentials are exposed as an endpoint on that same identifier, which is how other parties can read them.
##### Manage the profile from your backend
The profile fields are also available through the API, so you can keep them in sync with your own systems. All three endpoints work on one wallet, identified by its external key.
| Endpoint | What it does |
|---|---|
| [Get public profile](https://docs.credenco.com/docs/api-generated/get-public-profile/) | Returns the current profile, including the wallet's external key. |
| [Update public profile](https://docs.credenco.com/docs/api-generated/update-public-profile/) | Replaces **all** profile fields. Fields you leave out are cleared. |
| [Partially update public profile](https://docs.credenco.com/docs/api-generated/patch-public-profile/) | Updates only the fields you send and leaves the rest untouched. |
The writable fields are `displayName` (required on a full update), `logo`, `website`, `phoneNumber`, `email`, `addressStreet`, `addressPostalCode`, `addressCity`, `addressCountry`, `geoLocationLatitude`, and `geoLocationLongitude`. The logo accepts either a URL, which is fetched and stored, or a base64 data URI.
Reading a profile requires the **Public wallet profile (View)** permission, writing it requires **Public wallet profile (Change)**.
Every successful update, through either endpoint, emits the `com.credenco.businesswallet.publicprofile.updated.v1` event with a full snapshot of the profile. See the [Event catalog](https://docs.credenco.com/docs/guide/integrations/event-catalog/) if you want to react to profile changes.
##### Notes and limitations
- Credentials are published and removed from the UI only. The API covers the profile fields, not the published credentials.
- The geo location fields are available through the API but are not shown in the UI.
- Changing the **Organization name** changes the name shown throughout your wallet, not only on the public profile.
## Catalog Sources
### Catalog Sources
https://docs.credenco.com/docs/guide/catalog-sources/catalog-sources/
#### Catalog sources
A **credential catalog** is an external, published list of credential types. Each type describes a credential: its name, its type identifier, the formats it comes in, and the attributes it carries.
The **Catalog sources** screen decides which catalogs this wallet works with. Credential types from a source only become visible once you select that source here. Once visible, a type can be picked when you create an issuer template or add a credential to a verifier template.
##### What are catalog sources?
A catalog source is an external registry, such as **Fides**, **WeBuild**, or the **EU catalogue (TS11)**, that publishes credential type definitions your wallet can use. Selecting a source on this screen makes its credential types available when you build issuer templates or verifier templates; deselecting it hides those types again without deleting anything already issued.
##### Open the screen
Navigate to the Catalog sources screen to choose which external credential catalogs the wallet works with.
1. Open **Settings**.
2. Under **Generic**, select **Catalog sources**.
Each row under **Available sources** is one catalog. Which catalogs appear depends on your deployment. The wallet above works with **Fides** and **WeBuild**; **EU catalogue (TS11)** is another source you may see.
:::info[What is TS11?]
TS11 is one of the technical specifications behind the European Digital Identity Wallet: *Specification of Interfaces and Formats for the Catalogue of Attestation Rulebooks and Attributes*. It defines how a registry publishes its catalog of credential types, so that any wallet can read any TS11 registry the same way. **EU catalogue (TS11)** is the European Commission's own registry; **WeBuild** is a separate registry that publishes in the same format.
See the [TS11 specification](https://github.com/eu-digital-identity-wallet/eudi-doc-standards-and-technical-specifications/blob/main/docs/technical-specifications/ts11-interfaces-and-formats-for-catalogue-of-attributes-and-catalogue-of-schemes.md) for the details.
:::
Every row shows:
- A **switch** to turn the source on or off for this wallet.
- The source name.
- A count of the visible types, for example `(17/17)`, meaning 17 of the 17 available types are visible.
- **Automatically add new types**: whether new types published by the source are added on their own.
- **Add new types**: reveals the types that were held back while **Automatically add new types** was off.
Below the sources sits a group called **Other**. It collects credential types that do not come from a selectable catalog, for example types you defined in this wallet yourself. It has no source switch, only type visibility.
##### Turn a source on or off
Flip the switch next to the source name.
Turning a source off hides all of its credential types. Existing templates that already use one of those types are unaffected, but you can no longer pick the type in a new template.
Changes are staged, not applied immediately. **You have unsaved changes** appears at the bottom of the screen. Click **Save** to apply them, or leave the screen to discard them.
##### Choose which credential types are visible
Click the arrow in front of a source to expand it.
Every type has a checkbox. A ticked type is visible in this wallet; unticking it hides that one type while keeping the rest of the source. Use **Select all** and **Deselect all** to flip the whole group at once.
:::note
The checkboxes only work while the source itself is switched on. When it is off, the list is dimmed and shows "Turn this source on to choose which credential types are visible."
:::
##### Inspect a credential type
Click the arrow in front of a credential type to see what it contains.
- **Description**: what the type is for, as published by the catalog.
- **Authority**: the party that publishes the type.
- **Type identifier**: the identifier used on the wire, for example `eu.we-build:contactperson:1`. Use the copy button to put it on your clipboard.
- **Formats**: the credential formats this type is published in, for example `dc+sd-jwt`.
- **Attributes**: the attributes the credential carries. **Label** is the human-readable name, **Path** is the attribute path in the credential, **Mandatory** says whether the issuer must fill it in, and **Selectively disclosable** says whether the holder can share the attribute on its own.
- **Category**: the catalog's own grouping, for example `business` or `finance`.
- **Language**: shown only when the catalog publishes the display texts in a language other than the one you are using.
##### Keep up with new types
Catalogs keep publishing. Two controls decide how your wallet follows along:
- **Automatically add new types** *(on by default)*: when the source publishes a new type, it becomes visible in this wallet on its own. Turn it off to keep the current selection fixed and add new types by hand.
- **Add new types**: makes visible, right now, every type that was held back while the switch above was off. Types you hid by hand stay hidden. Unlike the switches, this is an action and takes effect without saving. A message tells you how many types were added, or that there was nothing new.
:::note
**Add new types** is disabled while you have unsaved changes. Save or discard them first.
:::
:::info[Required permission]
You need the **Catalog (View)** permission to open this screen, and **Catalog (Change)** to change the sources or the type selection.
:::
## API Access
### Configure OAuth Clients for API Access
https://docs.credenco.com/docs/guide/api-access/intro/
#### OAuth client
The **API Access** screen lets administrators configure OAuth clients that allow external systems to authenticate against your wallet using the OAuth 2.0 Client Credentials flow.
Each client has its own client ID, a set of permissions, an expiry date, and optional notes - so you can grant different integrating parties exactly the access they need, for as long as they need it.
##### What is an OAuth client for?
An OAuth client lets an external system authenticate against your wallet's API using the OAuth 2.0 Client Credentials flow, without sharing a long-lived username or password. Each client has its own client ID, permission set, and expiry date, so you can scope exactly what an integrating party can access, and revoke that access at any time by deleting the client.
- [Add an OAuth client](#add-an-oauth-client) to grant an external system access to your wallet
- [Edit an OAuth client](#edit-an-oauth-client) to update its permissions, expiry date, or notes
- [Delete an OAuth client](#delete-an-oauth-client) to revoke access
##### Navigate to API Access
Go to **Settings → API access**.
The screen has two tabs:
- **OAuth2 API access** - OAuth clients (covered on this page)
- **API key API access** - simple Bearer-token API keys (see [API keys](https://docs.credenco.com/docs/guide/api-access/api-keys/))
The **OAuth2 API access** table lists all configured OAuth clients. Each row shows:
| Column | Description |
|---|---|
| **Client ID** | The unique identifier used during OAuth authentication |
| **Roles** | The permissions assigned to this client |
| **Expiry date** | The date after which this client is rejected |
| **Notes** | Optional context about the integrating party |
The **Wallet external key** is shown at the bottom of the screen - this value is part of the client ID and is used to scope the OAuth token to your wallet.
:::info[Required permission]
You need the **API access (View)** permission to view this screen, and **API access (Change)** to add, edit, or delete OAuth clients.
:::
##### Add an OAuth client
Click **Add API client** in the top right of the screen. The **Add API client** dialog opens.
Fill in the fields:
**Client ID** *(required)*
A unique identifier for this client. Choose something meaningful, such as the name of the integrating party or its purpose (e.g. `acme-backend` or `reporting-service`). This value cannot be changed after creation.
**Expiry date** *(required)*
The date on which this client expires. Defaults to one year from today. After the expiry date, the client can no longer obtain tokens.
**Notes** *(optional)*
Free-text field to record context about the client, such as the integrating party's name, contact person, or purpose.
**Permissions**
Select which permissions to assign to this client using the permissions grid. Each row represents a resource (such as **Holder credentials**, **Identifier**, **Trusted contacts**, **Issue credentials**, **API access**, **Wallet**, …) and has two checkboxes:
- **Change** - grants full create/read/update/delete access for the resource (and implicitly selects **View**)
- **View** - grants read-only access; can be selected independently
A few resources only have a **Change** column (for example **Send Invoices** and **Audit trail**) because read-only access is not meaningful for them.
Click **Save** to create the client. A dialog appears showing the generated **client secret**.
:::danger[Copy the secret now]
The client secret is only shown once. Store it securely - it cannot be retrieved afterwards.
:::
The new OAuth client now appears in the list.
##### Edit an OAuth client
Click the **pencil icon** on any row to edit an OAuth client.
You can update the **expiry date**, **notes**, and **permissions**. The client ID cannot be changed.
Click **Save** to apply the changes.
##### Delete an OAuth client
Click the **trash icon** on any row. A confirmation dialog appears.
Click **Yes** to permanently revoke access for this OAuth client.
##### Authenticate using an OAuth client
Use the **token endpoint** shown at the bottom of the **OAuth2 API access** tab to obtain an access token via the OAuth 2.0 Client Credentials flow.
Example request:
```http
POST {token-endpoint}
Content-Type: application/x-www-form-urlencoded
grant_type=client_credentials
&client_id=wallet-{wallet-external-key}-{your-client-id}
&client_secret={your-client-secret}
```
The returned `access_token` can then be passed as a `Bearer` token in API requests to your wallet.
### API Keys
https://docs.credenco.com/docs/guide/api-access/api-keys/
#### API key
API keys are an alternative to [OAuth clients](https://docs.credenco.com/docs/guide/api-access/intro/) for granting external systems access to your wallet. Each key has a name, a set of permissions, and an expiry date - so you can grant different integrating parties exactly the access they need, for as long as they need it.
Unlike OAuth clients, API keys use a simple Bearer token scheme and do not require an OAuth token exchange step.
##### What can you do with an API key?
An API key lets an external system authenticate against the Business Wallet REST API without an OAuth token exchange step. Each key carries its own name, permission set, and expiry date, so you can grant different integrating parties exactly the access they need, add new keys as integrations grow, and revoke access instantly by deleting the key.
- [Add an API key](#add-an-api-key) to grant an external system access to your wallet
- [Edit an API key](#edit-an-api-key) to update its permissions or expiry date
- [Delete an API key](#delete-an-api-key) to revoke access
##### Navigate to API keys
Go to **Settings → API access** and open the **API key API access** tab.
The table lists all configured API keys. Each row shows:
| Column | Description |
|---|---|
| **Name** | The name given to this API key |
| **Roles** | The permissions assigned to this key |
| **Expiry date** | The date after which this key is rejected |
Expired API keys are visually greyed out and flagged with a warning icon.
:::info[Required permission]
You need the **API access (View)** permission to view this screen, and **API access (Change)** to add, edit, or delete API keys.
:::
##### Add an API key
Click **Add API key** in the top right of the screen. The **Add API key** dialog opens.
Fill in the fields:
**Name** *(required)*
A name for this key. Choose something meaningful, such as the name of the integrating party or its purpose (e.g. `acme-backend` or `reporting-service`). This value cannot be changed after creation.
**Expiry date** *(required)*
The date on which this key expires. Defaults to one year from today. After the expiry date, the key is rejected.
**Notes** *(optional)*
Free-text field to record context about the key, such as the integrating party's name, contact person, or purpose.
**Permissions**
Select which permissions to assign to this key using the permissions grid. Each row represents a resource (such as **Holder credentials**, **Identifier**, **Trusted contacts**, **Issue credentials**, **API access**, **Wallet**, …) and has two checkboxes:
- **Change** - grants full create/read/update/delete access for the resource (and implicitly selects **View**)
- **View** - grants read-only access; can be selected independently
A few resources only have a **Change** column (for example **Send Invoices** and **Audit trail**) because read-only access is not meaningful for them.
Click **Save**. A dialog appears showing the generated **API key value**.
:::danger[Copy the key now]
The API key value is only shown once. Store it securely - it cannot be retrieved afterwards.
:::
The new API key now appears in the list.
##### Edit an API key
Click the **pencil icon** on any row to edit an API key.
You can update the **expiry date**, **notes**, and **permissions**. The name cannot be changed.
Click **Save** to apply the changes.
##### Delete an API key
Click the **trash icon** on any row. A confirmation dialog appears.
Click **Yes** to permanently revoke access for this API key.
##### Authenticate using an API key
Pass the API key value in the `x-api-key` header of your API requests:
```http
GET /api/...
x-api-key: {your-api-key-value}
```
## Manage Identifiers and Keys
### Import Cryptographic Keys from PKCS12 Files
https://docs.credenco.com/docs/guide/import-pkcs12-key/
#### Import a key from a PKCS12 file
##### What does importing a PKCS#12 key do?
Importing a PKCS#12 key lets you reuse a signing key you already own, instead of generating a new one in the wallet. You upload a PKCS#12 file containing one private and one public key, and the wallet stores it as a cryptographic key that credential issuance and DID operations can then sign with.
##### Importing a key
Importing your own existing keys to be used by the Business Wallet for signing credentials is possible.
You can import your keys from a PKCS#12 file. The file must contain **1 private and 1 public key**, and the file password must be the same as the private key password.
Import an existing signing key from a PKCS#12 file into the Credenco Business Wallet.
1. Open the main menu and click **Settings**.
1. In the settings menu, select **Identifiers**.
1. Open the **Cryptographic key** tab.
1. Click on the **Import key** button.
5. Fill in a **Display name** for the key. This name is shown in the wallet when key selection is needed.
1. Click **Choose** next to **PKCS#12 file** and select the PKCS#12 file from your computer.
1. Enter the password in **PKCS#12 password**. Make sure you are using the password that applies to both the PKCS#12 file and the private key inside it.
1. Click on the **Test import** button to check whether the key can be imported correctly.
9. When the test succeeds, a dialog shows the key details (key type, key ID, validity dates, subject and issuer DN). Review the details and click **OK** to close the dialog.
10. Click the **Save** button to import the key.
1. The key is imported and appears in the list on the **Cryptographic key** tab, ready to be used.
:::info[Required permission]
You need the **Identifiers (Read)** permission to view this screen, and **Identifiers (Change)** to import cryptographic keys.
:::
### Google Cloud KMS
https://docs.credenco.com/docs/guide/google-cloud-kms/
#### Google Cloud KMS
Google Cloud KMS allows you to store and manage your wallet's cryptographic signing keys in Google Cloud's infrastructure. You can choose between software-based or hardware (HSM) protection for your keys.
##### What is Google Cloud KMS used for in the wallet?
Google Cloud KMS is a cloud service that generates and stores cryptographic keys on your behalf, so the private key never has to live inside the wallet itself. Connecting the wallet to a Google Cloud KMS key lets it sign credentials and DID-based operations using that externally managed key, with either software or hardware (HSM) protection.
##### Prerequisites
Before you begin, make sure you have:
- A Google Cloud project with the [Cloud KMS API](https://cloud.google.com/kms/docs) enabled
- A service account with appropriate KMS permissions
- The service account credentials JSON file
##### Navigate to the key form
Open the cryptographic key form to create a new Google Cloud KMS key.
1. Click **Settings**.
2. Under **Generic**, click **Identifiers**.
3. Select the **Cryptographic key** tab.
4. Click **Create new key**.
##### Configure a Google Cloud KMS key
Fill in and save the Google Cloud KMS configuration for a cryptographic signing key.
Fill in the Project ID, Location ID, Key ring ID, Protection level, and Credentials JSON fields.
1. Select **Google Key Management Service** as the **Key type**.
2. Enter a **Display name** for the key. This name is shown in the wallet when key selection is needed.
3. Fill in the Google Cloud KMS configuration fields:
| Field | Description |
|---|---|
| **Project ID** | Your Google Cloud project identifier |
| **Location ID** | The Google Cloud region where the key ring is located (e.g. `europe-west4`) |
| **Key ring ID** | The name of the key ring that will contain the key |
| **Protection level** | Choose **Software** for software-based key storage, or **HSM** for hardware security module protection |
| **Credentials JSON** | Paste the full contents of your service account credentials JSON file |
###### Obtaining the Credentials JSON
The Credentials JSON is a service account key file that allows the wallet to authenticate with Google Cloud. To obtain it:
Create a Google Cloud service account key and export its credentials JSON for use in the wallet's Google Cloud KMS configuration.
Go to the Google Cloud Console.
1. Go to the [Google Cloud Console](https://console.cloud.google.com).
2. Navigate to **IAM & Admin** → **Service Accounts**.
3. Select an existing service account or create a new one.
4. Make sure the service account has the **Cloud KMS CryptoKey Signer/Verifier** role (or a custom role with equivalent permissions).
5. Click **Keys** → **Add Key** → **Create new key**.
6. Select **JSON** as the key type and click **Create**.
7. A JSON file will be downloaded. Open it and paste its full contents into the **Credentials JSON** field.
:::caution
Keep the credentials JSON file secure. It grants access to your Google Cloud KMS resources. Do not share it or commit it to version control.
:::
4. Click **Test connection** to verify that the wallet can connect to Google Cloud KMS with the provided configuration.
5. Click **Save** to create the key.
:::info[Required permission]
You need the **Identifiers (Read)** permission to view this screen, and **Identifiers (Change)** to create, edit, or delete cryptographic keys.
:::
## User Management
### User Management Overview
https://docs.credenco.com/docs/guide/user-management/overview/
#### User Management Overview
The Business Wallet includes user and role management features that let you control who has access to your wallet and what they can do. You can add and remove users, assign roles, and configure permissions to match your organization's needs.
##### What can you manage under user management?
User management lets you control who can access your Business Wallet and what they're allowed to do once inside. From the Settings screen you can add or remove user accounts, create authorization roles with specific permissions and assign them to users, and help a locked-out user regain access with a password reset email.
- [Manage users](https://docs.credenco.com/docs/guide/user-management/users/) - Add, edit, and remove users who can access your wallet
- [Manage roles](https://docs.credenco.com/docs/guide/user-management/roles/) - Create and configure authorization roles with specific permissions
- [Send a password reset email](https://docs.credenco.com/docs/guide/user-management/send-password-reset-email/) - Help a user regain access to their account
##### How to access
Navigate to the user and role management screens in the Credenco Business Wallet.
1. Open the left sidebar.
2. Click **Settings**.
3. Under **Team**, you will find **Users**, **Roles**, and **API access**.
### Users
https://docs.credenco.com/docs/guide/user-management/users/
#### Users
The **Users** screen lists every user who has access to your wallet. From here you can add new users, edit existing users, and remove users who no longer need access.
##### How do I manage who has access to my wallet?
Open the **Users** screen under Settings to see everyone who currently has access. From there you can add a new user and assign them a role, edit an existing user's details or role, or remove a user entirely to revoke their access - all without contacting support.
##### How to access
Navigate to the users screen in the Credenco Business Wallet.
1. Open the left sidebar.
2. Click **Settings**.
3. Under **Team**, click **Users**.
##### Users overview
The overview shows a table with every user who has access to the wallet. Each row shows the user's **Username** and **Email** address.
Click any row to open the user form and edit that user's details.
##### Add a user
Add a new user to the wallet and assign them at least one authorization role.
1. On the users overview, click **Add** in the top right.
2. Fill in the user's **First name**, **Last name**, and **Email**.
3. Under **Roles**, tick at least one role to assign to the user.
4. Click **Save**.
The new user will receive an email with a link to set their password and access the wallet.
##### Edit a user
Update a user's name, email, or assigned roles.
1. On the users overview, click the row of the user you want to edit.
2. Update the user's **First name**, **Last name**, or **Email** as needed.
3. Change the assigned **Roles** by ticking or unticking the role checkboxes.
4. Click **Save**.
##### Delete a user
Permanently remove a user's access to the wallet.
1. On the users overview, click the user you want to delete.
2. Click **Delete**.
3. Confirm the deletion when prompted.
##### Send a password reset email
From the user form in edit mode you can send a password reset email. See [Send Password Reset Email](https://docs.credenco.com/docs/guide/user-management/send-password-reset-email/) for details.
:::info[Required permission]
You need the **User management (Change)** permission to add, edit, or delete users. The **User management (View)** permission allows you to view the users list without making changes.
:::
### Roles
https://docs.credenco.com/docs/guide/user-management/roles/
#### Roles
An **authorization role** defines a group of permissions. A role can be assigned to one or more users, who then inherit all the permissions in that role. Roles are how you control what each user can see and do in the wallet.
##### What is a role for?
A role is a named group of permissions that you assign to one or more users, instead of configuring each user's access individually. Anyone assigned to a role inherits every permission it grants, so updating the role updates access for everyone who holds it - this is how you control what different users can see and do in the wallet.
##### How to access
Navigate to the authorization roles screen in the Credenco Business Wallet.
1. Open the left sidebar.
2. Click **Settings**.
3. Under **Team**, click **Roles**.
##### Roles overview
The **Authorization roles** screen lists every role configured for this wallet. Each row shows the role's **Name** and **Description**.
Click a row to open the role and edit its details.
##### Create a role
Create a new authorization role with a name, description, and set of permissions.
Tick the permissions to grant.
1. On the roles overview, click **Add** in the top right.
2. Enter a **Name** for the role.
3. Enter a **Description** explaining the purpose of the role.
4. Tick the permissions to grant (see [Configure permissions](#configure-permissions) below).
5. Click **Save**.
After saving, the **Members** tab becomes available so you can assign users to the role.
##### Edit a role
Update the name, description, or permissions of an existing role.
1. On the roles overview, click the role you want to edit.
2. The **Details** tab opens, showing the role's name, description, and permissions.
3. Update the fields as needed.
4. Click **Save**.
##### Configure permissions
Each role has a permissions matrix where you control what users with this role can do. Permissions are organized in rows, with up to two columns:
- **Change** - Allows the user to create, edit, and delete items.
- **View** - Allows the user to view items without making changes.
Ticking **Change** automatically ticks **View** as well.
###### Available permissions
| Permission | Description |
|---|---|
| **Holder credentials** | Read, receive and delete credentials |
| **Identifier** | Manage the identifiers used by this wallet |
| **Public wallet profile** | Configure the public wallet profile |
| **Trusted contacts** | Manage the trusted contacts |
| **Issue credentials** | Issue credentials from this wallet |
| **Issuer templates** | Manage the issuer templates |
| **Status list** | Manage the credential status list |
| **Trusted issuers** | Manage the issuers trusted by this wallet |
| **Verified credentials** | Show or delete credentials that are verified |
| **Verifier templates** | Manage the verifier templates |
| **Send Invoices** | Send invoices to trusted contacts |
| **Audit trail** | Show the audit trail of the wallet |
| **User management** | Manage the users of this wallet |
| **API access** | Manage the API access credentials of this wallet |
| **Inbox configuration** | Manage the inbox configuration of this wallet |
| **Integration channels** | Manage outbound integration channels (webhooks) for this wallet |
| **Integration deliveries** | View and manage outbound integration event deliveries for this wallet |
:::note
A few permissions only expose a single **Change** column - for example **Send Invoices** and **Audit trail** - because the nature of that feature does not require both levels of access.
:::
:::tip[API permissions]
The role required to call a specific API endpoint is documented on the API endpoint page itself, under the **Required Role** section in the endpoint description. For example, see the [Start issue Credential](https://docs.credenco.com/docs/api-generated/start-credential-issuance/) API.
:::
##### Manage members
The **Members** tab shows every user currently assigned to this role. The tab badge shows the member count.
###### Add a member
Assign a user to an authorization role from the role's Members tab.
1. Open a role and click the **Members** tab.
2. Click **Add**.
3. Select the user you want to add to the role.
###### Remove a member
Unassign a user from an authorization role from the role's Members tab.
1. Open a role and click the **Members** tab.
2. Click the delete icon next to the user you want to remove.
:::tip
You can also assign roles to a user from the [user form](https://docs.credenco.com/docs/guide/user-management/users/#edit-a-user) by ticking or unticking the role checkboxes.
:::
##### Delete a role
Permanently remove an authorization role and its associated permissions from every assigned user.
1. On the roles overview, click the role you want to delete.
2. On the **Details** tab, click **Delete** in the top right.
3. Confirm the deletion when prompted.
:::warning
Deleting a role removes the associated permissions from all users who were assigned to that role.
:::
:::caution[Don't lock yourself out]
Always ensure at least one user has a role with the **User management (Change)** permission. If no user has this permission, nobody will be able to manage users or roles, and you will need to contact support to regain access.
:::
:::info[Required permission]
You need the **User management (Change)** permission to create, edit, or delete roles. The **User management (View)** permission allows you to view the roles list without making changes.
:::
### Send Password Reset Email
https://docs.credenco.com/docs/guide/user-management/send-password-reset-email/
#### Send Password Reset Email
Wallet administrators can send a password reset email to any user directly from the user maintenance screen. The email contains a secure link that lets the user set a new password. This is useful when a user has forgotten their password or when an administrator wants to force a password change.
The email contains a time-limited link that allows the user to set a new password.
##### How do I help a user who forgot their password?
As a wallet administrator, you can send a password reset email to any user directly from their user form, without them needing to request it themselves. The email contains a time-limited, single-use link that lets the user set a new password, so they regain access without you ever seeing or handling their credentials.
- [Send a password reset email](#send-a-password-reset-email) to help a user regain access to their account
##### Navigate to the user form
Open a user's form before sending them a password reset email.
1. Open the left sidebar.
2. Click **Settings**.
3. Under **Team**, click **Users**.
4. Click on the user you want to send a password reset email to.
The user form opens in edit mode showing the user's first name, last name, email address, and assigned roles.
##### Send a password reset email
On the user form (edit mode), click the **Send password reset email** button.
A confirmation dialog appears asking you to confirm the action:
Click **Yes** to send the email. A success message appears confirming that the password reset email has been sent.
The user will receive an email with a link to set a new password. The link is time-limited and can only be used once.
:::info[Required permission]
You need the **User Maintenance (Change)** permission to see and use the **Send password reset email** button.
:::
## Guides
### Wallet Domain
https://docs.credenco.com/docs/guide/wallet-domain/
#### Wallet Domain
By default your Business Wallet is served under a Credenco hostname, for example `https://wallet.credenco.com`. A **wallet domain** lets you serve the same wallet under a hostname you own, such as `https://wallet.yourcompany.com`.
The custom domain is an addition, not a replacement: the wallet stays reachable on its original hostname as well.
##### Why configure your own domain
**Recognition and trust.** Everything a counterparty sees carries your name instead of your provider's: the login screen, the wallet UI, credential offer links, and the QR codes people scan with their wallet app. A holder who is asked to accept a credential from `wallet.yourcompany.com` has an obvious reason to trust it.
**`did:web` identifiers under your own domain.** A `did:web` identifier is derived from the hostname that publishes it. With a wallet domain you can create identifiers such as `did:web:wallet.yourcompany.com`, so credentials you issue are cryptographically anchored to a domain you control, and verifiers can trace them back to your organisation through DNS and your TLS certificate.
**Control over your own namespace.** Credential offer URIs, status list URLs, and DID documents are all served from your hostname. Relying parties can allow-list your domain, and you are not tied to a provider URL in anything you have published.
:::info[Requirements]
- You need the **Wallet domain (View)** permission to see this screen, and **Wallet domain (Change)** to register, verify, or remove a domain.
- You must be able to create DNS records for the hostname.
- The final activation step is performed by Credenco Operations; you cannot complete it on your own.
:::
##### Before you start
Pick a **subdomain**, for example `wallet.yourcompany.com`. A root (apex) domain such as `yourcompany.com` cannot be used, because DNS does not allow a CNAME record on an apex domain. If your DNS provider does not support CNAME on the hostname you want, look for an **ALIAS** or **ANAME** record type instead.
The hostname must be a domain you own, and it may not be a hostname belonging to the wallet provider.
##### Navigate to Wallet domain
Go to **Settings → Wallet domain**.
##### Step 1: register the hostname
Click **Add**. Fill in the **Hostname** field with the subdomain you want to use.
Click **Save**. The domain is created with status **Pending** and you are taken to its detail page.
:::warning[Existing identifiers are not migrated]
Saving the domain does **not** change your existing identifiers. See [Create a did:web identifier](#step-4-create-a-didweb-identifier) below.
:::
##### Step 2: add the DNS records
The detail page shows the two DNS records you have to create at your DNS provider. Both values can be copied with the copy icon next to them.
| Type | Name | Value | TTL |
|---|---|---|---|
| **TXT** | `_credenco-wallet.wallet.yourcompany.com` | the verification token shown on the page | 3600 |
| **CNAME** | `wallet.yourcompany.com` | the wallet hostname shown on the page | 3600 |
The **TXT** record proves that you own the hostname. The **CNAME** record points the hostname at the wallet.
:::tip[Relative versus absolute names]
Many DNS panels treat the name field as *relative to the zone* and append the zone themselves. In that case enter `_credenco-wallet.wallet` rather than the full `_credenco-wallet.wallet.yourcompany.com`. If you get it wrong, the verification message tells you exactly which name the record was found at and what to enter instead.
:::
##### Step 3: verify
Click **Verify DNS**. The TXT record is checked first, then the CNAME.
If a record is missing or wrong, the reason is shown above the table:
Fix the record and click **Verify DNS** again. DNS changes can take a while to propagate; if you just created the records, wait a few minutes before retrying.
When both records check out, the status becomes **Verified** and Credenco Operations is notified automatically. They add your hostname to the platform ingress, arrange the TLS certificate, and register the hostname with the identity provider. Once the hostname actually serves your wallet, the status changes to **Active** on its own.
You do not have to keep clicking **Verify DNS**. Newly registered domains are re-checked automatically every 30 minutes during the first 48 hours, and every domain is re-checked once every 24 hours after that.
###### Statuses
| Status | Meaning |
|---|---|
| **Pending** | Registered, but DNS ownership has not been proven yet. |
| **Verified** | DNS records are correct. Waiting for Credenco Operations to put the hostname into service. |
| **Active** | The hostname serves your wallet. Everything is done. |
| **Failed** | The DNS records no longer verify, for example because the TXT or CNAME record was changed or removed. Restore the records and the domain recovers automatically. |
The overview lists every registered domain with its status and the time it was last checked.
##### Step 4: create a `did:web` identifier
Registering a domain does not touch your identifiers. To issue or present credentials from the new hostname, go to **Settings → Identifiers** and create a **new** `did:web` identifier with the custom hostname as its domain.
Keep in mind:
- Existing identifiers keep working exactly as before, on their original hostname, for as long as that hostname stays configured.
- The domain must reach status **Active** before a `did:web` identifier that uses it can resolve.
- Credentials and references issued under an old identifier do **not** automatically transfer to the new one.
- The wallet remains reachable on its original hostname; the custom domain is an addition, not a replacement.
##### Remove a wallet domain
Open the domain and click **Delete**. Confirm with **Yes**.
The hostname is immutable, so removing and re-registering is also how you change a domain.
:::danger[Removing a domain that is already in use invalidates issued credentials]
A `did:web` identifier is published on its hostname. If you remove a wallet domain that a `did:web` identifier already uses, that identifier can no longer be resolved, and **every credential ever issued with it becomes invalid**: verifiers can no longer retrieve the DID document, so they cannot check the signature. The same applies if you delete the `did:web` identifier itself.
This cannot be undone by re-registering the domain later, because a new registration issues a new verification token and the identifier's keys are not restored. Only remove a wallet domain if no `did:web` identifier on it has been used to issue credentials, or if you accept that those credentials stop verifying.
:::
##### Monitor domain status from your own systems
Status changes are published as an integration event, so you do not have to watch the screen. Subscribe to **Wallet Domain Status Changed (v1)** on an [integration channel](https://docs.credenco.com/docs/guide/integrations/intro/). It carries the hostname plus the previous and new status.
## Integrations
### Integrations Overview
https://docs.credenco.com/docs/guide/integrations/intro/
#### Integrations Overview
Integrations let the Business Wallet push domain events to your own systems as soon as they happen - for example, when a wallet is created or a new identifier (DID, X509, JWK) is added. You no longer have to poll the REST API to find out what changed.
Every event is delivered as a CloudEvents 1.0 message in [binary HTTP mode](https://docs.credenco.com/docs/guide/integrations/cloudevents/#how-do-binary-and-structured-mode-differ) (for webhooks) or [structured mode](https://docs.credenco.com/docs/guide/integrations/cloudevents/#how-do-binary-and-structured-mode-differ) (for Kafka and JMS), so any CloudEvents-compatible receiver can parse it without custom code.
##### How a webhook integration looks
At a glance, an event flows from the Business Wallet to your own backend like this:
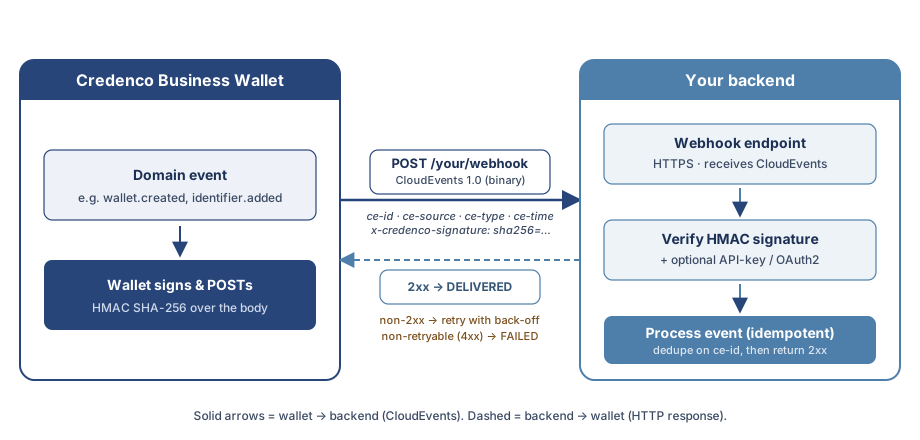
When a domain event happens, the wallet signs the payload with HMAC SHA-256 and POSTs a CloudEvents message to your endpoint. Your backend verifies the signature, dedupes on the CloudEvents `id`, and replies `2xx`. Anything else triggers a retry with exponential back-off - see [delivery semantics](#delivery-semantics) below.
##### What you can do
- Configure one or more [integration channels](https://docs.credenco.com/docs/guide/integrations/channels/) (webhook, Kafka, JMS, or a custom adapter) per wallet.
- Subscribe each channel to one or more event types from the [event catalog](https://docs.credenco.com/docs/guide/integrations/event-catalog/).
- Inspect every outbound message in the [Deliveries](https://docs.credenco.com/docs/guide/integrations/deliveries/) view, with the full request, response, and timing.
- Replay failed deliveries after fixing the receiver, or dismiss them once they are no longer relevant.
##### When should I use webhooks instead of Kafka or JMS?
Webhooks are the default for most customers because they work in SaaS and on-premise deployments and need no extra infrastructure beyond an HTTPS endpoint. Kafka and JMS suit on-premise deployments that already run that messaging middleware. Custom adapters let on-premise customers embedding the wallet bridge to other systems, like SNS or Pub/Sub.
| Channel | Available in | When to use | Notes |
|---|------------------------------|---|---|
| **Webhook** | SaaS + on-premise | The default. You expose an HTTPS endpoint; we POST CloudEvents to it. | Always available. HMAC SHA-256 signature is always on; API-key and OAuth2 client-credentials auth are optional. See [webhook authentication](https://docs.credenco.com/docs/guide/integrations/webhook-auth/). |
| **Kafka** | On-premise only | You already run a Kafka cluster and prefer log-based fan-out. | Requires the optional Kafka Maven dependency to be on the classpath. Structured-mode CloudEvents on the topic. |
| **JMS** | On-premise only | You run an enterprise message broker (ActiveMQ, IBM MQ, …) and want exactly-once-style delivery to a queue. | Requires the optional JMS Maven dependency. Structured-mode CloudEvents in the message body. |
| **Custom adapter** | On-premise (on request) only | You want to bridge wallet events to a system we do not ship - SNS, Pub/Sub, an internal pub/sub, etc. | Implement the channel SPI; see [on-premise integration](https://docs.credenco.com/docs/onpremise/integration/). |
##### Permissions
Four authorities control who can configure integrations and inspect their deliveries.
| Authority | Grants |
|---|---|
| `WALLET_INTEGRATION_CHANNEL_READ` | View configured channels and their settings (secrets are never returned). |
| `WALLET_INTEGRATION_CHANNEL_CRUD` | Create, edit, rotate secrets, and delete channels. Implies `READ`. |
| `WALLET_INTEGRATION_DELIVERY_READ` | View the deliveries log for any channel in the wallet. |
| `WALLET_INTEGRATION_DELIVERY_CRUD` | Replay or dismiss `FAILED` deliveries. Implies `READ`. |
Super-admins with `GLOBAL_WALLET_CRUD` can perform any of the above on any wallet.
##### Delivery semantics
Integrations are designed for reliability over speed.
- **At-least-once delivery.** Each delivery is recorded atomically with the event that produced it, so events are never lost - even if the wallet crashes immediately afterwards.
- **Retries with exponential back-off.** Failed deliveries are retried automatically with increasing delays. Non-retryable HTTP responses (e.g. `400`, `401`, `403`, `404`) move the delivery to `FAILED` immediately so they can be triaged.
- **Receivers must be idempotent.** Because of the at-least-once contract, the same event may be delivered more than once (for example, after a network blip or a wallet restart). Use the `id` field in the CloudEvents envelope as your dedupe key - it is stable across retries.
- **Ordering is best-effort, not guaranteed.** Two events from the same wallet may arrive at your receiver out of order; rely on `time` and your own state, not on receipt order.
##### Lifecycle of a delivery
Every outbound integration delivery moves through the following state machine:
```mermaid
stateDiagram-v2
[*] --> PENDING: created when an event is produced
PENDING --> DELIVERING: delivery picked up
DELIVERING --> DELIVERED: 2xx response / broker ack
DELIVERING --> FAILED: non-2xx, network error, or max retries exhausted
DELIVERING --> PENDING: retry back-off (attempts < max)
FAILED --> PENDING: replay (manual)
FAILED --> DISMISSED: dismiss (manual)
DISMISSED --> [*]
DELIVERED --> [*]
```
**State reference**
| State | Meaning |
|---|---|
| `PENDING` | The delivery is queued and waiting to be sent. Also the state used between automatic retries while attempts remain. |
| `DELIVERING` | The wallet is currently sending the delivery to the configured channel. |
| `DELIVERED` | The receiver acknowledged the delivery (HTTP `2xx` for webhooks, broker ack for Kafka / JMS). Terminal. |
| `FAILED` | All retry attempts exhausted, or a non-retryable error occurred (e.g. `4xx` other than `408` / `429`). The delivery is preserved with the last response code, body excerpt, and error message for diagnosis. |
| `DISMISSED` | An operator deliberately marked a `FAILED` delivery as no-longer-relevant. Terminal - these deliveries are excluded from cleanup and from the failed-deliveries metric. |
**Manual transitions (`FAILED` →)**
- **Replay** moves the delivery back to `PENDING` and resets the attempt count. It will be re-sent shortly afterwards.
- **Dismiss** moves the delivery to `DISMISSED`. The original payload and error are kept for audit but the delivery is no longer considered actionable.
Both transitions require the `WALLET_INTEGRATION_DELIVERY_CRUD` authority and are recorded in the audit log as `INTEGRATION` history events.
##### Where to next
- [Webhook authentication](https://docs.credenco.com/docs/guide/integrations/webhook-auth/) - HMAC, API-key, and OAuth2 details, with code samples.
- [Event catalog](https://docs.credenco.com/docs/guide/integrations/event-catalog/) - the v1 events emitted today.
- [CloudEvents envelope](https://docs.credenco.com/docs/guide/integrations/cloudevents/) - the wire format for every integration.
- [On-premise integration](https://docs.credenco.com/docs/onpremise/integration/) - Kafka, JMS, and custom-adapter configuration for self-hosted deployments.
### Channels
https://docs.credenco.com/docs/guide/integrations/channels/
#### Channels
An integration channel describes where and how the Business Wallet pushes domain events. Each channel has a destination, an event filter, optional authentication, and an HMAC signing secret that is used to sign every outbound message.
##### What is an integration channel?
An integration channel is a configured destination — typically a webhook URL — that the Business Wallet sends selected domain events to. Each channel defines its own event filter, optional authentication (API key or OAuth2), and a unique HMAC signing secret used to sign every message so your receiver can verify it came from Credenco.
##### How to access
Navigate to the integration channels screen in the Credenco Business Wallet.
1. Open the left sidebar.
2. Click **Settings**.
3. Under **Generic**, click **Integrations**.
4. The **Channels** tab is selected by default.
##### Channels overview
The Channels tab lists every integration channel configured for the wallet. Each row shows the channel's **Name**, **Type**, destination **URL**, whether it is **Enabled**, the **Created at** timestamp, and the **Last modified** timestamp.
Click on a row to open the channel form and edit its configuration. Use **New channel** in the top-right to create a new one.
##### Create a channel
Create a new integration channel to deliver domain events to your own systems.
Fill in the channel form (Basics, Event filters, Webhook configuration, and optional authentication).
The HMAC signing secret dialog appears. Copy the secret to your secret manager before closing the dialog - it is only shown once.
1. On the channels overview, click **New channel**.
2. Fill in the form (see [Channel form](#channel-form) below).
3. Click **Create**.
4. The **HMAC signing secret** dialog appears (see [HMAC signing secret](#hmac-signing-secret) below). Copy the secret to your secret manager **before** closing the dialog - it is only shown once.
5. Click **I have stored the secret** to return to the channels overview.
##### Channel form
The channel form is divided into sections. The same form is used for both creating and editing a channel.
###### Basics
- **Name** - A short, recognisable label for this channel. Shown in the channels list and in delivery logs.
- **Description** - Optional free-text note describing what the channel is for. Maximum 2048 characters.
- **Type** - The transport used to deliver events. **Webhook** is the only option available in the SaaS deployment. Kafka, JMS, and custom adapters are available only in on-premise deployments.
- **Enabled** - When unchecked, the channel is paused and no events are delivered. Existing deliveries are not retried.
###### Event filters
Tick the events that should be delivered to this channel. If no events are selected, the channel will not receive anything.
See the [event catalog](https://docs.credenco.com/docs/guide/integrations/event-catalog/) for the list of available events and their payload schemas.
###### Webhook configuration
- **URL** - The HTTPS endpoint that will receive the CloudEvents messages.
- **Custom headers** - Optional extra HTTP headers that will be sent with every request. Use **Add header** to add a row with a name and a value, and the bin icon to remove a row.
###### API key authentication (optional)
Tick **Send API key with each request** to send a static API key in a header on every webhook request.
- **Header name** - The HTTP header to put the API key in (defaults to `X-Api-Key`).
- **API key value** - The secret value.
###### OAuth2 client credentials (optional)
Tick **Use OAuth2 client credentials grant** to fetch a bearer token from your identity provider before each delivery and attach it to the webhook request.
- **Token URL** - The OAuth2 token endpoint of your identity provider.
- **Client ID**
- **Client secret**
- **Scope** - Optional space-separated list of OAuth2 scopes.
See [webhook authentication](https://docs.credenco.com/docs/guide/integrations/webhook-auth/) for how the receiver should validate these credentials.
##### HMAC signing secret
When you create a channel, a unique HMAC SHA-256 signing secret is generated. The Business Wallet uses this secret to sign every outbound message via the `X-Credenco-Signature` header so your receiver can verify it came from us.
:::warning[Store the secret immediately]
The HMAC secret is shown **once** at creation time. Copy it to your secret manager before closing the dialog. If you lose it, you will need to delete the channel and create a new one to obtain a new secret.
:::
See [webhook authentication](https://docs.credenco.com/docs/guide/integrations/webhook-auth/#hmac-sha-256-signature) for how to verify the signature on the receiver side.
##### Edit a channel
Update the configuration of an existing integration channel.
1. On the channels overview, click on the channel you want to edit.
2. Update the fields as needed.
3. Click **Save**.
In edit mode, two extra buttons appear below the form:
- **Send test message** - Send a sample CloudEvents message to the configured URL without affecting any real wallet data. See [Send a test message](#send-a-test-message) below.
- **Delete** - Remove the channel permanently. Existing deliveries for this channel are retained in the delivery log but no new deliveries will be created.
##### Send a test message
The **Send test message** action lets you verify your receiver is reachable and correctly configured without waiting for a real wallet event.
Send a sample CloudEvents message to a channel's receiver to verify it is reachable and correctly configured.
1. Open a channel in edit mode.
2. Click **Send test message**.
3. Choose an event from the **Choose an event** dropdown. The dialog shows a preview of the JSON payload that will be sent.
4. Click **Send test**.
The dialog then shows the result of the call: **Success** or **Failure**, the HTTP status code, the duration, and the request headers that were sent (including the CloudEvents `ce-*` headers and the `X-Credenco-Signature`).
Click **Send another** to try a different event, or **Close** to return to the channel form.
:::note
Test messages are not recorded as deliveries and do not appear in the [Deliveries](https://docs.credenco.com/docs/guide/integrations/deliveries/) view. They use the same HMAC signature and authentication settings as real deliveries.
:::
##### Delete a channel
Permanently remove an integration channel.
1. On the channels overview, click on the channel you want to delete.
2. Click the **Delete** button.
3. Confirm the deletion when prompted.
:::info[Required permissions]
Managing channels requires the integration channel authorities listed in the [Integrations overview - permissions](https://docs.credenco.com/docs/guide/integrations/intro/#permissions). Specifically, `WALLET_INTEGRATION_CHANNEL_CRUD` is required to create, edit, or delete channels; `WALLET_INTEGRATION_CHANNEL_READ` is enough to view the channels list.
:::
### Deliveries
https://docs.credenco.com/docs/guide/integrations/deliveries/
#### Deliveries
The Deliveries view shows every outbound integration message produced by this wallet. Use it to verify that real events are reaching your receiver, to triage failures, and to replay or dismiss problematic deliveries.
##### What is the Deliveries view?
The Deliveries view is a log of every outbound integration message a wallet has sent, showing the event type, destination channel, delivery state, and any errors. Use it to confirm real events are reaching your receiver, triage failures, and replay or dismiss deliveries that need attention.
##### How to access
Navigate to the deliveries screen to inspect outbound integration messages.
1. Open the left sidebar.
2. Click **Settings**.
3. Under **Generic**, click **Integrations**.
4. Click the **Deliveries** tab.
##### Deliveries overview
The Deliveries tab lists deliveries across all channels in the wallet. Each row shows:
- **Created at** - When the event was produced.
- **Channel** - The channel that handled the delivery.
- **Channel type** - `WEBHOOK`, `KAFKA`, `JMS`, or a custom adapter type.
- **Event type** - The CloudEvents `type` (for example `com.credenco.businesswallet.identifier.created.v1`).
- **State** - The current delivery state (see [Delivery states](#delivery-states) below).
- **Attempts** - The number of delivery attempts so far and the maximum.
- **Last error** - The last error reported by the receiver, when applicable.
Click on a row to open the [delivery details](#delivery-details).
##### Filter deliveries
Three filters are shown above the table:
- **Status** - Filter by one or more delivery states. The default value is **All active (excludes delivered & dismissed)**, which hides successful and dismissed deliveries to keep the list focused on work that may still need attention.
- **Channel** - Limit results to one specific channel.
- **Date and time range** - Limit results to a custom time window.
When no deliveries match the current filters, the table shows **No deliveries found.** Adjust the filters or wait for new events.
##### Delivery states
| State | Meaning |
|---|---|
| **Pending** | The delivery is queued but not yet sent. |
| **Delivering** | An attempt is currently in progress, or further retries are scheduled. |
| **Delivered** | The receiver responded with a `2xx` status. No further action needed. |
| **Failed** | All retry attempts have been exhausted or the receiver returned a non-retryable error. Action may be needed. |
| **Dismissed** | A user has explicitly marked the delivery as no longer relevant. |
See [Integrations overview - delivery semantics](https://docs.credenco.com/docs/guide/integrations/intro/#delivery-semantics) for the retry policy and how the state machine progresses.
##### Delivery details
Clicking a row opens the **Delivery details** screen, which shows the full context of a single delivery. The left card shows the metadata (event type, event ID, channel, attempt count, timestamps). The right side has three tabs.
###### Envelope tab
Shows the CloudEvents envelope and payload that was sent. This is the exact body the receiver would parse.
###### Headers tab
Lists the HTTP headers that were sent with the request, including the `ce-*` CloudEvents headers and the `X-Credenco-Signature` header used for HMAC verification. See [webhook authentication](https://docs.credenco.com/docs/guide/integrations/webhook-auth/) for the meaning of each header.
###### Audit tab
Reserved for future use. In a later release this tab will link the delivery to related entries in the wallet audit trail.
##### Replay or dismiss a delivery
Failed or stuck deliveries can be replayed (to retry them after fixing your receiver) or dismissed (to mark them as no longer relevant).
Re-queue failed deliveries after fixing your receiver, or dismiss deliveries that are no longer relevant.
1. On the deliveries overview, tick the checkbox next to one or more rows.
2. A bulk-action bar appears at the bottom of the table showing how many items are selected.
3. Click **Replay selected (N)** to re-queue the deliveries, or **Dismiss selected (N)** to mark them as dismissed.
:::tip[Tick the header checkbox]
Tick the checkbox in the table header to select every visible delivery at once, then refine with the filters before replaying or dismissing.
:::
:::note[Replay vs. retry]
Automatic retries with exponential back-off happen behind the scenes for any delivery in the `Delivering` state - you don't need to do anything to make those happen. **Replay** is for deliveries that have already moved to `Failed` (so retries are exhausted) or for `Delivered` deliveries you want to re-send.
:::
:::info[Required permissions]
Viewing the deliveries list requires `WALLET_INTEGRATION_DELIVERY_READ`. Replaying or dismissing deliveries requires `WALLET_INTEGRATION_DELIVERY_CRUD`. See [Integrations overview - permissions](https://docs.credenco.com/docs/guide/integrations/intro/#permissions) for the full table.
:::
### Webhook Authentication
https://docs.credenco.com/docs/guide/integrations/webhook-auth/
#### Webhook Authentication
Every webhook delivery from the Business Wallet carries an HMAC SHA-256 signature so your receiver can verify the message has not been tampered with and was sent by us. You can additionally configure an API key header and/or OAuth2 client_credentials to authenticate the sender against your existing infrastructure.
This page walks through each method, with verification samples in Node.js, Python, and Java.
##### How do the three webhook authentication methods compare?
The Business Wallet supports three ways to authenticate webhook deliveries: HMAC SHA-256 signing (always on, proves the body wasn't tampered with), a static API key header (simple, but proves nothing alone), and OAuth2 client_credentials (a Bearer token from your identity provider). They can be layered together, and most customers combine HMAC with API key or OAuth2.
| Method | Always on? | When to use | Security characteristics |
|---|---|---|---|
| **HMAC SHA-256 signature** | Yes - emitted on every webhook delivery | Default integrity + authenticity check for any webhook receiver. Recommended for all customers. | Verifies the body has not been tampered with and proves the sender knows the shared secret. Includes a timestamp (`t=`) so receivers can detect replay attacks. Two-secret rotation is supported: a previous secret remains valid for a one-hour grace window. |
| **API key** | Optional - configured per channel | Lightweight authentication for receivers that already gate inbound traffic on a custom header. Often paired with HMAC. | The shared key is sent verbatim in a custom HTTP header. Prefer pairing with HMAC; an API key alone proves nothing about the body. Rotate the key any time by updating the channel. |
| **OAuth2 client_credentials** | Optional - configured per channel | Receivers that already accept Bearer tokens minted by their own identity provider (Auth0, Azure AD, Okta, Keycloak, …). | The wallet fetches a token from the receiver's token endpoint using `client_id` + `client_secret` + optional `scope`, then attaches `Authorization: Bearer ` to each delivery. Tokens are cached server-side until 60 seconds before expiry. The credentials never leave the wallet; only short-lived bearer tokens cross the network. |
**Combining methods.** HMAC is always on. API key and OAuth2 are independent and may both be enabled on the same channel; in that case the request carries both the API-key header *and* the `Authorization: Bearer …` header in addition to the HMAC signature.
##### HMAC SHA-256 signature
Every outbound delivery includes the header:
```
X-Credenco-Signature: t=,v1=
```
- `t` is the time the signature was generated, in seconds since the Unix epoch.
- `v1` is the lower-case hexadecimal representation of `HMAC_SHA256(secret, ".")`.
The string that is signed is exactly `t`, then a literal `.`, then the raw HTTP body (no re-serialization). When you verify, do not parse the JSON first - operate on the bytes you received over the wire.
###### Verification recipe
Verify the X-Credenco-Signature header on an inbound webhook delivery to confirm it came from the Business Wallet and was not tampered with.
1. Read the `X-Credenco-Signature` header.
2. Split on `,` and parse the `t=` and `v1=` parts.
3. Reject the request if `t` is more than 5 minutes older or newer than your server clock - this prevents replay attacks.
4. Compute `expected = hex(HMAC_SHA256(secret, t + "." + body))`.
5. Compare `expected` with the received `v1` using a constant-time comparison. Never use `==` on strings here - that leaks timing information.
6. Return `2xx` if everything matches; otherwise `401` (or silently drop).
###### Dual-secret rotation
When you rotate a webhook secret in the wallet UI, the previous secret remains valid for one hour. During that grace window the wallet will sign every delivery with the new secret, but you should accept either signature. After the grace window expires, only the new secret is valid.
Implement rotation by holding two secrets on the receiver side: `current` and `previous`. Compute the expected signature with each, and accept the request if either matches.
###### Replay protection
The `t` timestamp is part of the signed string, so an attacker cannot tamper with it without invalidating the signature. Reject requests where `|now - t| > 300 seconds` to refuse replays of an old, captured request.
###### Node.js (pure `crypto`)
```javascript
const crypto = require('crypto');
function verifyCredencoSignature(rawBody, header, secrets, toleranceSeconds = 300) {
if (!header) return false;
const parts = Object.fromEntries(
header.split(',').map((kv) => kv.trim().split('=')),
);
const t = Number(parts.t);
const v1 = parts.v1;
if (!t || !v1) return false;
const skew = Math.abs(Math.floor(Date.now() / 1000) - t);
if (skew > toleranceSeconds) return false;
const signed = `${t}.${rawBody}`;
const v1Buf = Buffer.from(v1, 'hex');
// Try every known secret (current + previous, during rotation grace window).
return secrets.some((secret) => {
const expected = crypto
.createHmac('sha256', secret)
.update(signed)
.digest();
return (
expected.length === v1Buf.length &&
crypto.timingSafeEqual(expected, v1Buf)
);
});
}
```
In an Express handler, capture the raw body (e.g. via `express.raw({ type: 'application/json' })`) and pass `req.body.toString('utf8')` as `rawBody`.
###### Python
```python
import hashlib
import hmac
import time
def verify_credenco_signature(raw_body: bytes, header: str, secrets: list[str], tolerance: int = 300) -> bool:
if not header:
return False
parts = dict(part.strip().split("=", 1) for part in header.split(","))
try:
t = int(parts["t"])
v1 = parts["v1"]
except (KeyError, ValueError):
return False
if abs(int(time.time()) - t) > tolerance:
return False
signed = f"{t}.".encode("utf-8") + raw_body
for secret in secrets:
expected = hmac.new(secret.encode("utf-8"), signed, hashlib.sha256).hexdigest()
if hmac.compare_digest(expected, v1):
return True
return False
```
In a Flask app, read `request.get_data()` (which preserves the raw body) and pass it as `raw_body`.
###### Java (JDK 17+)
```java
import javax.crypto.Mac;
import javax.crypto.spec.SecretKeySpec;
import java.nio.charset.StandardCharsets;
import java.security.MessageDigest;
import java.time.Instant;
import java.util.HexFormat;
import java.util.List;
public final class CredencoSignatureVerifier {
private static final long TOLERANCE_SECONDS = 300L;
public static boolean verify(byte[] rawBody, String header, List secrets) throws Exception {
if (header == null) {
return false;
}
long t = -1L;
String v1 = null;
for (String part : header.split(",")) {
String[] kv = part.trim().split("=", 2);
if (kv.length != 2) continue;
switch (kv[0]) {
case "t" -> t = Long.parseLong(kv[1]);
case "v1" -> v1 = kv[1];
}
}
if (t < 0 || v1 == null) return false;
if (Math.abs(Instant.now().getEpochSecond() - t) > TOLERANCE_SECONDS) {
return false;
}
byte[] signedPrefix = (t + ".").getBytes(StandardCharsets.UTF_8);
byte[] received = HexFormat.of().parseHex(v1);
for (String secret : secrets) {
Mac mac = Mac.getInstance("HmacSHA256");
mac.init(new SecretKeySpec(secret.getBytes(StandardCharsets.UTF_8), "HmacSHA256"));
mac.update(signedPrefix);
byte[] expected = mac.doFinal(rawBody);
if (MessageDigest.isEqual(expected, received)) {
return true;
}
}
return false;
}
}
```
`MessageDigest.isEqual` performs a constant-time comparison since JDK 6u17.
##### API key
When configured, the wallet attaches a static value to a custom HTTP header on every delivery. You choose the header name (often `X-API-Key`) and the value when you create the channel. The wallet stores the value encrypted at rest and never returns it through the API.
Use API keys for receivers that already gate inbound traffic on a custom header, or as a second factor alongside HMAC. An API key alone proves nothing about the body - always combine it with HMAC verification.
To rotate, edit the channel and replace the value. Unlike the HMAC secret, API-key rotation is immediate - there is no grace window. Coordinate with the receiver before rotating.
##### OAuth2 client_credentials
For receivers that already accept Bearer tokens minted by their own identity provider (Auth0, Azure AD, Okta, Keycloak, …), the wallet can perform an OAuth2 client_credentials exchange and attach the resulting token to each delivery as `Authorization: Bearer `.
Configuration on the channel:
| Field | Description |
|---|---|
| **Token URL** | The receiver's OAuth2 token endpoint, e.g. `https://login.example.com/oauth/token`. |
| **Client ID** | The OAuth2 client identifier the wallet uses. |
| **Client secret** | The matching client secret. Stored encrypted at rest; never returned by the API. |
| **Scope** *(optional)* | A space-separated list of scopes to request. |
The wallet caches issued access tokens in memory until 60 seconds before their `expires_in` deadline, then transparently fetches a fresh token. There is no token-refresh round trip on every delivery, and tokens never leave the wallet - only the resulting Bearer header crosses the network.
If the token endpoint returns `4xx`, the delivery is marked `FAILED` immediately (it is not retried) and the response body excerpt is captured for diagnosis. Transient `5xx` and network errors are retried with the standard back-off.
:::tip[Layer auth methods]
HMAC, API key, and OAuth2 are independent. A common, conservative configuration is HMAC + OAuth2: HMAC proves the body is intact and was minted with the shared secret, while the Bearer token authenticates the wallet against your existing identity infrastructure.
:::
##### Where to next
- [Event catalog](https://docs.credenco.com/docs/guide/integrations/event-catalog/) - the events you will receive on a webhook.
- [CloudEvents envelope](https://docs.credenco.com/docs/guide/integrations/cloudevents/) - what the headers and body look like.
- [Integrations overview](https://docs.credenco.com/docs/guide/integrations/intro/) - channels, permissions, and delivery semantics.
### Event Catalog
https://docs.credenco.com/docs/guide/integrations/event-catalog/
#### Event Catalog
The Business Wallet emits a small, deliberately focused set of domain events to integration channels. Every event:
- Is wrapped in a [CloudEvents 1.0 envelope](https://docs.credenco.com/docs/guide/integrations/cloudevents/).
- Has a `type` ending in `.v` - backwards-compatible additions reuse the same major version, breaking changes mint a new one.
- Has a public JSON Schema at `${WALLET_BASE_URL}/api/public/schemas/integration//v1.json` (no authentication required) which is also pinned in the envelope's `dataschema` attribute.
##### What events does the wallet publish?
The Business Wallet publishes domain events covering wallet creation, identifier creation, credential issuance and revocation, credential receipt, presentation verification, public profile updates, and the audit trail. Each event carries a stable type ending in `.v1` and a public JSON Schema link. No event ever carries a credential document or the subject claims inside it; most carry business identifiers only, and the ones that carry personal data — contact details on `wallet.created.v1` and `publicprofile.updated.v1`, user activity on `audit.recorded.v1` — say so in their own section below.
| Event type | Trigger | `subject` pattern |
|---|---|---|
| `com.credenco.businesswallet.wallet.created.v1` | A Business Wallet is created. | `wallets/{walletExternalKey}` |
| `com.credenco.businesswallet.identifier.created.v1` | A wallet identifier (DID, X509, or JWK) is created. | `wallets/{walletExternalKey}/identifiers/{identifierExternalKey}` |
| `com.credenco.businesswallet.credential.issued.v1` | An issuer-side credential is issued and stored by the Business Wallet. | `wallets/{walletExternalKey}/credentials/{credentialUuid}` |
| `com.credenco.businesswallet.credential.revoked.v1` | An issued credential is revoked. | `wallets/{walletExternalKey}/credentials/{credentialUuid}` |
| `com.credenco.businesswallet.credential.received.v1` | A holder-side credential is received and stored by the Business Wallet. | `wallets/{walletExternalKey}/credentials/{credentialExternalKey}` |
| `com.credenco.businesswallet.presentation.verified.v1` | A verify session reaches the verified state. | `wallets/{walletExternalKey}/verify-sessions/{sessionKey}` |
| `com.credenco.businesswallet.publicprofile.updated.v1` | A Business Wallet's public profile is updated. | `wallets/{walletExternalKey}` |
| `com.credenco.businesswallet.audit.recorded.v1` | An audit record is written to the Business Wallet history log: a credential offer received, accepted or deleted, or a presentation request received or accepted. Carries audit metadata only — the record's free-form `evidence` blob is never included. Audits of integration-channel administration itself (category `INTEGRATION`) are not emitted, so the delivery pipeline cannot feed itself. One delivery per audited action, so on a holder-side wallet this is the busiest event in the catalog. | `wallets/{walletExternalKey}` |
All event types follow the naming convention `com.credenco.businesswallet...v`. The trailing `.v` segment is the major version. Backward-compatible additions (new optional fields) ship as the same `.v1` type; breaking changes ship as a new type (`.v2`) so existing consumers keep working.
JSON Schemas are served at `${WALLET_BASE_URL}/api/public/schemas/integration//v1.json` (no authentication required) and are pinned per-event via the `dataschema` envelope attribute.
---
##### `com.credenco.businesswallet.wallet.created.v1`
**Trigger.** Fired exactly once when a Business Wallet is created - either via the UI, the public API, or onboarding. The event is published atomically with the wallet itself, so consumers will never observe a wallet that the wallet itself does not yet know about.
**Subject.** `wallets/{walletExternalKey}`
**Data fields.**
| Field | Type | Description |
|---|---|---|
| `walletExternalKey` | string (UUID) | Stable external identifier of the wallet. Match this against your own records. |
| `displayName` | string | Human-readable name shown in the wallet UI. |
| `email` | string \| null | Primary contact email, if provided during creation. |
| `website` | string \| null | Primary website URL, if provided. |
| `phoneNumber` | string \| null | Primary phone number, if provided. |
| `address` | object \| null | Postal address with `street`, `postalCode`, `city`, `country`. Any inner field may be null. |
| `createdAt` | string (RFC 3339) | UTC timestamp of wallet creation. |
| `createdBy` | string | Subject (`sub`) of the principal that created the wallet - a human user ID or an OAuth2 client ID. |
**Sample envelope (binary CloudEvents over HTTP).**
```http
POST /webhooks/credenco HTTP/1.1
Host: receiver.example.com
Content-Type: application/json
ce-specversion: 1.0
ce-type: com.credenco.businesswallet.wallet.created.v1
ce-source: /credenco/wallets
ce-id: 9c7d6b1f-1d17-4c2c-8a5d-2e0f6b1a4f10
ce-time: 2026-05-01T09:42:17.812Z
ce-subject: wallets/3f2504e0-4f89-41d3-9a0c-0305e82c3301
ce-dataschema: https://wallet.acc.credenco.com/api/public/schemas/integration/wallet-created/v1.json
ce-datacontenttype: application/json
ce-walletexternalkey: 3f2504e0-4f89-41d3-9a0c-0305e82c3301
ce-correlationid: 5b1e2dca-6c3a-4b9b-9f0d-7c12da3a1b88
X-Credenco-Signature: t=1746094937,v1=2c1f8e30…
{
"walletExternalKey": "3f2504e0-4f89-41d3-9a0c-0305e82c3301",
"displayName": "Acme Healthcare B.V.",
"email": "ops@acme-healthcare.example",
"website": "https://acme-healthcare.example",
"phoneNumber": "+31 20 555 0100",
"address": {
"street": "Tolnasingel 3",
"postalCode": "2411 PV",
"city": "Bodegraven",
"country": "NL"
},
"createdAt": "2026-05-01T09:42:17.812Z",
"createdBy": "auth0|admin@acme-healthcare.example"
}
```
**JSON Schema.**
---
##### `com.credenco.businesswallet.identifier.created.v1`
**Trigger.** Fired exactly once when a wallet identifier (DID, X509 certificate, or JWK) is created. Like `wallet.created.v1`, the event is published atomically with the underlying change so it is never lost.
**Subject.** `wallets/{walletExternalKey}/identifiers/{identifierExternalKey}`
**Data fields.**
| Field | Type | Description |
|---|---|---|
| `walletExternalKey` | string (UUID) | External identifier of the owning wallet. |
| `identifierExternalKey` | string (UUID) | Stable external identifier of the identifier itself. |
| `identifierType` | enum | One of `DID`, `X509`, `JWK`. |
| `identifier` | string | The actual identifier value - a DID URI, an X509 subject, or a JWK thumbprint. |
| `displayName` | string | Human-readable label set by the operator. |
| `didType` | string \| null | Populated only when `identifierType = DID` (e.g. `did:web`, `did:key`, `did:ebsi`). `null` for `X509` and `JWK`. |
| `didEnvironment` | string \| null | Populated only when `identifierType = DID` and the DID method has environments (e.g. `pilot`, `production` for `did:ebsi`). `null` otherwise. |
| `createdAt` | string (RFC 3339) | UTC timestamp of identifier creation. |
| `createdBy` | string | Subject of the principal that created the identifier. |
**Sample envelope (binary CloudEvents over HTTP).**
```http
POST /webhooks/credenco HTTP/1.1
Host: receiver.example.com
Content-Type: application/json
ce-specversion: 1.0
ce-type: com.credenco.businesswallet.identifier.created.v1
ce-source: /credenco/wallets
ce-id: 7e2b1a86-9c1e-4d2e-b6a4-1f8db4a90f22
ce-time: 2026-05-01T09:43:02.401Z
ce-subject: wallets/3f2504e0-4f89-41d3-9a0c-0305e82c3301/identifiers/c4a4e34b-1d6d-4b9a-9e6f-3a7d6f8b1e02
ce-dataschema: https://wallet.acc.credenco.com/api/public/schemas/integration/identifier-created/v1.json
ce-datacontenttype: application/json
ce-walletexternalkey: 3f2504e0-4f89-41d3-9a0c-0305e82c3301
ce-correlationid: 5b1e2dca-6c3a-4b9b-9f0d-7c12da3a1b88
X-Credenco-Signature: t=1746094982,v1=8d4a91c2…
{
"walletExternalKey": "3f2504e0-4f89-41d3-9a0c-0305e82c3301",
"identifierExternalKey": "c4a4e34b-1d6d-4b9a-9e6f-3a7d6f8b1e02",
"identifierType": "DID",
"identifier": "did:web:acme-healthcare.example",
"displayName": "Primary issuer DID",
"didType": "did:web",
"didEnvironment": null,
"createdAt": "2026-05-01T09:43:02.401Z",
"createdBy": "auth0|admin@acme-healthcare.example"
}
```
**JSON Schema.**
---
##### `com.credenco.businesswallet.credential.issued.v1`
**Trigger.** Fired when an issuer-side credential is issued and stored by the Business Wallet. The event is published atomically with the issuance so consumers never observe an issued credential the wallet does not yet know about. The payload carries external and business identifiers only, never the credential document or any subject claims.
**Subject.** `wallets/{walletExternalKey}/credentials/{credentialUuid}`
**Data fields.**
| Field | Type | Description |
|---|---|---|
| `walletExternalKey` | string (UUID) | External identifier of the owning wallet. |
| `credentialUuid` | string | Stable business identifier of the issued credential. |
| `credentialFormat` | string | Credential format, one of `JWT`, `SD_JWT`, `LDP`, `STATUSLIST`, `MDOC`. |
| `credentialConfigurationId` | string \| null | Issuer credential-configuration identifier the credential was issued from, if known. |
| `issuanceDate` | string (ISO-8601 date-time) | Timestamp the credential was issued. |
| `revocationUuid` | string \| null | Revocation list entry key, present when the credential is revocable. |
**Sample envelope (binary CloudEvents over HTTP).**
```http
POST /webhooks/credenco HTTP/1.1
Host: receiver.example.com
Content-Type: application/json
ce-specversion: 1.0
ce-type: com.credenco.businesswallet.credential.issued.v1
ce-source: /credenco/wallets
ce-id: 0b8c1d2e-3f4a-4b5c-9d6e-7a8b9c0d1e2f
ce-time: 2026-05-04T09:42:17.812Z
ce-subject: wallets/3f2504e0-4f89-41d3-9a0c-0305e82c3301/credentials/11111111-1111-1111-1111-111111111111
ce-dataschema: https://wallet.acc.credenco.com/api/public/schemas/integration/credential-issued/v1.json
ce-datacontenttype: application/json
ce-walletexternalkey: 3f2504e0-4f89-41d3-9a0c-0305e82c3301
ce-correlationid: 5b1e2dca-6c3a-4b9b-9f0d-7c12da3a1b88
X-Credenco-Signature: t=1746351737,v1=9a1b2c3d…
{
"walletExternalKey": "3f2504e0-4f89-41d3-9a0c-0305e82c3301",
"credentialUuid": "11111111-1111-1111-1111-111111111111",
"credentialFormat": "SD_JWT",
"credentialConfigurationId": "DiplomaCredential",
"issuanceDate": "2026-05-04T09:42:17.812",
"revocationUuid": "22222222-2222-2222-2222-222222222222"
}
```
**JSON Schema.**
---
##### `com.credenco.businesswallet.credential.revoked.v1`
**Trigger.** Fired when an issued credential is revoked. The payload carries external and business identifiers only, never the credential document.
**Subject.** `wallets/{walletExternalKey}/credentials/{credentialUuid}`
**Data fields.**
| Field | Type | Description |
|---|---|---|
| `walletExternalKey` | string (UUID) | External identifier of the owning wallet. |
| `credentialUuid` | string | Stable business identifier of the revoked credential. |
| `credentialFormat` | string | Credential format, one of `JWT`, `SD_JWT`, `LDP`, `STATUSLIST`, `MDOC`. |
| `status` | string | Credential status after revocation, one of `VALID`, `INVALID`, `EXPIRED`. A revoked credential is `INVALID`. |
| `issuanceDate` | string (ISO-8601 date-time) | Timestamp the credential was originally issued. |
| `revocationUuid` | string \| null | Revocation list entry key. |
**Sample envelope (binary CloudEvents over HTTP).**
```http
POST /webhooks/credenco HTTP/1.1
Host: receiver.example.com
Content-Type: application/json
ce-specversion: 1.0
ce-type: com.credenco.businesswallet.credential.revoked.v1
ce-source: /credenco/wallets
ce-id: 1c9d2e3f-4a5b-4c6d-8e7f-9a0b1c2d3e4f
ce-time: 2026-05-06T11:08:44.219Z
ce-subject: wallets/3f2504e0-4f89-41d3-9a0c-0305e82c3301/credentials/11111111-1111-1111-1111-111111111111
ce-dataschema: https://wallet.acc.credenco.com/api/public/schemas/integration/credential-revoked/v1.json
ce-datacontenttype: application/json
ce-walletexternalkey: 3f2504e0-4f89-41d3-9a0c-0305e82c3301
ce-correlationid: 5b1e2dca-6c3a-4b9b-9f0d-7c12da3a1b88
X-Credenco-Signature: t=1746529724,v1=4d5e6f7a…
{
"walletExternalKey": "3f2504e0-4f89-41d3-9a0c-0305e82c3301",
"credentialUuid": "11111111-1111-1111-1111-111111111111",
"credentialFormat": "SD_JWT",
"status": "INVALID",
"issuanceDate": "2026-05-04T09:42:17.812",
"revocationUuid": "22222222-2222-2222-2222-222222222222"
}
```
**JSON Schema.**
---
##### `com.credenco.businesswallet.credential.received.v1`
**Trigger.** Fired when a holder-side credential is received and stored by the Business Wallet. The payload carries external identifiers and non-sensitive metadata only, never the credential document or any subject claims.
**Subject.** `wallets/{walletExternalKey}/credentials/{credentialExternalKey}`
**Data fields.**
| Field | Type | Description |
|---|---|---|
| `walletExternalKey` | string (UUID) | External identifier of the owning wallet. |
| `credentialExternalKey` | string (UUID) | Stable external identifier of the received credential. |
| `credentialType` | string | Credential type of the received credential. |
| `credentialFormat` | string | Credential format, one of `JWT`, `SD_JWT`, `LDP`, `STATUSLIST`, `MDOC`. |
| `issuerDid` | string \| null | DID of the credential issuer, when available. |
| `issuanceDate` | string (ISO-8601 date-time) \| null | Issuer-asserted issuance timestamp, when present in the credential. |
| `createdAt` | string (ISO-8601 date-time) | Timestamp the credential was stored in the wallet. |
**Sample envelope (binary CloudEvents over HTTP).**
```http
POST /webhooks/credenco HTTP/1.1
Host: receiver.example.com
Content-Type: application/json
ce-specversion: 1.0
ce-type: com.credenco.businesswallet.credential.received.v1
ce-source: /credenco/wallets
ce-id: 2d0e3f4a-5b6c-4d7e-9f8a-0b1c2d3e4f5a
ce-time: 2026-05-04T09:43:01.004Z
ce-subject: wallets/3f2504e0-4f89-41d3-9a0c-0305e82c3301/credentials/33333333-3333-3333-3333-333333333333
ce-dataschema: https://wallet.acc.credenco.com/api/public/schemas/integration/credential-received/v1.json
ce-datacontenttype: application/json
ce-walletexternalkey: 3f2504e0-4f89-41d3-9a0c-0305e82c3301
ce-correlationid: 5b1e2dca-6c3a-4b9b-9f0d-7c12da3a1b88
X-Credenco-Signature: t=1746351781,v1=7a8b9c0d…
{
"walletExternalKey": "3f2504e0-4f89-41d3-9a0c-0305e82c3301",
"credentialExternalKey": "33333333-3333-3333-3333-333333333333",
"credentialType": "DiplomaCredential",
"credentialFormat": "SD_JWT",
"issuerDid": "did:web:acme-healthcare.example",
"issuanceDate": "2026-05-04T09:42:17.812",
"createdAt": "2026-05-04T09:43:01.004"
}
```
**JSON Schema.**
---
##### `com.credenco.businesswallet.presentation.verified.v1`
**Trigger.** Fired when a verify session reaches the verified state. A verify session reaches the verified state at most once, so this event is delivered once per session. The payload carries the verify-session business key, the verdict, and the presented credential types only, never the VP tokens or the presented credential bodies.
**Subject.** `wallets/{walletExternalKey}/verify-sessions/{sessionKey}`
**Data fields.**
| Field | Type | Description |
|---|---|---|
| `walletExternalKey` | string (UUID) | External identifier of the verifying wallet. |
| `sessionKey` | string | Verify-session business key (the external correlation id). |
| `verified` | boolean | Verification verdict. |
| `presentedCredentialTypes` | array of string | Credential types presented in the session. May be empty. |
| `verifiedAt` | string (ISO-8601 date-time) | Timestamp the session reached the verified state. |
**Sample envelope (binary CloudEvents over HTTP).**
```http
POST /webhooks/credenco HTTP/1.1
Host: receiver.example.com
Content-Type: application/json
ce-specversion: 1.0
ce-type: com.credenco.businesswallet.presentation.verified.v1
ce-source: /credenco/wallets
ce-id: 3e1f4a5b-6c7d-4e8f-9a0b-1c2d3e4f5a6b
ce-time: 2026-05-04T09:44:12.330Z
ce-subject: wallets/3f2504e0-4f89-41d3-9a0c-0305e82c3301/verify-sessions/44444444-4444-4444-4444-444444444444
ce-dataschema: https://wallet.acc.credenco.com/api/public/schemas/integration/presentation-verified/v1.json
ce-datacontenttype: application/json
ce-walletexternalkey: 3f2504e0-4f89-41d3-9a0c-0305e82c3301
ce-correlationid: 5b1e2dca-6c3a-4b9b-9f0d-7c12da3a1b88
X-Credenco-Signature: t=1746351852,v1=0d1e2f3a…
{
"walletExternalKey": "3f2504e0-4f89-41d3-9a0c-0305e82c3301",
"sessionKey": "44444444-4444-4444-4444-444444444444",
"verified": true,
"presentedCredentialTypes": ["DiplomaCredential", "IdentityCredential"],
"verifiedAt": "2026-05-04T09:44:12.330"
}
```
**JSON Schema.**
---
##### `com.credenco.businesswallet.publicprofile.updated.v1`
**Trigger.** Fired whenever a Business Wallet's public profile is updated, through either the full replace (PUT) or the partial update (PATCH) endpoint. Every successful update emits one event carrying a full snapshot of the current public profile plus the last-modified audit fields.
**Subject.** `wallets/{walletExternalKey}`
**Data fields.**
| Field | Type | Description |
|---|---|---|
| `walletExternalKey` | string (UUID) | External identifier of the wallet. |
| `displayName` | string | Public display name. |
| `logo` | string | Logo, as a URL or a `data:` URI. |
| `email` | string | Public contact email. |
| `website` | string | Public website URL. |
| `phoneNumber` | string | Public contact phone number. |
| `address` | object | Nested `street`, `postalCode`, `city`, `country`. |
| `geoLocation` | object | Nested `latitude`, `longitude` (strings). |
| `lastModifiedAt` | string (ISO-8601 date-time) | Timestamp of this update. |
| `lastModifiedBy` | string | Principal that performed the update. |
**Sample envelope (binary CloudEvents over HTTP).**
```http
POST /webhooks/credenco HTTP/1.1
Host: receiver.example.com
Content-Type: application/json
ce-specversion: 1.0
ce-type: com.credenco.businesswallet.publicprofile.updated.v1
ce-source: /credenco/wallets
ce-id: 7c9e6679-7425-40de-944b-e07fc1f90ae7
ce-time: 2026-05-04T09:45:03.120Z
ce-subject: wallets/3f2504e0-4f89-41d3-9a0c-0305e82c3301
ce-dataschema: https://wallet.acc.credenco.com/api/public/schemas/integration/public-profile-updated/v1.json
ce-datacontenttype: application/json
ce-walletexternalkey: 3f2504e0-4f89-41d3-9a0c-0305e82c3301
ce-correlationid: 5b1e2dca-6c3a-4b9b-9f0d-7c12da3a1b88
X-Credenco-Signature: t=1746351903,v1=1a2b3c4d…
{
"walletExternalKey": "3f2504e0-4f89-41d3-9a0c-0305e82c3301",
"displayName": "Acme Healthcare B.V.",
"logo": "https://cdn.credenco.example/logos/acme.png",
"email": "ops@acme-healthcare.example",
"website": "https://acme-healthcare.example",
"phoneNumber": "+31 20 555 0100",
"address": {
"street": "Keizersgracht 123",
"postalCode": "1015 CJ",
"city": "Amsterdam",
"country": "NL"
},
"geoLocation": {
"latitude": "52.3676",
"longitude": "4.9041"
},
"lastModifiedAt": "2026-05-04T09:45:03.120",
"lastModifiedBy": "martijn"
}
```
**JSON Schema.**
---
##### `com.credenco.businesswallet.audit.recorded.v1`
**Trigger.** Fired whenever an audit record is written to the Business Wallet history log - the same trail the wallet UI shows under a wallet's history. Subscribe a channel to it to stream that trail into a SIEM or compliance system.
The wallet writes an audit record for exactly these actions, so this is the full set of `category` / `action` pairs the event can carry today:
| `category` | `action` | Written when |
|---|---|---|
| `CREDENTIAL` | `OFFER_RECEIVED` | A credential offer is received from an issuer. |
| `CREDENTIAL` | `OFFER_ACCEPTED` | An offered credential is accepted and stored. |
| `CREDENTIAL` | `DELETED` | A stored credential is deleted. |
| `PRESENTATION` | `OFFER_RECEIVED` | A presentation request is received from a verifier. |
| `PRESENTATION` | `OFFER_ACCEPTED` | A presentation request is accepted and the presentation is sent. |
That is one delivery per audited action, which on a holder-side wallet makes this the busiest event in the catalog. Both `category` and `action` are **open sets** - new values may be introduced within `v1`, so do not reject unknown ones.
Note that this is the *holder-side* audit trail. Issuer-side activity such as issuing or revoking a credential does not write a history record, and therefore does not produce this event; use `com.credenco.businesswallet.credential.issued.v1` and `com.credenco.businesswallet.credential.revoked.v1` for those.
Two classes of audit record are deliberately **not** emitted:
- **Records in the `INTEGRATION` category**, which audit the integration pipeline's own actions (channel and delivery administration - the `CHANNEL_*` and `DELIVERY_*` actions). Emitting them would let the pipeline feed itself: on a channel subscribed to `*` with a dead endpoint, dismissing a failed delivery would enqueue a fresh delivery that fails in turn, and the failure queue could never be drained. Those records stay visible in the wallet's own history log.
- **Records that are not attributable to a wallet**, because `walletExternalKey` is the partition and routing key, so there is no channel to route them to.
:::warning[Check your channels before this event reaches production]
**`evidence` is not in the contract.** The underlying history record's free-form `evidence` blob - which holds credential subject claims and full OID4VP authorization requests - is deliberately **not** part of this event and never leaves the wallet over a channel. It stays retrievable through the authenticated history API. Should a consumer ever need it, that would be a new `.v2` type with an explicit per-channel opt-in, never a silent addition to `v1`.
**What the event does carry is a behavioural record of a named user.** `userName` plus `action` plus `eventDate` says who did what and when. Other events in this catalog already carry personal data - `wallet.created.v1` carries `createdBy`, `email` and `phoneNumber` - but this is the first one that describes user *activity*, and it fires continuously rather than at setup time.
**An existing channel can start receiving it without anyone opting in.** A channel whose filter is `*` (or a matching wildcard) matches every type in the catalog, so it will pick this event up as soon as the wallet is upgraded - see [Versioning](#versioning). Before rolling this out, review your existing channels and pin explicit event types on any channel that should not receive the audit trail.
**Channel export is not gated on the audit-trail read permission.** Reading history through the wallet API requires `WALLET_AUDIT_TRAIL_READ`. Configuring a channel requires `WALLET_INTEGRATION_CHANNEL_CRUD`. Those are different permissions, so someone who can manage channels can route the audit trail to an endpoint they control without being able to read it in the UI. Treat channel-management rights on a wallet as equivalent to audit-trail read access.
:::
**Subject.** `wallets/{walletExternalKey}`
**Data fields.**
| Field | Type | Description |
|---|---|---|
| `walletExternalKey` | string (UUID) | External identifier of the wallet the audited action belongs to. |
| `userName` | string \| null | The wallet user recorded on the audit entry. Null when the record could not be attributed to a user. |
| `category` | string | The audited area - see the table above for the values in use. `INTEGRATION` never appears here. Open set. |
| `action` | string | The audited action - see the table above. The `CHANNEL_*` and `DELIVERY_*` actions exist in the wallet but only ever on `INTEGRATION` records, so they never reach this event. Open set. |
| `party` | string \| null | The counterparty the action concerned - the issuer URL for a credential offer, the verifier for a presentation request. |
| `credentialUuids` | array of string | The credentials the audited action touched. Empty when the action is not credential-scoped. **These are the `id` claims of the credential documents**, not the `credentialExternalKey` / `credentialUuid` values the other events in this catalog use, so do not expect them to join against those. |
| `eventDate` | string (ISO-8601 date-time) | When the action was recorded. Carries no UTC offset - it is the wallet server's local time. Use the envelope's `time` attribute when you need an unambiguous instant. |
**Sample envelope (binary CloudEvents over HTTP).**
```http
POST /webhooks/credenco HTTP/1.1
Host: receiver.example.com
Content-Type: application/json
ce-specversion: 1.0
ce-type: com.credenco.businesswallet.audit.recorded.v1
ce-source: /credenco/wallets
ce-id: 9b2c1d0e-5a4f-4c3b-8d7e-6f5a4b3c2d1e
ce-time: 2026-07-10T09:42:17.812Z
ce-subject: wallets/3f2504e0-4f89-41d3-9a0c-0305e82c3301
ce-dataschema: https://wallet.acc.credenco.com/api/public/schemas/integration/audit-recorded/v1.json
ce-datacontenttype: application/json
ce-walletexternalkey: 3f2504e0-4f89-41d3-9a0c-0305e82c3301
ce-correlationid: 5b1e2dca-6c3a-4b9b-9f0d-7c12da3a1b88
X-Credenco-Signature: t=1752140537,v1=2b3c4d5e…
{
"walletExternalKey": "3f2504e0-4f89-41d3-9a0c-0305e82c3301",
"userName": "j.jansen",
"category": "CREDENTIAL",
"action": "OFFER_ACCEPTED",
"party": "https://issuer.acme-healthcare.example",
"credentialUuids": ["urn:uuid:11111111-1111-1111-1111-111111111111"],
"eventDate": "2026-07-10T09:42:17.812"
}
```
**JSON Schema.**
---
##### Versioning
The trailing `.v1` segment in every event type is the major version. We follow these rules:
- Adding a new optional field to the `data` payload is backward compatible and ships as the same `v1` type. Build your receivers so that unknown fields are ignored.
- Removing a field, renaming a field, or changing a field's type is breaking and ships as a new major version (`v2`). The old `v1` type is kept emitting in parallel for at least one major release cycle so you have time to migrate.
- New event types are added freely. A channel whose [event filters](https://docs.credenco.com/docs/guide/integrations/channels/#event-filters) name specific types is never auto-subscribed to a new one. A channel configured over the API with a wildcard pattern *is*: `*` matches every type in the catalog, and a segment wildcard such as `com.credenco.businesswallet.credential.*` matches any future `credential` event. If you need a predictable set of deliveries, pin the types you want instead of relying on a wildcard.
Pin the schema you tested against in your receiver code by storing the `dataschema` attribute alongside any persisted event.
### CloudEvents Envelope
https://docs.credenco.com/docs/guide/integrations/cloudevents/
#### CloudEvents Envelope
Every event the Business Wallet emits to an integration channel is wrapped in a [CloudEvents 1.0](https://github.com/cloudevents/spec) envelope. Using a standard envelope means you can plug any CloudEvents-aware library on the receiver side and get parsing, validation, and observability for free.
##### How do binary and structured mode differ?
Binary mode sends the CloudEvents attributes as HTTP headers prefixed `ce-` and keeps only the raw JSON payload in the body — this is what webhooks use. Structured mode serializes the whole envelope, attributes and payload together, as one JSON document — this is what Kafka and JMS use.
| Mode | Used for | What it looks like |
|---|---|---|
| **Binary** | HTTP webhooks | Envelope attributes are HTTP headers prefixed with `ce-`. The HTTP body is only the event's `data` payload (raw JSON). |
| **Structured** | Kafka, JMS | The entire envelope (attributes *and* data) is serialized as a single JSON document and that JSON is the message body. The `Content-Type` is `application/cloudevents+json`. |
Both modes carry exactly the same information; only the framing differs. If you switch transports you can keep your event-handling code unchanged and only swap the parser.
:::note[Why is it called "binary" mode?]
"Binary" here doesn't mean the payload has to be binary data - our `data` is always JSON. It refers to the fact that the event data is placed in the message body **in its native byte form**, untouched and unwrapped by CloudEvents. The transport (HTTP) sees it as opaque bytes; the CloudEvents metadata travels separately in the headers. This contrasts with **structured** mode, where the data is re-encoded inside a JSON envelope alongside the metadata.
The naming comes from the CloudEvents [HTTP Protocol Binding §3.1 *Binary Content Mode*](https://github.com/cloudevents/spec/blob/main/cloudevents/bindings/http-protocol-binding.md#31-binary-content-mode) and [§3.2 *Structured Content Mode*](https://github.com/cloudevents/spec/blob/main/cloudevents/bindings/http-protocol-binding.md#32-structured-content-mode), which echo the long-standing MIME/HTTP convention of "binary" transfer meaning *bytes pass through unmodified*.
:::
###### Binary mode (webhook delivery)
```http
POST /webhooks/credenco HTTP/1.1
Host: receiver.example.com
Content-Type: application/json
ce-specversion: 1.0
ce-type: com.credenco.businesswallet.wallet.created.v1
ce-source: /credenco/wallets
ce-id: 9c7d6b1f-1d17-4c2c-8a5d-2e0f6b1a4f10
ce-time: 2026-05-01T09:42:17.812Z
ce-subject: wallets/3f2504e0-4f89-41d3-9a0c-0305e82c3301
ce-dataschema: https://wallet.acc.credenco.com/api/public/schemas/integration/wallet-created/v1.json
ce-datacontenttype: application/json
ce-walletexternalkey: 3f2504e0-4f89-41d3-9a0c-0305e82c3301
ce-correlationid: 5b1e2dca-6c3a-4b9b-9f0d-7c12da3a1b88
X-Credenco-Signature: t=1746094937,v1=2c1f8e30…
{ "walletExternalKey": "3f2504e0-…", "displayName": "Acme Healthcare B.V.", … }
```
###### Structured mode (Kafka or JMS message body)
```json
{
"specversion": "1.0",
"type": "com.credenco.businesswallet.wallet.created.v1",
"source": "/credenco/wallets",
"id": "9c7d6b1f-1d17-4c2c-8a5d-2e0f6b1a4f10",
"time": "2026-05-01T09:42:17.812Z",
"subject": "wallets/3f2504e0-4f89-41d3-9a0c-0305e82c3301",
"dataschema": "https://wallet.acc.credenco.com/api/public/schemas/integration/wallet-created/v1.json",
"datacontenttype": "application/json",
"walletexternalkey": "3f2504e0-4f89-41d3-9a0c-0305e82c3301",
"correlationid": "5b1e2dca-6c3a-4b9b-9f0d-7c12da3a1b88",
"data": {
"walletExternalKey": "3f2504e0-4f89-41d3-9a0c-0305e82c3301",
"displayName": "Acme Healthcare B.V.",
"email": "ops@acme-healthcare.example"
}
}
```
For Kafka, the JSON above is the value; the key is set to `walletExternalKey` so downstream partitioning preserves per-wallet ordering. For JMS, the JSON is the message body and the broker's standard `JMSMessageID` and `JMSCorrelationID` are populated from `id` and `correlationid` respectively.
##### Envelope reference
All required CloudEvents attributes plus the optional ones we always set.
| Attribute | Required | Type | Description |
|---|---|---|---|
| `specversion` | yes | string | Always `1.0`. |
| `type` | yes | string | Reverse-DNS-style event type, ending in `.v` (e.g. `com.credenco.businesswallet.wallet.created.v1`). |
| `source` | yes | URI-reference | Identifies the producer. The wallet always emits `/credenco/wallets`. |
| `id` | yes | string (UUID v4) | Unique per logical event. Stable across retries - use this as your dedupe key. |
| `time` | yes | RFC 3339 timestamp | UTC time the event was produced (not the time it was delivered). |
| `subject` | yes | string | Resource the event is about, in URI-path form (e.g. `wallets/{walletExternalKey}` or `wallets/{walletExternalKey}/identifiers/{identifierExternalKey}`). |
| `dataschema` | yes | URI | URL of the JSON Schema that the `data` payload conforms to. Pin this for forward compatibility. |
| `datacontenttype` | yes | string | Always `application/json`. |
| `walletexternalkey` | yes (extension) | string (UUID) | Wallet that produced the event. Useful for routing in shared receivers. |
| `correlationid` | yes (extension) | string (UUID) | Correlates the event with the originating user request or job. Identical for all events that share the same originating cause. |
###### Header naming in binary mode
In binary HTTP mode every attribute is sent as an HTTP header named `ce-` (lower-case). HTTP header names are case-insensitive, but receivers should compare against the lower-case form to match the CloudEvents HTTP binding spec.
##### Extension attributes
CloudEvents allows producers to define extra attributes outside the spec. The wallet uses two:
- **`walletexternalkey`** - present on every event. Lets a single receiver service serve multiple wallets without parsing the `subject`.
- **`correlationid`** - present on every event. Set to the originating request's correlation ID (or a fresh UUID for system-initiated events) and propagated to all derived events. Use it to stitch traces together across wallet, your receivers, and downstream systems.
Extension attribute names are all lower-case (per CloudEvents spec) - `walletexternalkey`, not `walletExternalKey`. They are mirrored verbatim in both binary headers (`ce-walletexternalkey`) and structured JSON keys.
##### Versioning policy
The wallet honours the following compatibility contract for every event type:
1. **Major version is in the type.** A type ends in `.v` - e.g. `wallet.created.v1`. There is no separate "version" header.
2. **New optional fields are backward-compatible.** They ship under the same major version. Receivers MUST ignore unknown fields.
3. **Breaking changes mint a new type.** A removed field, a renamed field, or a changed field type is shipped as `wallet.created.v2`. The `v1` type keeps emitting in parallel for at least one major release cycle so you have time to migrate. Customers subscribe explicitly to the new type when ready.
4. **Schema URLs are stable.** Once a schema URL has been emitted in a `dataschema` attribute, it never changes meaning. Schemas are versioned in the path (`/v1.json`, `/v2.json`).
Pin the `dataschema` URL alongside your persisted events; that gives you a guaranteed-stable contract regardless of how the wallet evolves.
##### Where to next
- [Event catalog](https://docs.credenco.com/docs/guide/integrations/event-catalog/) - the events you can subscribe to today.
- [Webhook authentication](https://docs.credenco.com/docs/guide/integrations/webhook-auth/) - what `X-Credenco-Signature` looks like and how to verify it.
- [CloudEvents 1.0 specification](https://github.com/cloudevents/spec) - the upstream standard.
## API
### Wallet API
https://docs.credenco.com/docs/wallet-api/
REST API reference for the Credenco Business Wallet: issue, verify, revoke and receive verifiable credentials, and manage wallets, keys and identifiers.
### API Authentication with OAuth2 and API Keys
https://docs.credenco.com/docs/api/authentication/
#### API Authentication Methods
To access the API, you need to authenticate with the Business Wallet API.
Two authentication methods are available:
- OAuth 2.0 Client Credentials flow
- API Key
Both methods are managed in the Business Wallet under **Settings → IAM → API Access**.
##### OAuth 2.0 Client Credentials flow
Create a client ID to authenticate using the OAuth 2.0 Client Credentials flow. Each client ID has its own set of roles and expiry date - allowing you to grant different integrating parties exactly the access they need.
Use the client ID and client secret to obtain an access token from the token endpoint. Pass the token as a `Bearer` token in API requests.
For detailed instructions on creating and managing client IDs, see the [Client ID guide](https://docs.credenco.com/docs/guide/api-access/intro/).
##### API Key
Create an API key for a simpler authentication method that does not require an OAuth token exchange step. Pass the API key in the `x-api-key` HTTP header of each request:
```
x-api-key:
```
Each API key has its own set of roles and expiry date.
For detailed instructions on creating and managing API keys, see the [API Keys guide](https://docs.credenco.com/docs/guide/api-access/api-keys/).
## CLI
### The credenco-cli Command-Line Client
https://docs.credenco.com/docs/guide/cli/intro/
#### The credenco-cli Command-Line Client
`credenco-cli` is a single binary that drives the public Credenco Business Wallet API from a
terminal. It covers 81 operations in 15 command groups, and on top of those there are four
hand-written workflow commands that chain several calls into one: `issue`, `verify`, `revoke` and
`wallet create`.
Five tag groups of the public API are deliberately left out of the generated surface and have no
command: Direct Issue Credential, Verify a Credential, Integration Channels, Integration
Deliveries and Public Integration Schemas. Use the API directly for those, or the web interface.
It is meant for three kinds of user:
- **Operators**, who need a wallet set up, a template created or a credential revoked without
clicking through the web interface.
- **Integrators**, who want to see the exact request and response of an API call before writing it
into their own backend.
- **AI agents**, which can discover the whole command surface from the binary itself. That use is
described separately in [Driving credenco-cli from an AI agent](https://docs.credenco.com/docs/guide/cli/ai/).
:::info[Where the examples come from]
Every terminal screen on these pages is a capture of a real run against a Credenco test
environment, issuing and presenting the Bank Account credential built up in
[Usage examples](https://docs.credenco.com/docs/guide/cli/usage/). Commands, flags, field names, statuses and response bodies
are verbatim. Three things are normalised for readability: the host name is written as
`wallet.acc.credenco.com`, home directories are shown as `~`, and secrets are redacted.
:::
##### Install
Pre-built binaries for macOS, Linux and Windows (amd64 and arm64) are published on this site. The
install scripts detect your OS and architecture, check the download against its SHA-256 checksum
and install without admin rights. Run the same command again to upgrade.
###### macOS, Linux and WSL
```bash
curl -fsSL https://docs.credenco.com/cli/install.sh | sh
```
The binary goes to `~/.local/bin`. The script tells you if that directory is not on your `PATH`.
###### Windows
In PowerShell:
```powershell
irm https://docs.credenco.com/cli/install.ps1 | iex
```
The binary goes to `%LOCALAPPDATA%\credenco-cli`, which the script adds to your user `PATH`.
Open a new terminal afterwards.
###### Check the installation
```bash
credenco-cli --version
```
###### Specific version or manual download
To install a specific version, set `CREDENCO_CLI_VERSION` before running the script:
```bash
curl -fsSL https://docs.credenco.com/cli/install.sh | CREDENCO_CLI_VERSION=v1.2.0 sh
```
To download an archive yourself, take `credenco-cli__.tar.gz` (`.zip` for Windows) from
`https://docs.credenco.com/cli/latest/`, or from `https://docs.credenco.com/cli/v/` for a
specific version. `` is `darwin`, `linux` or `windows` and `` is `amd64` or `arm64`.
Verify the archive against `checksums.txt` in the same directory, unpack it and put
`credenco-cli` on your `PATH`.
:::note[macOS: downloaded with a browser]
macOS blocks a binary downloaded with a browser because it is not notarized. The install script
does not have this problem. For a browser download, clear the quarantine flag once:
`xattr -d com.apple.quarantine credenco-cli`.
:::
##### Stay up to date
Once a day, any command checks whether a newer release is published and says so afterwards:
```text
$ credenco-cli profile list
NAME HOST WALLET AUTH
* tulip-bank https://wallet.acc.credenco.com 2a0ae7d8-2b17-4d05-94ab-02a1cc74606f api-key
credenco-cli v1.0.1 is available (you have v1.0.0). Run "credenco-cli upgrade" to install it.
```
`credenco-cli upgrade` installs it. It downloads the archive for your operating system and
architecture, verifies it against the SHA-256 checksums published beside it, and replaces the
running binary in place. Nothing is written before the checksum matches.
```text
$ credenco-cli upgrade
credenco-cli v1.0.1 is available (you have v1.0.0).
It replaces ~/.local/bin/credenco-cli
Install it now? [y/N]: y
Downloading https://docs.credenco.com/cli/latest/credenco-cli_darwin_arm64.tar.gz
Checksum verified (sha256 7f1032f9efa4198a598b11a2e9716cd3ee65bd906a912de9993ef734891c508d)
Installed credenco-cli version v1.0.1 to ~/.local/bin/credenco-cli
```
Other ways to run it:
| Command | What it does |
| --- | --- |
| `credenco-cli upgrade --check` | reports whether a newer release exists, installs nothing |
| `credenco-cli upgrade --yes` | installs without the confirmation prompt |
| `credenco-cli upgrade --dry-run` | prints what it would download and replace |
| `credenco-cli upgrade --version v1.2.0` | installs that release, also to go back to one |
A binary in a directory you cannot write is refused rather than overwritten, and so is one
installed by Homebrew, which `brew upgrade` owns. Re-running the install script from
[Install](#install) always works too.
:::note[The daily check in scripts and pipelines]
The check is skipped whenever standard error is not a terminal, so it never runs in a CI job or a
cron script, and it never writes to standard output, which stays reserved for command output.
Set `CREDENCO_CLI_NO_VERSION_CHECK=1` to switch it off entirely. It runs after your command, and a
failure is silent: it cannot change what a command prints or the status it exits with.
`~/.credenco/version-check.json` records when the last check happened, so it costs one request a
day rather than one per command, and it holds nothing but a timestamp and a version.
:::
##### Authenticate once with `login`
`credenco-cli login [host]` works like `az login`. It asks for the host if you leave it out, then
for an API key or an OAuth2 client id and secret. It verifies the credentials against the wallet,
lets you pick a default wallet, and writes everything to `~/.credenco/config.json` (directory
`0700`, file `0600`).
```text
$ credenco-cli login wallet.acc.credenco.com
Logging in to https://wallet.acc.credenco.com
Authentication method:
[1] API key
[2] OAuth2 client credentials
Select [1]: 1
API key:
Verifying credentials...
Default wallet: Tulip Trust Bank (2a0ae7d8-2b17-4d05-94ab-02a1cc74606f)
Login succeeded, saved as profile "default" in ~/.credenco/config.json
```
The key you type is not echoed. The capture above asks only twice, because the host was given as
an argument and the credentials saw a single wallet, which is then chosen for you. With more than
one wallet, a numbered list follows and you pick one.
The answers are read line by line, so a login can also be scripted by piping them into the
command, which is how the capture above was made.
###### Profiles
Each login is stored as a named profile. The first one stored becomes the current one; pick
another for a single command with `--profile` or `CREDENCO_PROFILE`, or switch for good with
`credenco-cli profile use`.
```text
$ credenco-cli profile list
NAME HOST WALLET AUTH
acme https://wallet.acc.credenco.com 9a5660e4-c113-4e15-8610-831dbb616b83 oauth
ada https://wallet.acc.credenco.com a6f8b20e-3bb0-44b5-b11d-ed35a28c6147 api-key
* tulip-bank https://wallet.acc.credenco.com 2a0ae7d8-2b17-4d05-94ab-02a1cc74606f api-key
```
The `*` marks the current profile. `credenco-cli logout` removes the whole file, all profiles
included; environment variables are left alone.
##### Discover the commands
`credenco-cli operations` prints every command with its HTTP method and path, grouped by API tag.
The command table is generated from the Business Wallet's own public OpenAPI document rather than
hand-maintained, so a command's method, path and required fields follow the API. The listing is
always plain text, piped or not.
```text
$ credenco-cli operations
CREDENTIAL
credential delete-wallet-holder-credential DELETE /api/v1/wallets/{walletExternalKey}/credentials/{credentialExternalKey} Delete a wallet credential [--yes]
credential get-wallet-holder-credential GET /api/v1/wallets/{walletExternalKey}/credentials/{credentialExternalKey} Get a single wallet credential
credential list-wallet-holder-credentials GET /api/v1/wallets/{walletExternalKey}/credentials List all wallet credentials
CREDENTIAL-REVOCATION
credential-revocation revoke-credential POST /api/credential/revoke/{revocationUuid} Revoke an issued verifiable credential [--yes]
...
WALLET-MANAGEMENT
wallet-management create-wallet POST /api/wallets Create a new wallet for the caller
wallet-management delete-wallet DELETE /api/wallets/{walletExternalKey} Delete an existing wallet [--yes]
wallet-management get-all-wallets GET /api/wallets List all accessible wallets
wallet-management get-wallet GET /api/wallets/{walletExternalKey} Get a single wallet's details
wallet-management patch-wallet PATCH /api/wallets/{walletExternalKey} Partially update an existing wallet
wallet-management update-wallet PUT /api/wallets/{walletExternalKey} Fully update an existing wallet
81 operations in 15 groups
```
Per-group and per-command help works as you would expect, and the per-command help lists the
field flags generated from the request body:
```bash
credenco-cli --help
credenco-cli wallet-management --help
credenco-cli issuer-template create-issuer-template --help
```
##### Request bodies
A request body can be given as inline JSON, as `@file`, or as `@-` to read standard input. On top
of that, most top-level fields of the body are also a flag, and a flag overrides the same field in
`--body`. Two kinds of field get no flag and stay `--body` only:
- **Nested structures**, such as `attributes`, `displays`, `queryDefinition` and `claims`. Lists of
plain strings do get a flag, taking a comma-separated or repeated value.
- **Secrets and one-time codes**, any field whose name contains `password` or `secret`, plus
`code`, `tx_code` and `verificationCode`. A flag would leak them into shell history and the
process table, for the same reason the API key has no flag.
```bash
credenco-cli public-profile patch-public-profile --body '{"website":"https://tulip-trust-bank.example"}'
credenco-cli public-profile update-public-profile --body @public-profile.json
credenco-cli public-profile patch-public-profile --phone-number "+31 30 123 4567" --address-city Utrecht
credenco-cli role create-role --name Admin --wallet-roles WALLET_READ,WALLET_CRUD
```
The wallet path parameter is bound to `--wallet` and `CREDENCO_WALLET` rather than to a positional
argument, so a configured default wallet applies to every wallet-scoped command. All other path
parameters are positional.
##### Output
For a command that calls the API, output is a table when standard output is a terminal and JSON
when it is piped. `--json` and `--table` force a format. Progress messages, QR codes and errors go
to **standard error**, so a piped standard output is always valid JSON and can go straight into
`jq`.
The local commands that print no API response are the exception: `operations`, `profile list` and
every `--help` are plain text whether piped or not.
```bash
credenco-cli wallet-management get-all-wallets | jq -r '.content[].displayName'
```
##### Safety
Destructive commands refuse to run without `--yes`, and `--dry-run` prints the request that would
be sent and sends nothing at all, not even an OAuth token request.
```text
$ credenco-cli issuer-template delete-issuer-template bank-account-issuer
error: issuer-template delete-issuer-template is destructive; pass --yes to confirm (or --dry-run to preview)
exit code: 2
```
`--dry-run` is safe on a destructive command even without `--yes`, because it changes nothing. It
is just as useful to preview an update, such as a change to the wallet's public profile:
```json
$ credenco-cli public-profile patch-public-profile --website https://tulip-trust-bank.example --dry-run
{
"dryRun": true,
"method": "PATCH",
"url": "https://wallet.acc.credenco.com/api/v1/wallets/2a0ae7d8-2b17-4d05-94ab-02a1cc74606f/public-profile",
"headers": {
"Accept": "application/json",
"Content-Type": "application/json",
"x-api-key": "[REDACTED]"
},
"requestBody": {
"website": "https://tulip-trust-bank.example"
}
}
```
##### Exit codes
| Code | Meaning |
| --- | --- |
| `0` | success |
| `1` | unexpected local failure (network, I/O, malformed response) |
| `2` | usage error or missing configuration |
| `3` | authentication or authorisation failure (401, 403) |
| `4` | not found (404) |
| `5` | server error (5xx) |
| `6` | any other API error (4xx) |
The distinct codes exist so a script, a CI job or an agent can branch on the kind of failure
without parsing the message:
```text
$ credenco-cli issuer-template get-issuer-template no-such-template
{
"detail": "Issuer template not found",
"instance": "/api/v1/wallets/2a0ae7d8-2b17-4d05-94ab-02a1cc74606f/issuer-templates/no-such-template",
"status": 404,
"title": "Not Found"
}
error: GET https://wallet.acc.credenco.com/api/v1/wallets/2a0ae7d8-2b17-4d05-94ab-02a1cc74606f/issuer-templates/no-such-template returned 404: Issuer template not found
exit code: 4
$ CREDENCO_BASE_URL=https://wallet.acc.credenco.com CREDENCO_API_KEY=not-a-real-key credenco-cli wallet-management get-all-wallets
{
"error": "Unauthorized"
}
error: GET https://wallet.acc.credenco.com/api/wallets returned 401: Unauthorized
exit code: 3
```
##### Environment variables
Settings come from three places, each overriding the one before: the selected profile, then
`CREDENCO_*` environment variables, then flags.
| Variable | Purpose |
| --- | --- |
| `CREDENCO_PROFILE` | stored profile to use (flag: `--profile`) |
| `CREDENCO_BASE_URL` | Business Wallet base URL, for example `https://wallet.acc.credenco.com` |
| `CREDENCO_API_KEY` | API-key authentication, sent as the `x-api-key` header |
| `CREDENCO_CLIENT_ID` | OAuth2 client-credentials client id |
| `CREDENCO_CLIENT_SECRET` | OAuth2 client secret |
| `CREDENCO_TOKEN_URL` | Keycloak token endpoint |
| `CREDENCO_WALLET` | default wallet external key (alias: `CREDENCO_TENANT_KEY`) |
Either `CREDENCO_API_KEY` or the OAuth2 client-credentials pair works for every command.
Read [API Keys](https://docs.credenco.com/docs/guide/api-access/api-keys/) and [Client ID](https://docs.credenco.com/docs/guide/api-access/intro/) for how to
obtain them.
:::danger[Secrets never go on the command line]
`CREDENCO_API_KEY` and `CREDENCO_CLIENT_SECRET` have **no flag equivalent**. A flag would write
the secret into your shell history and expose it in the process table, where any local user can
read it with `ps`. Use `credenco-cli login`, your environment or a secret manager.
Stored credentials are only ever sent to the host they were stored for. Pointing the CLI somewhere
else drops them, so a key for one environment cannot leak into a request to another. Any of
`--base-url`, `CREDENCO_BASE_URL`, `--token-url` and `CREDENCO_TOKEN_URL` counts as pointing
somewhere else, so setting a token URL that differs from the stored one also drops the stored key
and the next command fails with "no credentials" and exit code 2. Credentials that came from the
environment are kept, since whoever set them also chose the host.
The CLI redacts `Authorization` and `x-api-key` everywhere it prints a request, including in
`--dry-run` output.
:::
##### Next
- [Usage examples](https://docs.credenco.com/docs/guide/cli/usage/) walks a Bank Account credential from an empty wallet all the
way through issuance and presentation, with the real terminal output of every step.
- [Driving credenco-cli from an AI agent](https://docs.credenco.com/docs/guide/cli/ai/) covers the same ground as a series of
natural-language requests and the commands an agent turns them into.
### credenco-cli Usage Examples
https://docs.credenco.com/docs/guide/cli/usage/
#### credenco-cli Usage Examples
This page walks one credential, a **Bank Account** credential with the claims `iban`,
`account_name`, `currency` and `account_type`, all the way from an empty wallet to a verified
presentation. Each step shows the command and the output it produced.
Two wallets take part:
| Wallet | Profile | Role |
| --- | --- | --- |
| Tulip Trust Bank | `tulip-bank` | issues the credential, and later asks for it back |
| Ada Lovelace | `ada` | holds the credential |
Both wallets already exist, and each has a stored login profile; see
[Profiles](https://docs.credenco.com/docs/guide/cli/intro/#profiles).
:::info[Where the output comes from]
Every terminal screen below is a capture of a real run against a Credenco test environment.
Commands, flags, field names, statuses and response bodies are verbatim. Three things are
normalised for readability: the host name is written as `wallet.acc.credenco.com`, home
directories are shown as `~`, and secrets are redacted.
:::
##### 1. Which credentials are stored in my wallet?
A Business Wallet holds credentials of its own, and `credential list-wallet-holder-credentials`
lists them. Ada's wallet is empty so far:
```json
$ credenco-cli --profile ada credential list-wallet-holder-credentials
{
"content": [],
"page": {
"number": 0,
"size": 20,
"totalElements": 0,
"totalPages": 0
}
}
```
The output is JSON here because it is piped; on a terminal the same command prints a table. See
step 5 for the populated version.
##### 2. Create the issuer template
An issuer template is the credential issuer itself: the public OpenID4VCI endpoint, its
interoperability profile and the domain it is published on. In the web interface it is called a
**Credential Issuer definition**.
```json
$ credenco-cli --profile tulip-bank issuer-template create-issuer-template \
--issuer-template-key bank-account-issuer \
--name "Tulip Trust Bank" \
--description "Issues Bank Account credentials" \
--interop-profile DIIP_V4
{
"createdAt": "2026-10-13T14:26:08",
"createdBy": "Tulip Trust Bank",
"credentialIssuer": "https://wallet.acc.credenco.com/public/2a0ae7d8-2b17-4d05-94ab-02a1cc74606f/bank-account-issuer",
"credentialIssuerMetadataUrl": "https://wallet.acc.credenco.com/public/2a0ae7d8-2b17-4d05-94ab-02a1cc74606f/bank-account-issuer/.well-known/openid-credential-issuer",
"description": "Issues Bank Account credentials",
"displays": [],
"domain": "wallet.acc.credenco.com",
"interopProfile": "DIIP_V4",
"issuerTemplateKey": "bank-account-issuer",
"lastModifiedAt": "2026-10-13T14:26:09",
"lastModifiedBy": "Tulip Trust Bank",
"name": "Tulip Trust Bank"
}
```
`issuerTemplateKey` is part of the public credential issuer URL, so pick it once and keep it.
`--interop-profile` is required and takes `DIIP_V2`, `DIIP_V3`, `DIIP_V4`, `DIIP_V5` or `HAIP`; it
decides the OpenID4VCI version and the shape of the metadata URL.
##### 3. Define the Bank Account credential
The credential template says what is in the credential: its format, its type and its claims. The
`attributes` and `displays` arrays are nested objects, so they go through `--body` rather than
through a field flag. `--body` accepts inline JSON, `@file`, or `@-` for standard input.
```json title="bank-account.json"
{
"credentialTemplateKey": "bank-account-sd-jwt",
"format": "SD_JWT",
"credentialType": "BankAccountCredential",
"validityPeriod": "P1Y",
"storeCredential": true,
"issuerIdentifierKey": "f8124ef0-bf81-46fe-9655-5a2b3864ade9",
"displays": [
{
"locale": "en-US",
"name": "Bank Account",
"description": "Proof of a bank account at Tulip Trust Bank",
"textColor": "#FFFFFF",
"backgroundColor": "#03133D"
}
],
"attributes": [
{ "name": "iban", "type": "STRING", "mandatory": true, "selectivelyDisclosable": true, "displays": [{ "locale": "en-US", "name": "IBAN" }] },
{ "name": "account_name", "type": "STRING", "mandatory": true, "selectivelyDisclosable": true, "displays": [{ "locale": "en-US", "name": "Account name" }] },
{ "name": "currency", "type": "STRING", "mandatory": false, "selectivelyDisclosable": true, "displays": [{ "locale": "en-US", "name": "Currency" }] },
{ "name": "account_type", "type": "STRING", "mandatory": false, "selectivelyDisclosable": true, "displays": [{ "locale": "en-US", "name": "Account type" }] }
]
}
```
`issuerIdentifierKey` is the `externalKey` of the identifier that signs the credential. The wallet
already has a default `did:web` identifier; read it with
`credenco-cli --profile tulip-bank identifier list-identifiers`.
```json
$ credenco-cli --profile tulip-bank credential-template create-credential-template \
bank-account-issuer --body @bank-account.json
{
"attributes": [
{
"array": false,
"children": [],
"displays": [
{
"locale": "en-US",
"name": "IBAN"
}
],
"mandatory": true,
"name": "iban",
"selectivelyDisclosable": true,
"type": "STRING"
},
...
],
"contexts": [],
"credentialTemplateKey": "bank-account-sd-jwt",
"credentialType": "BankAccountCredential",
"displays": [
{
"backgroundColor": "#03133D",
"description": "Proof of a bank account at Tulip Trust Bank",
"locale": "en-US",
"name": "Bank Account",
"textColor": "#FFFFFF"
}
],
"format": "SD_JWT",
"issuerIdentifierKey": "f8124ef0-bf81-46fe-9655-5a2b3864ade9",
"issuerTemplateKey": "bank-account-issuer",
"storeCredential": true,
"validityPeriod": "P1Y"
}
```
The response also carries a `defaultTemplate` field, left out above, holding the credential
template the format uses when `customTemplate` is not set.
Two details worth knowing:
- `credentialTemplateKey` is the OpenID4VCI credential configuration id. It is the name you pass
to `credenco-cli issue`, so changing it on a `PUT` renames the template and breaks every client
still using the old key.
- `selectivelyDisclosable` is what makes step 7 possible: the holder can present `iban` and
`account_name` without revealing `currency` and `account_type`.
##### 4. Test the issue of the Bank Account credential
`credenco-cli issue` creates the offer, prints the offer URI and a scannable QR code, and then
polls the issuance status until it reaches a terminal value. The URI and the QR go to standard
error, so a piped standard output stays valid JSON.
```text
$ credenco-cli --profile tulip-bank issue bank-account-sd-jwt \
--claims '{"iban":"NL91ABNA0417164300","account_name":"Ada Lovelace","currency":"EUR","account_type":"checking"}'
Scan or open:
openid-credential-offer://?credential_offer_uri=https%3A%2F%2Fwallet.acc.credenco.com%2Fpublic%2F2a0ae7d8-2b17-4d05-94ab-02a1cc74606f%2Fbank-account-issuer%2FcredentialOffer%3Fid%3Dbfbc0336-7f8c-49d6-9d4f-4d83f4abb1e4
█████████████████████████████████████████████████████████████
█████████████████████████████████████████████████████████████
████ ▄▄▄▄▄ ██▄▀█ ▄▄█▄██▄▄█▀▀ ██▄ ██▄ ▀ ▄ ▀██ ▄▄▄▄▄ ████
████ █ █ █▄▄▀▀ ██ ▀█▀▄▄█ ▀ █▀ ▄██ ▄▄██ ▄██▀▄▀█ █ █ ████
████ █▄▄▄█ ██▄▀█▄█▀█▄ █ █▀ ▄▄▄ ▀ █▀▄ █ ███ █▄▄▄█ ████
████▄▄▄▄▄▄▄█ █ ▀ ▀ ▀▄▀ ▀▄█▄█ █▄█ █▄▀▄█▄▀ █ ▀ ▀ █ █▄▄▄▄▄▄▄████
████▄▄▄█ ▄▄▄▄█▀ ██ ███ ▄ ▄▄ ▄█ █▄▄▄█▄▄▄▀█ █▄▄▀█▀▄▀▀████
████▄ █ ▄█▄▀▀█▄▄█▄██▀▀ █▄▄█ █▄██ ██▀ ▀ ▀▄▄█▀▀▀▀███▄ ▀█ ████
████▄ █ ▀▄▄██ ▀▀█ █ █▀ █▄▄▀▀ ▄ ▄▄▄▄▄▄▄▄ ███▀█▀▄▀▀ ▀████
████ ▀▄▄▄▄▄▀▄▀▀█▄█▄▀█▀ ▄▄████ ▄█ █▄ ██▄ █▀▀▀█▀ ▄ ▀▄ ▄▄▄▄████
████▄▄▄█▀ ▄ ▄▄▀▄█▄ ▄█ █ █▀ ██ ▄▄█▄█▄█▄▄█ ▄ █▄█▄▄ █▀▀ ████
████▄▀▄ █▄▄▀▀▄█▀ ▄ ▄█▄██▄▄█████ ▀█ ▄ █▀▀██ █▀▄▄▀█▄▀ ▄▄▄████
██████▀▀▀▀▄█▄█▄█▄ ███ ▀██ ██▀ ▄█▄ ▄▄ ▄▄▄▄▄▄▄██▀▄█ ▄█ ████
████▀▀█ ▀▀▄▄█▀ ▀ ▀▀██▄ █ ▄▀█▄█▄ █ ▀ ▀█ ▄▀▄▀█▀▀█ █ ▀▄ ▄████
████▄ ▄ ▄▄▄ ▀██▄ ██ ███ ▄ ▄▄▄ █▄▀ █▄ ▄█ ██ ▄▄▄ ▀█ ████
█████▄ █▄█ ▄▄▀▄ ▄█▀▀▄ █▀ ▄ █▄█ ██▄ ▄▀▀ ▀█ ▀ █ █▄█ ▀▄ ▄████
█████▀ ▄▄ ▄ ▄▀ ▄█ █ ██ ▄▄▄ ▄█▄█▄█▄▄▄▀█▀▄▄▄█ ▄▄▄▄▄▀█ ████
████▄ ▄▀▀█▄█ ██ ██▄▄ ▄▄ ▄▀ ▄▄ ██▀ ▄▀▄▄ ██ █▀█ ▄▄▄▄█▄████
█████▀▄▄▄█▄█▄ ▄ ██▄ ▄█ █ █ ▀▄█▄ █▄▄██▄▄▄██ █▀██▀████
████ ▀ ▀▀▄▀██▀██▀▄ ▄█▄▀ ██ ██▀█▀ █▀ ██▄ ▀██ ███▄ ████
████▀██▄ ▀▄▄█▄██▄█ ▀█ ██▄ ███ ▄██▀ ▄█ ▄ ▄██ ███▀█▄▀████
████▄ ▄ █ ▄ ▄ █▄▄ ▀▀ ▄█ ▀▀ ▄ ████ ███ ▄█ ▀▀█▀ ▀ █▄▄██▄████
██████▄▀█▄▄ ▀▀ ██ ▀▄ █▀ ▄ █▄▄█▄ ▄▄ ██ ▄▄██▄ ██ █ ▀████
████▄ ▀▄▄▄▄ ▄ ▄ ███▀▄▄█▄▀▄█ ▀███▄█▄ ▄█▄▀▀█ ██ ▀ █ ▄▄▄████
███████▄██▄▄▀▄▄▄██▄ ██ ██▄ ▄▄▄ ██▄▄██▄ ██▄▄▄██ ▄▄▄ █▀▀████
████ ▄▄▄▄▄ █ ▀▀▀▄▄██▄ ▀▀█▄█ █▄█ ██ ▀██▄█▄ ▀█▄ █▄█ ███▄████
████ █ █ █▄▀▀█▄▀ ▄ ████ █ ▄▄ ▀▄█▄▄█ ▄▄▄▄██▄ ▄ ▀█▄▄████
████ █▄▄▄█ █ ▄ █▀▀▄ ▄▄ █▄▄▄▀ ██ ▀▀█▀ █▄▀ ▄█▄ █▀█▄▄▄▄▄▄▄ █████
████▄▄▄▄▄▄▄█▄██▄█████▄▄██▄▄▄▄▄▄▄▄██▄▄██▄▄██▄▄▄█▄▄██▄▄██▄▄████
█████████████████████████████████████████████████████████████
▀▀▀▀▀▀▀▀▀▀▀▀▀▀▀▀▀▀▀▀▀▀▀▀▀▀▀▀▀▀▀▀▀▀▀▀▀▀▀▀▀▀▀▀▀▀▀▀▀▀▀▀▀▀▀▀▀▀▀▀▀
status: issue_request_created
status: credential_offer_retrieved
status: issue_completed
{
"correlation_id": "0a590152-d44a-4b5b-8745-b7eb93bf82bf",
"last_updated": 1791894374805,
"request_uri": "openid-credential-offer://?credential_offer_uri=https%3A%2F%2Fwallet.acc.credenco.com%2Fpublic%2F2a0ae7d8-2b17-4d05-94ab-02a1cc74606f%2Fbank-account-issuer%2FcredentialOffer%3Fid%3Dbfbc0336-7f8c-49d6-9d4f-4d83f4abb1e4",
"status": "issue_completed",
"status_uri": "https://wallet.acc.credenco.com/api/v2/credential/issue/0a590152-d44a-4b5b-8745-b7eb93bf82bf"
}
```
The statuses an issuance passes through are `issue_request_created`,
`credential_offer_retrieved`, `awaiting_confirmation`, `confirmed`, `issue_completed` and
`error`. `issue` treats `issue_completed`, `error` and `awaiting_confirmation` as terminal:
`awaiting_confirmation` needs an out-of-band confirm call at a desk, so waiting longer cannot
move it. Pass `--wait=false` to get the offer and exit immediately, `--wait-timeout` to change the
three-minute default, and `--correlation-id` to track the issuance under your own business key.
:::caution[Nothing moves until a holder accepts the offer]
`issue` creates the offer and then waits; it cannot complete it on its own. In the capture above,
Ada's wallet accepted the offer while the command was polling, which is why the status walks on to
`issue_completed` within a few seconds. Run the same command with no holder and it sits at
`issue_request_created` or `credential_offer_retrieved` until the three-minute timeout.
With a phone, scan the QR code. With a Business Wallet as the holder, as here, the wallet resolves
and accepts the offer itself: it holds credentials of its own, which is what step 5 lists.
Unattended, pass `--wait=false`, hand the `request_uri` on, and come back with
`credenco-cli issue-credential get-credential-issuance-status `.
:::
:::info[A revocation UUID only appears at the end]
`revocation_uuid` is only present in the status once the flow reaches `issue_completed`, and only
when a status list is configured on the credential template. The template in step 3 sets no
`statusListKey`, so the credentials it issues carry no status and the status above has no
`revocation_uuid`. Add `statusListKey` to the template to be able to revoke what it issues, as in
step 8. See [Status lists and revocation](https://docs.credenco.com/docs/guide/credential-status/status-lists/).
:::
##### 5. Which credentials are stored in my wallet, again
Ada's wallet now holds the credential. On a terminal the output is a table:
```text
$ credenco-cli --profile ada credential list-wallet-holder-credentials
EXTERNALKEY DISPLAYNAME CREDENTIALFORMAT CREDENTIALSTATUS ISSUEDAT ISSUER ISSUERMETADATAURL TYPE
c4a44fe5-da89-47e8-831e-e178fecd64b8 BankAccountCredential SD_JWT VALID 2026-10-13T14:26:15 did:web:wallet.acc.credenco.com:public:did:fddcd738-826f-4702-ab02-f2a5bcd97b1a https://wallet.acc.credenco.com/public/2a0ae7d8-2b17-4d05-94ab-02a1cc74606f/bank-account-issuer/.well-known/openid-credential-issuer BankAccountCredential
```
Piping the same command gives the full credential, claims included:
```json
$ credenco-cli --profile ada credential list-wallet-holder-credentials | jq '.content[0].payload | {iban, account_name, currency, account_type, vct}'
{
"iban": "NL91ABNA0417164300",
"account_name": "Ada Lovelace",
"currency": "EUR",
"account_type": "checking",
"vct": "BankAccountCredential"
}
```
##### 6. Configure the receive of a Bank Account credential
Asking for a credential back is a **verifier template**: a name, a purpose shown to the holder, an
interoperability profile and a [DCQL](https://docs.credenco.com/docs/explained/explained-dcql/) query naming the credential
type and the claims you want. For the Bank Account credential, asking for `iban` and
`account_name` and nothing else looks like this:
```json title="bank-account-check.json"
{
"verifierTemplateKey": "bank-account-check",
"name": "Bank Account check",
"description": "Asks for the IBAN and account name from a Bank Account credential",
"purpose": "We need your IBAN and account name to set up the direct debit",
"interopProfile": "DIIP_V5",
"queryDefinition": {
"credentials": [
{
"id": "bank_account",
"format": "dc+sd-jwt",
"meta": { "vct_values": ["BankAccountCredential"] },
"claims": [
{ "path": ["iban"] },
{ "path": ["account_name"] }
]
}
]
}
}
```
The `format` in a DCQL query is the OpenID4VP format identifier, not the Business Wallet's
`SD_JWT` enum: an SD-JWT VC is `dc+sd-jwt` under `DIIP_V4`, `DIIP_V5` and `HAIP`, and `vc+sd-jwt`
under `DIIP_V2` and `DIIP_V3`.
`--dry-run` prints the exact request without sending it, which is the quickest way to check a
hand-written `queryDefinition` before it reaches the wallet:
```json
$ credenco-cli --profile tulip-bank verifier-template create-verifier-template \
--body @bank-account-check.json --dry-run
{
"dryRun": true,
"method": "POST",
"url": "https://wallet.acc.credenco.com/api/v1/wallets/2a0ae7d8-2b17-4d05-94ab-02a1cc74606f/verifier-templates",
"headers": {
"Accept": "application/json",
"Content-Type": "application/json",
"x-api-key": "[REDACTED]"
},
"requestBody": {
"verifierTemplateKey": "bank-account-check",
"name": "Bank Account check",
"description": "Asks for the IBAN and account name from a Bank Account credential",
"purpose": "We need your IBAN and account name to set up the direct debit",
"interopProfile": "DIIP_V5",
"queryDefinition": {
"credentials": [
{
"id": "bank_account",
"format": "dc+sd-jwt",
"meta": {
"vct_values": [
"BankAccountCredential"
]
},
"claims": [
{
"path": [
"iban"
]
},
{
"path": [
"account_name"
]
}
]
}
]
}
}
}
```
##### 7. Test the receive of a Bank Account credential
`credenco-cli verify ` creates an OpenID4VP authorization request, prints
the request URI and a QR code, waits for the holder's response to be verified, and prints the
verified claims.
```text
$ credenco-cli --profile tulip-bank verify bank-account-check
Scan or open:
openid4vp://authorize?client_id=decentralized_identifier%3Adid%3Aweb%3Awallet.acc.credenco.com%3Apublic%3Adid%3Afddcd738-826f-4702-ab02-f2a5bcd97b1a&request_uri=https%3A%2F%2Fwallet.acc.credenco.com%2Fpublic%2Foid4vp%2Frequest%2F08b44511-405c-4f3b-b57d-967b7fcd154c
█████████████████████████████████████████████████████████████████
█████████████████████████████████████████████████████████████████
████ ▄▄▄▄▄ ██▄▄██ █▄▄█ ▄ ▀█ ▄▄ ▄▄ █▄ ▀█ ▄▀ █▄█▄ ██ ▄▄▄▄▄ ████
████ █ █ █▄█ ▀██▄ ▄█ █▄ ▀ ██ ███ ██▄███▄▄███▄ ██ █ █ ████
████ █▄▄▄█ ██▄█▄█▄██▄▄▀█▄ █▀ ▀ ▄▄▄ ▀█ ▄▄ ▄ ▀█ ▀▄██ █▄▄▄█ ████
████▄▄▄▄▄▄▄█ ▀▄▀ ▀ ▀▄█ ▀▄█ █▄█ █▄█ █ ▀▄█ ▀▄█ █▄█ ▀▄▀▄█▄▄▄▄▄▄▄████
████▄▄ ▀ ▄▄▄▄█▄▄█▄ █▄▀ ██▄ ██▄▄▄▄▄▄█▄ ▄█▄▀▄▀ ▄▄▄▄▀▄██▄▄▀██ ▀▀████
████▀█ ▄▄▄▄ █▀▄▄▀ ▀▀█▄▄ █▄ █▀█▄▀ ▄█ ████ ▄█▄ ▀▀▀ █▀ ▄▀█▄▀▄█ ▄████
████▀█▄▄▄▄▄▄█▄█▄▄ ████ ▀█ █▄▄▄▄█▄ █▄█▄▄▄█▄▄▄▄▄▄█▀█▄█▀▄▄█ ▀████
████▀▄ ▀█▀▄ ▄ ▀▀▄ ▄█▄████▄███ ▀█▀ █▀ █▀▀▀▄█ ▀█▄▀█▀ ▄▄▄████
████▄█▄▀█ ▄█ ▀█▀▀▄ █▄ █ ▄███▄▄▄▄▄▄█▄▄▄ ▄▄ ▄▄▄▄▄█▄█▄█ ▄█ ▀████
████ ▀▀ ▄▄▀█▄▄▄█▄ █ ▄▄▄▀██▀▀▄ ▀▀▀█ ▀█▄ ▀▀▀ ▀█▄ ▀█████ ▀█▀ ████
█████ ▀▄█▄▄▄█▀██▄█▄█ █ █▀ ███ ▄▄▄ ▄ ▄▀▄█▄ ▄▄█▄ ▄ ██▄ ▀▀ ████
█████▀█ █▀▄▄ ▀ ▄█▀ ▀█▄▀ ▄ ███ █▀▄ ▀ █▄█▄▀██▀█▄▀▀ ▄▄▄▄████
█████ ▀█▄▄▄██ █ █▀ █ ██ ▀█▄▀▄ ▄██ ▄█▄█▄ ▄▄▄▄ ▄███▄▄▄▀█▀▀████
████▀ ▀ ▄▄▄ ▀▄█ ▄▄ ▄█▀▀ █▄ ▄▄▄ █ ▄█ █▀▀ ▀▄ ██ ▄▄▄ █▄ ████
████▀▄▀█ █▄█ █ █ ██ ███ ██ █▄█ █▄▄▄█ ██ ██▄▄▄▄▄ █▄█ ▀█▀ ████
████ ▀ ▄▄▄█ ███ ▄ ▄██ █▄ ▄ ▄ ▄▀▀█ ▄█▀ █▀▀ ██▄ ▄▄█▀ ████
█████▀█ ▄▀▄▄█▀▀ ▄▄█ █ ▀█ ██▀███ ▄ ▄▄ ▄ ▄ ██ ██▄ ▄██▀▄▀ ████
████ ▀▀▄ ▄▄▄█ ▀ ▄▄▀▄▄▄ ▀█▄█▄▄▄█▀▀█ █ ██▀ ▄█ ▀██▀ ██▄▀█ ██▄▄████
████▄██▄██▄▄▀▀▄▀▀ █ ▄█ ███ █ █▀█ █ ▄▄▄█▄▄ █▄ ▄██▀ ███▄▀█ ▄████
████▄ ▄▄ █▄▄▄▄█ ▄▄█ ▄█ █▄▄▄ █▀█ ▀▄██▀ ██ ▄▀▀ ██ ▀█ ██▄████
████▄█▄▄▄▄▄▀█ ▀▀▀█▄▀█ ██ ██ ▀██ ▄▄▄▀▄▀▄▀██▄▄█ ███▀ ████▀ ████
████▀▄███▀▄ ▄ ▀▄▄▄ ▄ █ ▄▄▄ █▄██ ▀ █▄ ▄█▄ ▄██ █▄█▄▄ ▄▄▄▄▄▄████
████▀█▀ ▄▀▄█▀ ▄▀ ▀▄▀█▀▄ █ ██▀ ██▄▀ ▄█ ▄█▄▄▄ ▄▄▄▄▄▀ ▄▄██▀█▄ ████
████ ▀ ▀▀▄▄ ▀▀▄█ ▀███▀███ █ █▄▄ ▄ ▀██ ▄ █▄ ▄▀██▄ ▄█▄▄▀▄████
██████████▄█ ▄▄▀▀▀█ ▄█ ██ ▄▄▄ █▄ █▄▄▄██ ▄█▄ ██▀ ▄▄▄ █▀ ████
████ ▄▄▄▄▄ █ █ ▄ ▀█▄▀▄▄▄▀██▄▀ █▄█ ▀█▀ █▄ ▀█▀▀ ▀█▀ █▄█ ▄▄ ████
████ █ █ █▄ █▄▄ █ █ ███ ▀█ ▄ ▄▄▄██▄ █▄▄ ▄█ ▄███ ▄█ ▄████
████ █▄▄▄█ █ ▀▀ ▀█▀▄▀██ ▄█▄█▄▄▄▄█▄ ▀▄▄▀▄█ ▀▄█▄ ██▀▄ ▄ ▄▀▄████
████▄▄▄▄▄▄▄█▄▄█▄▄█▄██▄▄██▄▄██▄▄█████▄█▄█▄█▄█▄█▄▄▄██▄▄▄█▄█▄█▄▄████
█████████████████████████████████████████████████████████████████
▀▀▀▀▀▀▀▀▀▀▀▀▀▀▀▀▀▀▀▀▀▀▀▀▀▀▀▀▀▀▀▀▀▀▀▀▀▀▀▀▀▀▀▀▀▀▀▀▀▀▀▀▀▀▀▀▀▀▀▀▀▀▀▀▀
status: authorization_request_created
status: authorization_response_verified
{
"correlation_id": "93b42470-0a64-4ef5-a96a-bc96eb19db8b",
"query_id": "bank-account-check",
"status": "authorization_response_verified",
"verified_data": {
"credential_claims": [
{
"claims": {
"_sd_alg": "sha-256",
"account_name": "Ada Lovelace",
"cnf": {
"kid": "did:web:wallet.acc.credenco.com:public:did:804f15a8-40e1-4c0c-b36b-693809f1bbdf#0"
},
"iban": "NL91ABNA0417164300",
"id": "urn:uuid:ab1b4ba1-e6a1-48cb-ba10-50e532e499f7",
"vct": "BankAccountCredential"
},
"id": "BankAccountCredential",
"type": "BankAccountCredential"
}
]
}
}
```
`currency` and `account_type` are absent, even though the credential carries them: the DCQL query
asked for `iban` and `account_name`, and selective disclosure kept the rest hidden. The
`verified_data` object also contains the raw `authorization_response`, with the SD-JWT and its
key binding JWT; that part is left out above.
The statuses a verification passes through are `authorization_request_created`,
`authorization_request_retrieved`, `authorization_response_received`,
`authorization_response_verified` and `error`. Only
`authorization_response_verified` carries `verified_data`, so `verify` waits for exactly that one
and treats the three earlier values as still in flight.
As with the issuance, the holder has to answer before anything happens: in the capture above Ada's
wallet matched the request against the credential from step 4 and sent back only the two required
claims while `verify` was polling. Without a holder the command stays at
`authorization_request_created` until the three-minute timeout; `--wait=false` gives you the
`request_uri` to hand on, and
`credenco-cli universal-oidc4-vp get-oid4vp-request-status ` picks the result up
later.
##### 8. Revoke an issued credential
Revocation is irreversible, so `revoke` refuses to run without `--yes`. Use `--dry-run` first; it
sends nothing, not even an OAuth token request.
```bash
credenco-cli --profile tulip-bank revoke --dry-run
credenco-cli --profile tulip-bank revoke --yes
```
The `revocation_uuid` comes from the issuance status, and only a credential template that names a
`statusListKey` ever produces one. The Bank Account template in step 3 does not, so this step does
not apply to the credential issued above; add `statusListKey` to the template first, then issue
again, and the `issue_completed` status carries the UUID this command takes.
##### 9. When something goes wrong
Errors print the API's own problem document, then a one-line summary, and the process exits with a
code describing the kind of failure rather than just "it failed".
```text
$ credenco-cli --profile tulip-bank issuer-template get-issuer-template no-such-template
{
"detail": "Issuer template not found",
"instance": "/api/v1/wallets/2a0ae7d8-2b17-4d05-94ab-02a1cc74606f/issuer-templates/no-such-template",
"status": 404,
"title": "Not Found"
}
error: GET https://wallet.acc.credenco.com/api/v1/wallets/2a0ae7d8-2b17-4d05-94ab-02a1cc74606f/issuer-templates/no-such-template returned 404: Issuer template not found
exit code: 4
```
The full table is in [the introduction](https://docs.credenco.com/docs/guide/cli/intro/). The codes that matter most in a script
are `2` for a usage or configuration mistake, `3` for bad credentials and `4` for a missing
resource.
##### Next
[Driving credenco-cli from an AI agent](https://docs.credenco.com/docs/guide/cli/ai/) runs this same walkthrough as a series of
natural-language requests.
### Driving credenco-cli from an AI Agent
https://docs.credenco.com/docs/guide/cli/ai/
#### Driving credenco-cli from an AI Agent
An AI agent with a shell can operate a Business Wallet through `credenco-cli`. Below are five
plain-English requests, the commands an agent turned them into, and the real output.
##### Examples
###### "Which credentials are stored in Ada's wallet?"
Ada is the holder who receives the Bank Account credential in the issue example below. Her wallet
has its own profile, `ada`.
Which credentials are stored in Ada's wallet?
```text
Bash(credenco-cli --profile ada credential list-wallet-holder-credentials | jq '.content[] | {type, credentialStatus, issuedAt, claims: (.payload | {iban, account_name, currency, account_type})}')
```
```text
{
"type": "BankAccountCredential",
"credentialStatus": "VALID",
… +8 lines (ctrl+o to expand)
```
One **valid** `BankAccountCredential`, issued on 2026-10-13 at 14:26:
| Claim | Value |
|---|---|
| `iban` | NL91ABNA0417164300 |
| `account_name` | Ada Lovelace |
| `currency` | EUR |
| `account_type` | checking |
###### "I want to issue Bank Account credentials with the attributes iban, account_name, currency and account_type. Make the configuration for me"
This is two objects, not one: an **issuer template** (the OpenID4VCI credential issuer) and a
**credential template** inside it (the credential's format, type and claims).
I want to issue Bank Account credentials with the attributes iban, account_name, currency and account_type. Make the configuration for me
```text
Bash(credenco-cli issuer-template create-issuer-template --issuer-template-key bank-account-issuer …)
```
```text
{
… +13 lines (ctrl+o to expand)
```
Issuer template `bank-account-issuer` is created, with interop profile `DIIP_V5`. The credential template needs the identifier that signs the credential, so I look that up first.
```text
Bash(credenco-cli identifier list-identifiers | jq -r '.content[] | select(.defaultIdentifier) | .externalKey')
```
```text
f8124ef0-bf81-46fe-9655-5a2b3864ade9
```
```text
Bash(credenco-cli credential-template create-credential-template bank-account-issuer --body @- <<'JSON' …)
```
```text
{
"attributes": [
{
… +34 lines (ctrl+o to expand)
```
Created credential template `bank-account-sd-jwt` under `bank-account-issuer`, format `SD_JWT`:
| Attribute | Mandatory | Selectively disclosable |
|---|---|---|
| `iban` | yes | yes |
| `account_name` | yes | yes |
| `currency` | no | yes |
| `account_type` | no | yes |
The response echoes the stored template, so the agent can confirm the four claims landed in order
rather than assuming they did.
:::tip[Ask the agent to preview first]
`--dry-run` on either command prints the request it would send, with the key redacted. It is the
cheapest way to review an agent's interpretation of a request like this one before anything is
created.
:::
###### "Test the issue of the Bank Account credential"
`issue` is one of the four workflow commands. It creates the offer, prints the offer URI and a
QR code to standard error, and polls the status until it is terminal. The agent only has to read
the final status from standard output.
Test the issue of the Bank Account credential
```text
Bash(credenco-cli issue bank-account-sd-jwt \
--claims '{"iban":"NL91ABNA0417164300","account_name":"Ada Lovelace","currency":"EUR","account_type":"checking"}')
```
```text
Scan or open:
openid-credential-offer://?credential_offer_uri=https%3A%2F%2Fwallet.acc.credenco.com%2Fpublic%2F2a0ae7d8-2b17-4d05-94ab-02a1cc74606f%2Fbank-account-issuer%2FcredentialOffer%3Fid%3Dbfbc0336-7f8c-49d6-9d4f-4d83f4abb1e4
█████████████████████████████████████████████████████████████
█████████████████████████████████████████████████████████████
████ ▄▄▄▄▄ ██▄▀█ ▄▄█▄██▄▄█▀▀ ██▄ ██▄ ▀ ▄ ▀██ ▄▄▄▄▄ ████
████ █ █ █▄▄▀▀ ██ ▀█▀▄▄█ ▀ █▀ ▄██ ▄▄██ ▄██▀▄▀█ █ █ ████
████ █▄▄▄█ ██▄▀█▄█▀█▄ █ █▀ ▄▄▄ ▀ █▀▄ █ ███ █▄▄▄█ ████
████▄▄▄▄▄▄▄█ █ ▀ ▀ ▀▄▀ ▀▄█▄█ █▄█ █▄▀▄█▄▀ █ ▀ ▀ █ █▄▄▄▄▄▄▄████
████▄▄▄█ ▄▄▄▄█▀ ██ ███ ▄ ▄▄ ▄█ █▄▄▄█▄▄▄▀█ █▄▄▀█▀▄▀▀████
████▄ █ ▄█▄▀▀█▄▄█▄██▀▀ █▄▄█ █▄██ ██▀ ▀ ▀▄▄█▀▀▀▀███▄ ▀█ ████
████▄ █ ▀▄▄██ ▀▀█ █ █▀ █▄▄▀▀ ▄ ▄▄▄▄▄▄▄▄ ███▀█▀▄▀▀ ▀████
████ ▀▄▄▄▄▄▀▄▀▀█▄█▄▀█▀ ▄▄████ ▄█ █▄ ██▄ █▀▀▀█▀ ▄ ▀▄ ▄▄▄▄████
████▄▄▄█▀ ▄ ▄▄▀▄█▄ ▄█ █ █▀ ██ ▄▄█▄█▄█▄▄█ ▄ █▄█▄▄ █▀▀ ████
████▄▀▄ █▄▄▀▀▄█▀ ▄ ▄█▄██▄▄█████ ▀█ ▄ █▀▀██ █▀▄▄▀█▄▀ ▄▄▄████
██████▀▀▀▀▄█▄█▄█▄ ███ ▀██ ██▀ ▄█▄ ▄▄ ▄▄▄▄▄▄▄██▀▄█ ▄█ ████
████▀▀█ ▀▀▄▄█▀ ▀ ▀▀██▄ █ ▄▀█▄█▄ █ ▀ ▀█ ▄▀▄▀█▀▀█ █ ▀▄ ▄████
████▄ ▄ ▄▄▄ ▀██▄ ██ ███ ▄ ▄▄▄ █▄▀ █▄ ▄█ ██ ▄▄▄ ▀█ ████
█████▄ █▄█ ▄▄▀▄ ▄█▀▀▄ █▀ ▄ █▄█ ██▄ ▄▀▀ ▀█ ▀ █ █▄█ ▀▄ ▄████
█████▀ ▄▄ ▄ ▄▀ ▄█ █ ██ ▄▄▄ ▄█▄█▄█▄▄▄▀█▀▄▄▄█ ▄▄▄▄▄▀█ ████
████▄ ▄▀▀█▄█ ██ ██▄▄ ▄▄ ▄▀ ▄▄ ██▀ ▄▀▄▄ ██ █▀█ ▄▄▄▄█▄████
█████▀▄▄▄█▄█▄ ▄ ██▄ ▄█ █ █ ▀▄█▄ █▄▄██▄▄▄██ █▀██▀████
████ ▀ ▀▀▄▀██▀██▀▄ ▄█▄▀ ██ ██▀█▀ █▀ ██▄ ▀██ ███▄ ████
████▀██▄ ▀▄▄█▄██▄█ ▀█ ██▄ ███ ▄██▀ ▄█ ▄ ▄██ ███▀█▄▀████
████▄ ▄ █ ▄ ▄ █▄▄ ▀▀ ▄█ ▀▀ ▄ ████ ███ ▄█ ▀▀█▀ ▀ █▄▄██▄████
██████▄▀█▄▄ ▀▀ ██ ▀▄ █▀ ▄ █▄▄█▄ ▄▄ ██ ▄▄██▄ ██ █ ▀████
████▄ ▀▄▄▄▄ ▄ ▄ ███▀▄▄█▄▀▄█ ▀███▄█▄ ▄█▄▀▀█ ██ ▀ █ ▄▄▄████
███████▄██▄▄▀▄▄▄██▄ ██ ██▄ ▄▄▄ ██▄▄██▄ ██▄▄▄██ ▄▄▄ █▀▀████
████ ▄▄▄▄▄ █ ▀▀▀▄▄██▄ ▀▀█▄█ █▄█ ██ ▀██▄█▄ ▀█▄ █▄█ ███▄████
████ █ █ █▄▀▀█▄▀ ▄ ████ █ ▄▄ ▀▄█▄▄█ ▄▄▄▄██▄ ▄ ▀█▄▄████
████ █▄▄▄█ █ ▄ █▀▀▄ ▄▄ █▄▄▄▀ ██ ▀▀█▀ █▄▀ ▄█▄ █▀█▄▄▄▄▄▄▄ █████
████▄▄▄▄▄▄▄█▄██▄█████▄▄██▄▄▄▄▄▄▄▄██▄▄██▄▄██▄▄▄█▄▄██▄▄██▄▄████
█████████████████████████████████████████████████████████████
▀▀▀▀▀▀▀▀▀▀▀▀▀▀▀▀▀▀▀▀▀▀▀▀▀▀▀▀▀▀▀▀▀▀▀▀▀▀▀▀▀▀▀▀▀▀▀▀▀▀▀▀▀▀▀▀▀▀▀▀▀
status: issue_request_created
status: credential_offer_retrieved
status: issue_completed
{
"correlation_id": "0a590152-d44a-4b5b-8745-b7eb93bf82bf",
… +5 lines (ctrl+o to expand)
```
The wallet accepted the offer: the issuance ended with status **`issue_completed`** (correlation id `0a590152-d44a-4b5b-8745-b7eb93bf82bf`).
Two things an agent has to get right here:
- **A credential offer needs a holder.** The flow only reaches `issue_completed` once a wallet
accepts the offer. An agent working unattended should pass `--wait=false`, hand the `request_uri`
to whoever is holding the phone, and poll
`credenco-cli issue-credential get-credential-issuance-status ` afterwards.
- **`awaiting_confirmation` is terminal for this command, but not for the flow.** It means the
issuance is waiting for an out-of-band confirmation at a desk. Polling longer will not move it;
`credenco-cli issue-credential confirm-credential-issuance --confirmation-code `
will.
###### "I want to receive BankAccount credentials, with the iban and account_name attributes. Make the configuration for me"
Receiving a credential is a **verifier template**: a purpose shown to the holder plus a
[DCQL](https://docs.credenco.com/docs/explained/explained-dcql/) query naming the credential type and the exact claims
wanted. This is the request where an agent earns its keep, because the mapping from the sentence
to DCQL is mechanical but easy for a person to get wrong.
I want to receive BankAccount credentials, with the iban and account_name attributes. Make the configuration for me
```text
Bash(credenco-cli verifier-template create-verifier-template --body @bank-account-check.json --dry-run)
```
```text
{
"dryRun": true,
"method": "POST",
… +39 lines (ctrl+o to expand)
```
This is the request I would send. It is a **dry run**, so nothing is created yet:
- Verifier template `bank-account-check`, interop profile `DIIP_V5`
- Asks for a `BankAccountCredential` in format `dc+sd-jwt`
- Requested claims: `iban` and `account_name`
Say **go** and I will create it.
go
```text
Bash(credenco-cli verifier-template create-verifier-template --body @bank-account-check.json)
```
```text
{
"clientId": "decentralized_identifier:did:web:wallet.acc.credenco.com:public:did:fddcd738-826f-4702-ab02-f2a5bcd97b1a",
… +67 lines (ctrl+o to expand)
```
Created verifier template `bank-account-check`. It asks holders for the `iban` and `account_name` of a `BankAccountCredential` and signs its requests with the wallet's default identifier. The receive can be tested now.
Note the `format`: in DCQL it is the OpenID4VP identifier `dc+sd-jwt` under `DIIP_V4`, `DIIP_V5`
and `HAIP`, not the Business Wallet's own `SD_JWT` enum. An agent that copies `SD_JWT` into the
query here produces a template that matches nothing, and `--dry-run` is where that shows up.
###### "Test the receive of a BankAccount credential"
`verify` takes the verifier template key, creates the OpenID4VP authorization request, waits for
the holder's response to be verified, and prints the claims.
Test the receive of a BankAccount credential
```text
Bash(credenco-cli verify bank-account-check)
```
```text
Scan or open:
openid4vp://authorize?client_id=decentralized_identifier%3Adid%3Aweb%3Awallet.acc.credenco.com%3Apublic%3Adid%3Afddcd738-826f-4702-ab02-f2a5bcd97b1a&request_uri=https%3A%2F%2Fwallet.acc.credenco.com%2Fpublic%2Foid4vp%2Frequest%2F08b44511-405c-4f3b-b57d-967b7fcd154c
█████████████████████████████████████████████████████████████████
█████████████████████████████████████████████████████████████████
████ ▄▄▄▄▄ ██▄▄██ █▄▄█ ▄ ▀█ ▄▄ ▄▄ █▄ ▀█ ▄▀ █▄█▄ ██ ▄▄▄▄▄ ████
████ █ █ █▄█ ▀██▄ ▄█ █▄ ▀ ██ ███ ██▄███▄▄███▄ ██ █ █ ████
████ █▄▄▄█ ██▄█▄█▄██▄▄▀█▄ █▀ ▀ ▄▄▄ ▀█ ▄▄ ▄ ▀█ ▀▄██ █▄▄▄█ ████
████▄▄▄▄▄▄▄█ ▀▄▀ ▀ ▀▄█ ▀▄█ █▄█ █▄█ █ ▀▄█ ▀▄█ █▄█ ▀▄▀▄█▄▄▄▄▄▄▄████
████▄▄ ▀ ▄▄▄▄█▄▄█▄ █▄▀ ██▄ ██▄▄▄▄▄▄█▄ ▄█▄▀▄▀ ▄▄▄▄▀▄██▄▄▀██ ▀▀████
████▀█ ▄▄▄▄ █▀▄▄▀ ▀▀█▄▄ █▄ █▀█▄▀ ▄█ ████ ▄█▄ ▀▀▀ █▀ ▄▀█▄▀▄█ ▄████
████▀█▄▄▄▄▄▄█▄█▄▄ ████ ▀█ █▄▄▄▄█▄ █▄█▄▄▄█▄▄▄▄▄▄█▀█▄█▀▄▄█ ▀████
████▀▄ ▀█▀▄ ▄ ▀▀▄ ▄█▄████▄███ ▀█▀ █▀ █▀▀▀▄█ ▀█▄▀█▀ ▄▄▄████
████▄█▄▀█ ▄█ ▀█▀▀▄ █▄ █ ▄███▄▄▄▄▄▄█▄▄▄ ▄▄ ▄▄▄▄▄█▄█▄█ ▄█ ▀████
████ ▀▀ ▄▄▀█▄▄▄█▄ █ ▄▄▄▀██▀▀▄ ▀▀▀█ ▀█▄ ▀▀▀ ▀█▄ ▀█████ ▀█▀ ████
█████ ▀▄█▄▄▄█▀██▄█▄█ █ █▀ ███ ▄▄▄ ▄ ▄▀▄█▄ ▄▄█▄ ▄ ██▄ ▀▀ ████
█████▀█ █▀▄▄ ▀ ▄█▀ ▀█▄▀ ▄ ███ █▀▄ ▀ █▄█▄▀██▀█▄▀▀ ▄▄▄▄████
█████ ▀█▄▄▄██ █ █▀ █ ██ ▀█▄▀▄ ▄██ ▄█▄█▄ ▄▄▄▄ ▄███▄▄▄▀█▀▀████
████▀ ▀ ▄▄▄ ▀▄█ ▄▄ ▄█▀▀ █▄ ▄▄▄ █ ▄█ █▀▀ ▀▄ ██ ▄▄▄ █▄ ████
████▀▄▀█ █▄█ █ █ ██ ███ ██ █▄█ █▄▄▄█ ██ ██▄▄▄▄▄ █▄█ ▀█▀ ████
████ ▀ ▄▄▄█ ███ ▄ ▄██ █▄ ▄ ▄ ▄▀▀█ ▄█▀ █▀▀ ██▄ ▄▄█▀ ████
█████▀█ ▄▀▄▄█▀▀ ▄▄█ █ ▀█ ██▀███ ▄ ▄▄ ▄ ▄ ██ ██▄ ▄██▀▄▀ ████
████ ▀▀▄ ▄▄▄█ ▀ ▄▄▀▄▄▄ ▀█▄█▄▄▄█▀▀█ █ ██▀ ▄█ ▀██▀ ██▄▀█ ██▄▄████
████▄██▄██▄▄▀▀▄▀▀ █ ▄█ ███ █ █▀█ █ ▄▄▄█▄▄ █▄ ▄██▀ ███▄▀█ ▄████
████▄ ▄▄ █▄▄▄▄█ ▄▄█ ▄█ █▄▄▄ █▀█ ▀▄██▀ ██ ▄▀▀ ██ ▀█ ██▄████
████▄█▄▄▄▄▄▀█ ▀▀▀█▄▀█ ██ ██ ▀██ ▄▄▄▀▄▀▄▀██▄▄█ ███▀ ████▀ ████
████▀▄███▀▄ ▄ ▀▄▄▄ ▄ █ ▄▄▄ █▄██ ▀ █▄ ▄█▄ ▄██ █▄█▄▄ ▄▄▄▄▄▄████
████▀█▀ ▄▀▄█▀ ▄▀ ▀▄▀█▀▄ █ ██▀ ██▄▀ ▄█ ▄█▄▄▄ ▄▄▄▄▄▀ ▄▄██▀█▄ ████
████ ▀ ▀▀▄▄ ▀▀▄█ ▀███▀███ █ █▄▄ ▄ ▀██ ▄ █▄ ▄▀██▄ ▄█▄▄▀▄████
██████████▄█ ▄▄▀▀▀█ ▄█ ██ ▄▄▄ █▄ █▄▄▄██ ▄█▄ ██▀ ▄▄▄ █▀ ████
████ ▄▄▄▄▄ █ █ ▄ ▀█▄▀▄▄▄▀██▄▀ █▄█ ▀█▀ █▄ ▀█▀▀ ▀█▀ █▄█ ▄▄ ████
████ █ █ █▄ █▄▄ █ █ ███ ▀█ ▄ ▄▄▄██▄ █▄▄ ▄█ ▄███ ▄█ ▄████
████ █▄▄▄█ █ ▀▀ ▀█▀▄▀██ ▄█▄█▄▄▄▄█▄ ▀▄▄▀▄█ ▀▄█▄ ██▀▄ ▄ ▄▀▄████
████▄▄▄▄▄▄▄█▄▄█▄▄█▄██▄▄██▄▄██▄▄█████▄█▄█▄█▄█▄█▄▄▄██▄▄▄█▄█▄█▄▄████
█████████████████████████████████████████████████████████████████
▀▀▀▀▀▀▀▀▀▀▀▀▀▀▀▀▀▀▀▀▀▀▀▀▀▀▀▀▀▀▀▀▀▀▀▀▀▀▀▀▀▀▀▀▀▀▀▀▀▀▀▀▀▀▀▀▀▀▀▀▀▀▀▀▀
status: authorization_request_created
status: authorization_response_verified
{
"correlation_id": "93b42470-0a64-4ef5-a96a-bc96eb19db8b",
… +21 lines (ctrl+o to expand)
```
Verified. The holder disclosed exactly the requested claims:
| Claim | Value |
|---|---|
| `iban` | NL91ABNA0417164300 |
| `account_name` | Ada Lovelace |
`currency` and `account_type` stayed hidden.
`currency` and `account_type` are absent even though the credential carries them, because the DCQL
query asked for `iban` and `account_name` and selective disclosure kept the rest hidden. That is
the result an agent should check: not "the command exited 0", but "the claims I asked for are in
`verified_data.credential_claims`, and nothing else is".
:::caution[Only one status carries the claims]
Of the five verification statuses, only `authorization_response_verified` has `verified_data`.
An agent that treats the first poll as the answer gets `authorization_request_created` and no
claims at all, and would report a success that proved nothing. `verify` waits for the verified
status for exactly this reason; if you poll
`credenco-cli universal-oidc4-vp get-oid4vp-request-status` yourself, wait for it too.
:::
##### A prompt that works
Nothing here needs a custom tool definition. Pointing the agent at the binary is enough:
```text
You have `credenco-cli` on your PATH and a logged-in profile for the Business Wallet.
- Run `credenco-cli operations` and `credenco-cli --help` to find out what exists. Never guess a flag or a field name.
- An API call writes JSON to standard output, because you are not a terminal. Parse it. Progress messages, QR codes and errors are on standard error. `operations`, `profile list` and `--help` are plain text instead: read them, do not parse them.
- Branch on the exit code, not on the message: 1 local failure, 2 usage or configuration, 3 authentication, 4 not found, 5 server error, 6 other API error.
- Before anything that creates, changes or deletes, run the command with `--dry-run`, show me the request, and wait for me to say go.
- Never pass a secret as a flag. The stored profile already holds the credentials.
- Never add `--yes` without asking me first.
```
##### Setup
Run `credenco-cli login` once yourself. It stores the host, the credentials and the default wallet
in a profile, and the agent uses that profile without having to handle the secret. See
[Profiles](https://docs.credenco.com/docs/guide/cli/intro/#profiles).
```text
$ credenco-cli login wallet.acc.credenco.com
```
An API key is bound to one wallet, so start the agent on a sandbox wallet. See
[API Keys](https://docs.credenco.com/docs/guide/api-access/api-keys/).
##### Next
- [Usage examples](https://docs.credenco.com/docs/guide/cli/usage/) is the same walkthrough with every step spelled out.
- [The credenco-cli introduction](https://docs.credenco.com/docs/guide/cli/intro/) covers installation, profiles, output formats
and the full exit-code table.
## On-premise Deployment
### On-Premise Deployment
https://docs.credenco.com/docs/onpremise/intro/
#### Introduction
This section provides comprehensive information about deploying the Business Wallet in an on-premise environment.
##### Overview
The Business Wallet can be deployed in your own infrastructure, giving you full control over your data and the deployment environment.
##### Requirements
Before deploying the Business Wallet on-premise, ensure you have the following:
1. A Kubernetes platform to run containers.
1. A PostgresQL database cluster
1. Helm (3.8.0+) to run Helm templates. The Helm templates are provides to install the Business Wallet in your Kubernetes cluster
1. An oAuth 2.0 Identity Provider (tested with KeyCloak)
1. Make sure when using ArgoCD the Helm 3.8.0+ version is supported. Helm 3.8.0+ is needed as this version supports OCI images.
### OAuth2 Identity Provider Configuration
https://docs.credenco.com/docs/onpremise/idp/
#### oAuth2 Identity Provider
This section provides information about required Identity Provider configuration.
##### Overview
- A Realm has to be available in the Identity Provider (IdP)
- After authentication by the IdP a JWT token has to be provided
- The jwt needs the following attributes:
- "wallet_external_key": ["<the wallet uuid>"]
- "given_name": "<given_name>"
- "family_name": "<family name>"
- An oAuth IdP client configuration for the frontend.
The frontend container needs the following environment variables:
```
IAM_URL: https://iam.credenco.com
IAM_REALM: organization-wallet
IAM_CLIENT_ID: organization-wallet-frontend
```
OR
When using the provided helm chart these setting can be configured in the values.yaml
```
- configMap:
environmentVars:
IAM_URL: https://iam.credenco.com
IAM_REALM: organization-wallet
IAM_CLIENT_ID: organization-wallet-frontend
```
- An oAuth client configuration for the backend
The details must be provided as en environment variable or a ConfigMap setting.
- Setting in configMap:
```spring.security.oauth2.resourceserver.jwt.issuer-uri: https://iam.credenco.com/realms/organization-wallet```
OR
an evironment variable in the backend container:
```SPRING_SECURITY_OAUTH_2_RESOURCESERVER_JWT_ISSUERURI: https://iam.credenco.com/realms/organization-wallet```
- When using the provides helm charts:
```
- configMap:
spring.security.oauth2.resourceserver.jwt.issuer-uri: https://iam.acc.credenco.com/realms/organization-wallet
```
### Installation Guide
https://docs.credenco.com/docs/onpremise/installation/
#### Installation
This section provides comprehensive instructions for deploying the Business Wallet on-premise using the provided Helm charts.
##### Overview
The installation process consists of three main steps:
1. Setting up the required PostgreSQL database
2. Creating necessary Kubernetes secrets
3. Deploying the application using Helm charts
##### Prerequisites
Before proceeding with the installation, ensure you have:
- Access to a Kubernetes cluster
- PostgreSQL database server
- Kubectl command-line tool configured to communicate with your cluster
- Helm 3.8.0 or later installed or ArgoCD v2.3 or later
##### Database Setup
The Business Wallet requires a PostgreSQL database for operation.
1. Create a new PostgreSQL database. In this documentation, we use the name `organization_wallet`. Note that the database naming in this documentation serves as examples only - you may use your own naming convention.
2. Create a database user `organization_wallet_flyway_user` for maintaining the database schema. This user requires DDL (Data Definition Language) authorizations to create and update schemas:
```sql
CREATE USER organization_wallet_flyway_user WITH ENCRYPTED PASSWORD 'your_flyway_password';
GRANT ALL ON DATABASE organization_wallet TO organization_wallet_flyway_user;
```
3. Create a database user `organization_wallet_user` for normal operation. This user requires DML (Data Manipulation Language) authorizations:
```sql
CREATE USER organization_wallet_user WITH ENCRYPTED PASSWORD 'your_password';
GRANT CONNECT ON DATABASE organization_wallet TO organization_wallet_user;
GRANT USAGE ON SCHEMA public TO organization_wallet_user;
GRANT ALL on ALL TABLES IN SCHEMA public TO organization_wallet_user;
GRANT ALL on ALL SEQUENCES IN SCHEMA public TO organization_wallet_user;
```
##### Kubernetes Secrets Configuration
You need to create three Kubernetes secrets for the application components:
1. A secret for the backend containing the database credentials. The name `organization-webwallet-backend` is fixed:
```shell
kubectl create secret generic organization-webwallet-backend \
--namespace=your-namespace \
--from-literal=spring.flyway.user=organization_wallet_flyway_user \
--from-literal=spring.flyway.password='your-flyway-password' \
--from-literal=spring.datasource.username=organization_wallet_user \
--from-literal=spring.datasource.password='your-password'
```
1. An empty secret for the frontend. The name `organization-webwallet-frontend` is fixed:
```shell
kubectl create secret generic organization-webwallet-frontend \
--namespace=your-namespace
```
1. An empty secret for the documentation. The name `organization-webwallet-documentation` is fixed:
```shell
kubectl create secret generic organization-webwallet-documentation \
--namespace=your-namespace
```
1. Create a secret for pulling the container images. Contact Credenco for the Helm and container registry access credentials.
```shell
kubectl create secret docker-registry global-pull-secret \
--docker-server=registry.onstackit.cloud
--docker-username=robot\$organization-wallet+customername \
--docker-password=your-password \
--namespace=your-namespace
```
***Important***: escape $ in docker-username
##### Helm Chart Deployment
After setting up the database and creating the required Kubernetes secrets, you can deploy the Business Wallet using the provided Helm charts:
1. Create your own git repo containing a `Chart.yaml` and `values.yaml` containing the complete deployment configuration of the Credenco Business Wallet.
1. Create a 'Chart.yaml' file containing the organization-wallet as a dependency:
```yaml
apiVersion: v2
name: your-organization-wallet
description: Your Helm chart for deploying the Credenco Business Wallet in Kubernetes
type: application
version: 1.0.0
appVersion: 1.0.0
dependencies:
- name: organization-webwallet
version: 1.0.10
repository: oci://registry.onstackit.cloud/organization-wallet/organization-webwallet/helm
```
With this example you deploy version 1.0.10 of the Credenco Business Wallet in your Kubernetes cluster.
1. Create a `values.yaml` file containing all your installation specific configuration. See all value options below.
1. Perform a Helm Login to be able to access the Helm Charts and containers. Contact Credenco for the Helm and container registry access credentials:
```shell
CREDENCO_HELM_REGISTRY_USERNAME=your_username
CREDENCO_HELM_REGISTRY_PASSWORD=your_password
echo "$CREDENCO_HELM_REGISTRY_PASSWORD" | helm registry login -u "$CREDENCO_HELM_REGISTRY_USERNAME" --password-stdin registry.onstackit.cloud
```
1. Install the Business Wallet using the Helm chart:
```shell
cd your_installation_dir_containing_the_values.yaml
helm install -f values.yaml organization-wallet .
```
##### Values
###### global
| Key | Type | Default | Description |
|-----|------|---------|-------------|
| global.deployEnvironment | string | `"prod"` | the environment in which the software is deployed. Allowed values: test, acc, prod |
| global.networkPolicy.database | object | `{"enabled":true,"ipBased":{"allowedCidrs":["10.0.0.0/32"]},"namespaceBased":{"allowedNamespace":"postgres","podSelectorLabels":{"app.kubernetes.io/name":"postgres"}}}` | Access to the database is controlled based on IP ranges or namespace and pod labels |
| global.networkPolicy.database.enabled | bool | `true` | Enable this NetworkPolicie. When disabled, no NetworkPolicy will be created. |
| global.networkPolicy.database.ipBased | object | `{"allowedCidrs":["10.0.0.0/32"]}` | Configuration for database access based on IP/CIDR ranges |
| global.networkPolicy.database.ipBased.allowedCidrs | list | `["10.0.0.0/32"]` | A list of CIDR ranges that are allowed to be accessed (e.g., managed database IPs) |
| global.networkPolicy.database.namespaceBased | object | `{"allowedNamespace":"postgres","podSelectorLabels":{"app.kubernetes.io/name":"postgres"}}` | Configuration for database access based on namespace and pod labels |
| global.networkPolicy.database.namespaceBased.allowedNamespace | string | `"postgres"` | The namespace where the database is running |
| global.networkPolicy.database.namespaceBased.podSelectorLabels | object | `{"app.kubernetes.io/name":"postgres"}` | The labels used to select the database pods |
| global.networkPolicy.denyAll.enabled | bool | `true` | Enable this NetworkPolicie. When disabled, no NetworkPolicy will be created. |
| global.networkPolicy.enabled | bool | `false` | Enable NetworkPolicies for the namespace. When disabled, no NetworkPolicies will be created. |
| global.networkPolicy.ingressController.enabled | bool | `true` | Enable this NetworkPolicie. When disabled, no NetworkPolicy will be created. |
| global.networkPolicy.ingressController.namespace | string | `"ingress-nginx"` | The namespace where the ingress controller is running |
| global.networkPolicy.ingressController.podSelectorLabels | object | `{"app.kubernetes.io/name":"ingress-nginx"}` | The labels used to select the ingress controller pods |
| global.networkPolicy.internal.enabled | bool | `true` | Enable this NetworkPolicie. When disabled, no NetworkPolicy will be created. |
| global.networkPolicy.monitoring.enabled | bool | `true` | Enable this NetworkPolicie. When disabled, no NetworkPolicy will be created. |
| global.networkPolicy.monitoring.namespace | string | `"monitoring"` | The namespace where the monitoring system (e.g., Prometheus) is running |
| global.networkPolicy.monitoring.podSelectorLabels | object | `{"app.kubernetes.io/name":"prometheus"}` | The labels used to select the monitoring pods |
###### organization-webwallet-backend
| Key | Type | Default | Description |
|-----|------|---------|-------------|
| organization-webwallet-backend.microservice.configMap.environmentVars.config_wallet_url | string | `"https://wallet.yoursite.com"` | The hostname used to access the Organization Wallet |
| organization-webwallet-backend.microservice.configMap.environmentVars.environment_checkers_internet_enabled | string | `"true"` | Enables the internet connectivity checker that verifies internet access on application startup. The checker retries with exponential backoff if the internet is not available. |
| organization-webwallet-backend.microservice.configMap.environmentVars.features_flags_AITRANSLATIONS | string | `"true"` | The feature flag AI_TRANSLATIONS enables the option to translate texts in the frontend vai the AI translation service. This service is connected to Mistral AI. A Mistal API key is required. |
| organization-webwallet-backend.microservice.configMap.environmentVars.features_flags_APPLICATIONSINVOICE | string | `"true"` | The feature flag APPLICATIONS_INVOICE enables the invoice application |
| organization-webwallet-backend.microservice.configMap.environmentVars.features_flags_AUTOREFRESHEXTERNALISSUERCONFIGURATION | string | `"true"` | The feature flag AUTO_REFRESH_EXTERNAL_ISSUER_CONFIGURATION enables the auto refresh of external issuer configurations |
| organization-webwallet-backend.microservice.configMap.environmentVars.features_flags_FIDESBLUEPAGES | string | `"true"` | The feature flag FIDES_BLUE_PAGES enables the Fides Blue Pages. |
| organization-webwallet-backend.microservice.configMap.environmentVars.features_flags_FIDESCREDENTIALCATALOG | string | `"true"` | The feature flag FIDES_CREDENTIAL_CATALOG enables the Fides Credential Catalog. |
| organization-webwallet-backend.microservice.configMap.environmentVars.features_flags_IAMAPIMANAGEMENT | string | `"true"` | The feature flag IAM_API_MANAGEMENT enables the option to manage keycloak OAuth2 clients and api-keys in the frontend. The OAuth2 clients and api-keys can be used to access the backend API. |
| organization-webwallet-backend.microservice.configMap.environmentVars.features_flags_IAMUSERMANAGEMENT | string | `"true"` | The feature flag IAM_USER_MANAGEMENT enables the option to manage keycloak users in the frontend |
| organization-webwallet-backend.microservice.configMap.environmentVars.oauth2_baseUrl | string | `"https://iam.yoursite.com"` | The url of the oAuth2 Identity Provider |
| organization-webwallet-backend.microservice.configMap.environmentVars.oauth2_frontend_clientid | string | `"organization-wallet-frontend"` | The Client ID used by the frontend during authentication |
| organization-webwallet-backend.microservice.configMap.environmentVars.oauth2_realm | string | `"organization-wallet"` | The Realm to authenticate against |
| organization-webwallet-backend.microservice.configMap.environmentVars.spring_datasource_url | string | `"jdbc:postgresql://yourpostgesql-host:2506/organization_wallet"` | The PostresQL jdbc connection url to your postgresql database |
| organization-webwallet-backend.microservice.configMap.environmentVars.spring_flyway_url | string | `"jdbc:postgresql://yourpostgesql-host:2506/organization_wallet"` | The PostresQL jdbc connection url to your postgresql database |
| organization-webwallet-backend.microservice.configMap.extraLabels | object | `{}` | Extra labels to add to the ConfigMap resource |
| organization-webwallet-backend.microservice.deployment.extraLabels | object | `{}` | Extra labels to add to the Deployment resource |
| organization-webwallet-backend.microservice.deployment.image.pullPolicy | string | `"IfNotPresent"` | The pull policy for the container image |
| organization-webwallet-backend.microservice.deployment.image.registry | string | `"oci-registry.yoursite.com"` | The OCI registry you want to use to download the container images from |
| organization-webwallet-backend.microservice.deployment.imagePullSecretName | string | `"global-pull-secret"` | The name of the secret containing the credentials to pull containers from the OCI container registry |
| organization-webwallet-backend.microservice.deployment.replicaCount | int | `2` | The number of pods to be started |
| organization-webwallet-backend.microservice.ingress.default.extraLabels | object | `{}` | Extra labels to add to the default Ingress resource |
| organization-webwallet-backend.microservice.ingress.default.hosts[0].configName | string | `"organization-webwallet"` | Keep this name to organization-webwallet for the primary hostname |
| organization-webwallet-backend.microservice.ingress.default.hosts[0].hostname | string | `"wallet.yoursite.com"` | The hostname used to access the Organization Wallet |
| organization-webwallet-backend.microservice.ingress.default.hosts[0].maxUploadFilesize | string | `"100m"` | A limit to the maximum file upload size |
| organization-webwallet-backend.microservice.ingress.default.name | string | `"default"` | An arbitrary unique name to name the ingresses in k8s |
| organization-webwallet-backend.microservice.ingress.default.paths[0].path | string | `"/"` | The path to access the Organization Wallet. Keep on / |
| organization-webwallet-backend.microservice.ingress.extraIngresses[0].extraLabels | object | `{}` | Extra labels to add to this extra Ingress resource |
| organization-webwallet-backend.microservice.ingress.extraIngresses[0].hosts[0].hostname | string | `"did.wallet.yoursite.com"` | The hostname used to access the Organization Wallet |
| organization-webwallet-backend.microservice.ingress.extraIngresses[0].hosts[0].maxUploadFilesize | string | `"100m"` | A limit to the maximum file upload size |
| organization-webwallet-backend.microservice.ingress.extraIngresses[0].name | string | `"did"` | An arbitrary unique name to name the ingresses in k8s |
| organization-webwallet-backend.microservice.ingress.extraIngresses[0].paths[0].path | string | `"/did"` | The path to access the Organization Wallet. |
| organization-webwallet-backend.microservice.service.extraLabels | object | `{}` | Extra labels to add to the Service resource |
###### organization-webwallet-documentation
| Key | Type | Default | Description |
|-----|------|---------|-------------|
| organization-webwallet-documentation.frontend.configMap.extraLabels | object | `{}` | Extra labels to add to the ConfigMap resource |
| organization-webwallet-documentation.frontend.deployment.extraLabels | object | `{}` | Extra labels to add to the Deployment resource |
| organization-webwallet-documentation.frontend.deployment.image.pullPolicy | string | `"IfNotPresent"` | The pull policy for the container image |
| organization-webwallet-documentation.frontend.deployment.image.registry | string | `"oci-registry.yoursite.com"` | The OCI registry you want to use to download the container images from |
| organization-webwallet-documentation.frontend.deployment.imagePullSecretName | string | `"global-pull-secret"` | The name of the secret containing the credentials to pull containers from the OCI container registry |
| organization-webwallet-documentation.frontend.deployment.replicaCount | int | `1` | The number of pods to be started |
| organization-webwallet-documentation.frontend.ingress.default.extraLabels | object | `{}` | Extra labels to add to the default Ingress resource |
| organization-webwallet-documentation.frontend.ingress.default.hosts[0].configName | string | `"organization-webwallet-documentation"` | Keep this name to organization-webwallet-documentation for the primary hostname |
| organization-webwallet-documentation.frontend.ingress.default.hosts[0].hostname | string | `"docs.yoursite.com"` | The hostname used to access the Organization Wallet |
| organization-webwallet-documentation.frontend.ingress.default.name | string | `"web"` | An arbitrary unique name to name the ingresses in k8s |
| organization-webwallet-documentation.frontend.ingress.default.paths[0].path | string | `"/"` | The path to access the Organization Wallet. Keep on / |
| organization-webwallet-documentation.frontend.service.extraLabels | object | `{}` | Extra labels to add to the Service resource |
###### organization-webwallet-frontend
| Key | Type | Default | Description |
|-----|------|---------|-------------|
| organization-webwallet-frontend.frontend.configMap.extraLabels | object | `{}` | Extra labels to add to the ConfigMap resource |
| organization-webwallet-frontend.frontend.deployment.extraLabels | object | `{}` | Extra labels to add to the Deployment resource |
| organization-webwallet-frontend.frontend.deployment.image.pullPolicy | string | `"IfNotPresent"` | The pull policy for the container image |
| organization-webwallet-frontend.frontend.deployment.image.registry | string | `"oci-registry.yoursite.com"` | The OCI registry you want to use to download the container images from |
| organization-webwallet-frontend.frontend.deployment.imagePullSecretName | string | `"global-pull-secret"` | The name of the secret containing the credentials to pull containers from the OCI container registry |
| organization-webwallet-frontend.frontend.deployment.replicaCount | int | `2` | The number of pods to be started |
| organization-webwallet-frontend.frontend.ingress.default.extraLabels | object | `{}` | Extra labels to add to the default Ingress resource |
| organization-webwallet-frontend.frontend.ingress.default.hosts[0].hostname | string | `"wallet.yoursite.com"` | The hostname used to access the Organization Wallet |
| organization-webwallet-frontend.frontend.ingress.default.name | string | `"web"` | An arbitrary unique name to name the ingresses in k8s |
| organization-webwallet-frontend.frontend.ingress.default.paths[0].path | string | `"/"` | The path to access the Organization Wallet. Keep on / |
| organization-webwallet-frontend.frontend.ingress.extraIngresses[0].extraLabels | object | `{}` | Extra labels to add to this extra Ingress resource |
| organization-webwallet-frontend.frontend.ingress.extraIngresses[0].hosts[0].hostname | string | `"wallet.yoursite2.com"` | The hostname used to access the Organization Wallet |
| organization-webwallet-frontend.frontend.ingress.extraIngresses[0].name | string | `"extra"` | An arbitrary unique name to name the ingresses in k8s |
| organization-webwallet-frontend.frontend.ingress.extraIngresses[0].paths[0].path | string | `"/"` | The path to access the Organization Wallet. Keep on / |
| organization-webwallet-frontend.frontend.service.extraLabels | object | `{}` | Extra labels to add to the Service resource |
##### Example values.yaml configuration file:
```yaml
global:
deployEnvironment: prod
networkPolicy:
enabled: false
ingressController:
enabled: true
namespace: ingress-nginx
podSelectorLabels:
app.kubernetes.io/name: ingress-nginx
monitoring:
enabled: true
namespace: monitoring
podSelectorLabels:
app.kubernetes.io/name: prometheus
database:
enabled: true
ipBased:
allowedCidrs:
- 10.0.0.0/32
namespaceBased:
allowedNamespace: postgres
podSelectorLabels:
app.kubernetes.io/name: postgres
internal:
enabled: true
denyAll:
enabled: true
organization-webwallet:
organization-webwallet-frontend:
frontend:
configMap:
extraLabels: {}
deployment:
imagePullSecretName: global-pull-secret
extraLabels: {}
replicaCount: 2
image:
registry: oci-registry.yoursite.com
pullPolicy: IfNotPresent
service:
extraLabels: {}
ingress:
default:
name: web
extraLabels: {}
paths:
- # -- The path to access the Organization Wallet. Keep on /
path: /
hosts:
- # -- The hostname used to access the Organization Wallet
hostname: wallet.yoursite.com
extraIngresses:
- # -- An arbitrary unique name to name the ingresses in k8s
name: extra
extraLabels: {}
paths:
- # -- The path to access the Organization Wallet. Keep on /
path: /
hosts:
- # -- The hostname used to access the Organization Wallet
hostname: wallet.yoursite2.com
organization-webwallet-backend:
microservice:
configMap:
extraLabels: {}
environmentVars:
spring_datasource_url: jdbc:postgresql://yourpostgesql-host:2506/organization_wallet
spring_flyway_url: jdbc:postgresql://yourpostgesql-host:2506/organization_wallet
oauth2_baseUrl: https://iam.yoursite.com
oauth2_realm: organization-wallet
oauth2_frontend_clientid: organization-wallet-frontend
config_wallet_url: https://wallet.yoursite.com
features_flags_IAMUSERMANAGEMENT: "true"
features_flags_IAMAPIMANAGEMENT: "true"
features_flags_AITRANSLATIONS: "true"
features_flags_FIDESCREDENTIALCATALOG: "true"
features_flags_FIDESBLUEPAGES: "true"
features_flags_AUTOREFRESHEXTERNALISSUERCONFIGURATION: "true"
features_flags_APPLICATIONSINVOICE: "true"
environment_checkers_internet_enabled: "true"
deployment:
imagePullSecretName: global-pull-secret
extraLabels: {}
replicaCount: 2
image:
registry: oci-registry.yoursite.com
pullPolicy: IfNotPresent
service:
extraLabels: {}
ingress:
default:
name: default
extraLabels: {}
paths:
- # -- The path to access the Organization Wallet. Keep on /
path: /
hosts:
- # -- The hostname used to access the Organization Wallet
hostname: wallet.yoursite.com
configName: organization-webwallet
maxUploadFilesize: 100m
extraIngresses:
- # -- An arbitrary unique name to name the ingresses in k8s
name: did
extraLabels: {}
paths:
- # -- The path to access the Organization Wallet.
path: /did
hosts:
- # -- The hostname used to access the Organization Wallet
hostname: did.wallet.yoursite.com
maxUploadFilesize: 100m
organization-webwallet-documentation:
frontend:
configMap:
extraLabels: {}
deployment:
imagePullSecretName: global-pull-secret
extraLabels: {}
replicaCount: 1
image:
registry: oci-registry.yoursite.com
pullPolicy: IfNotPresent
service:
extraLabels: {}
ingress:
default:
name: web
extraLabels: {}
paths:
- # -- The path to access the Organization Wallet. Keep on /
path: /
hosts:
- # -- The hostname used to access the Organization Wallet
hostname: docs.yoursite.com
configName: organization-webwallet-documentation
```
### White-Label Branding
https://docs.credenco.com/docs/onpremise/branding/
#### White-Label Branding
An on-premise deployment can carry your own brand: your logo, your favicon, your
application name and your colors, with a separate palette for light mode and dark mode.
No custom image is needed. Everything on this page is configuration.
##### What can and cannot be branded
Branded: the application itself, including the menu, buttons, icons, page and card
surfaces, text, borders, the credential card, the browser tab title and the favicon.
Not branded: the sign-in screen. It belongs to your identity provider, not to the
Business Wallet, and carries its own theme. See
[Identity Provider](https://docs.credenco.com/docs/onpremise/idp/) for that configuration.
##### How it works
The backend serves your palette as a stylesheet at `/public/branding.css`, which the
application loads before it paints. Two rules follow from that:
1. **Anything you do not set keeps its default.** The defaults are the Credenco palette
and they live in the application itself, so an unconfigured deployment looks exactly
as it does today, and a partly configured one mixes your colors with Credenco's
defaults for whatever you left out.
2. **Dark mode falls back to light mode.** A color set under `light` and not under
`dark` is used in both. Set a `dark` value only where the light one does not work on
a dark surface, which is usually the case for a saturated brand color.
##### Settings
Non-color settings, which apply to both themes:
| Setting | What it does | If you leave it empty |
|---|---|---|
| `branding.logo-url` | Your logo, shown in place of the Credenco wordmark under **Powered by** at the bottom of the menu, and at the top of the menu for any wallet that has no organization logo of its own. Must be an `http` or `https` URL your users can reach. | The Credenco logo is used. The same happens if the image fails to load. |
| `branding.favicon-url` | The browser tab icon. | The Credenco favicon is used. |
| `branding.app-name` | The product name in the browser tab title, for example "Contoso Business Wallet". | "Credenco Business Wallet" is used. |
| `branding.watermark` | `true` or `false`. The decorative ring watermark at the bottom of the menu. | The watermark is shown. |
Colors, each available under both `branding.light` and `branding.dark`:
| Setting | What it colors | If you leave it empty |
|---|---|---|
| `primary` | Links, focus outlines, the active menu item, and anything else that reads as "interactive". | The Credenco blue. |
| `button` | The fill of primary buttons. Set this only if your buttons should differ from your links. | Falls back to `primary`. |
| `menu-background` | The background of the left-hand menu. | The Credenco deep navy. |
| `menu-text` | The text and icons in the menu. Resting items are rendered slightly softer than this color, blended toward the menu background. The active item's icon and the keyboard focus ring follow it as well, unless `accent-color` is set. | White. |
| `icon-background` | The filled tile behind a page or card icon. | Falls back to `primary`. |
| `icon` | The glyph drawn on that tile. Pick a color that is readable on your `icon-background`. | White. |
| `background` | The page background behind the cards. | A very light grey. |
| `surface` | Cards, dialogs and panels. | White. |
| `text` | Headings and body text. Captions, help text and placeholders are derived from it, blended toward `background`, so they stay readable. | Near-black. |
| `border` | Card borders and the dividers between rows. | A light grey. |
| `accent-color` | Decorative accent: the underline on the active tab, the marker on a selected row, the active item in the menu, and the ring watermark when it is switched on. | A soft tint of `primary`, or the Credenco light blue when `primary` is unset too. |
| `card-gradient-start` / `card-gradient-end` | The gradient on credential cards. | The Credenco navy gradient. |
Colors must be CSS hex values: `#rgb`, `#rgba`, `#rrggbb` or `#rrggbbaa`. Anything else
is ignored, logged as a warning, and the default is used for that one setting.
Several parts of the interface are derived from the settings above rather than configured
separately, so that a short palette still produces a coherent result:
| Derived from | What it colors |
|---|---|
| `primary` | Focus rings, the hover shade of buttons (darker in light mode, lighter in dark), the info banner, and the role pills on the API access screen. The text on those pills is picked as black or white, whichever reads on your color. |
| `text` | Captions, help text and placeholders, blended toward `background` so they stay a step quieter than body text. |
| `icon-background` | The soft tile behind dashboard and wizard icons. |
| `menu-text` | The menu's resting items, the active item's icon and the keyboard focus ring inside the menu. |
**Contrast is yours to get right.** The application uses the colors you give it. It does
not adjust a hard-to-read combination and it does not refuse to start on one. Check your
text against your background, and your `icon` against your `icon-background`, before
rolling a palette out.
##### Example
This is a complete palette for an invented company, CoolSoft B.V. Two things to notice. `dark` only restates the colors that need to change: the teal is lightened so it holds up
on a dark surface and the neutrals are inverted, while `icon-background` carries over from
`light` untouched. And `watermark: false` turns off the decorative
rings at the bottom of the menu, which is the usual choice when the menu carries your own
brand color rather than Credenco's.
```yaml
branding:
logo-url: "https://example.com/logo.png"
favicon-url: "https://example.com/favicon.ico"
app-name: "CoolSoft Business Wallet"
watermark: false
light:
primary: "#2f6f6a"
button: "#2f6f6a"
menu-background: "#1f2933"
menu-text: "#ffffff"
icon-background: "#ffd166"
icon: "#1f2933"
background: "#f4f6f7"
surface: "#ffffff"
text: "#16202b"
border: "#dde3e7"
card-gradient-start: "#1f2933"
card-gradient-end: "#2f6f6a"
dark:
primary: "#6fbfb6"
menu-background: "#141a21"
menu-text: "#f2f5f7"
icon: "#141a21"
background: "#10161c"
surface: "#18202a"
text: "#eef3f6"
border: "#27313c"
card-gradient-start: "#141a21"
```
In Helm, the same values are set as environment variables on the backend chart, under
`microservice.configMap.environmentVars`:
```yaml
organization-webwallet-backend:
microservice:
configMap:
environmentVars:
branding_logourl: "https://example.com/logo.png"
branding_appname: "CoolSoft Business Wallet"
branding_watermark: "false"
branding_light_primary: "#2f6f6a"
branding_light_menubackground: "#1f2933"
branding_light_menutext: "#ffffff"
branding_light_iconbackground: "#ffd166"
branding_dark_primary: "#6fbfb6"
branding_dark_background: "#10161c"
```
Watch the spelling of multi-word settings: `menu-background` becomes
`branding_light_menubackground`, with the hyphen removed rather than turned into an
underscore. Single-word settings such as `primary` and `text` are unaffected. The full
list of keys is in the [chart values](https://docs.credenco.com/docs/onpremise/installation/).
##### What it looks like
The default Credenco branding, with nothing configured. Note the ring watermark at the
bottom of the menu:
The same screen with the example palette above, in light mode. The logo is left at its
default here, since the example company does not have one. The numbers mark which setting
colors which part of the screen:
| # | Setting | Value | What it is on this screen |
|---|---|---|---|
| 1 | `logo-url` | Unset in this example | The logo under **Powered by** at the bottom of the menu. The logo at the top is the wallet's own organization logo; when a wallet has none, it falls back to `logo-url` as well. |
| 2 | `menu-background` | `#1f2933` | The menu panel itself. |
| 3 | `accent-color` | Unset, so it follows `menu-text` | The highlight on the active menu item, **Overview**. |
| 4 | `menu-text` | `#ffffff` | The menu labels and their icons. Resting items are drawn slightly softer than the active one. |
| 5 | `primary` | `#2f6f6a` | Links such as **Issued →**, the outlined buttons at the top right, and focus outlines. |
| 6 | `button` | `#2f6f6a` | The fill of primary buttons, such as **Request**. Left unset, it follows `primary`. |
| 7 | `text` | `#16202b` | Headings and body text. The card descriptions are derived from it, a step quieter. |
| 8 | `background` | `#f4f6f7` | The page behind the cards. |
| 9 | `surface` | `#ffffff` | The cards themselves. |
| 10 | `border` | `#dde3e7` | Card borders and the dividers inside them. |
| 11 | `icon-background` / `icon` | `#ffd166` / `#1f2933` | The tile behind a card icon, and the glyph drawn on it. |
Not visible here: `card-gradient-start` / `card-gradient-end`, which color credential cards
in the wallet, and `watermark` / `accent-color`, which draw the ring at the bottom of the
menu when it is switched on.
And in dark mode, where the lightened teal and the inverted neutrals take over. The same
amber `icon-background` is configured here, drawn softer against the dark surface:
##### Applying a change
Branding is read when the backend starts, so a change to these values takes effect after
the backend restarts. Users may need to reload the page once, since the browser caches
the stylesheet along with the rest of the application.
### Integrations on On-Premise
https://docs.credenco.com/docs/onpremise/integration/
#### Integrations on On-Premise
The integration module is part of every Business Wallet deployment, but its built-in channels and the SPI for custom adapters expose extra knobs when you self-host. This page covers what you need to know on top of the SaaS-equivalent guides:
- [Integrations overview](https://docs.credenco.com/docs/guide/integrations/intro/)
- [Webhook authentication](https://docs.credenco.com/docs/guide/integrations/webhook-auth/)
- [Event catalog](https://docs.credenco.com/docs/guide/integrations/event-catalog/)
- [CloudEvents envelope](https://docs.credenco.com/docs/guide/integrations/cloudevents/)
##### Operator profiles
There are two ways to run the wallet on-premise, and they have slightly different integration stories:
| Profile | Description | Channel options |
|---|---|---|
| **Docker-image users** | You run the published `organization-webwallet-backend` container as-is, configured via `application.yml` and Helm values. | Webhook (always). Kafka and JMS if the corresponding optional dependencies are on the image's classpath (they are, in the default published image). |
| **Embedded-library users** | You depend on the wallet as a Maven artifact inside your own Spring Boot application. | All of the above, plus the custom adapter SPI for sending events to systems we do not ship out of the box. |
Both profiles share the same configuration surface for the built-in channels.
##### Built-in channel configuration
Each built-in channel can be globally enabled or disabled in `application.yml`. Disabling a channel here makes it impossible for a wallet operator to create a channel of that type - useful if your security policy forbids, say, raw JMS to a specific broker.
```yaml
integration:
channels:
webhook:
enabled: true # default - almost always leave on
kafka:
enabled: false # toggle on if you have a Kafka cluster
jms:
enabled: false # toggle on if you have a JMS broker
```
Per-channel runtime parameters (Kafka bootstrap servers, JMS broker URL, default timeouts, …) live under the same prefix - see the on-premise installation guide's autogenerated values reference for the exhaustive list.
##### Optional Maven dependencies
To keep the slim deployment slim, Kafka and JMS are declared as optional Maven dependencies in the wallet's `pom.xml`:
```xml
org.springframework.kafkaspring-kafkatrueorg.springframework.bootspring-boot-starter-activemqtrue
```
The `true` declaration means:
- The wallet compiles against these libraries (so the channel implementations exist), but
- They are not transitively pulled into a downstream project that depends on the wallet artifact.
For embedded-library users this matters: if you do not need Kafka or JMS, simply do not add those dependencies to your own application's `pom.xml`. The auto-configuration is guarded by `@ConditionalOnClass`, so the channel beans are silently skipped when the libraries are absent - no configuration change required.
For docker-image users, the published image always ships with both Kafka and JMS on the classpath; the runtime toggle is `integration.channels.{kafka,jms}.enabled`.
##### Custom-adapter SPI
The custom-adapter SPI is the embedded-library escape hatch. Use it when you want to deliver wallet events to a system the wallet does not ship a built-in channel for - for example, an internal service bus, AWS SNS, or Google Pub/Sub.
A custom adapter consists of three parts:
1. A **`ChannelTypeRegistration`** bean that announces the new channel type to the wallet.
2. A **`MessageHandler`** bean named `integrationOutboundChannel.` that delivers a single CloudEvent.
3. A piece of channel-config JSON the operator fills in when creating the channel.
Below is a worked example for AWS SNS.
###### 1. Register the channel type
```java
package com.example.wallet.integration.sns;
import com.credenco.webwallet.backend.integration.api.ChannelTypeRegistration;
import org.springframework.context.annotation.Bean;
import org.springframework.context.annotation.Configuration;
@Configuration
public class SnsChannelRegistration {
@Bean
public ChannelTypeRegistration snsChannelType() {
return ChannelTypeRegistration.builder()
.type("SNS")
.label("AWS SNS")
.description("Publish CloudEvents to an AWS SNS topic.")
.configSchema("""
{
"$schema": "https://json-schema.org/draft/2020-12/schema",
"type": "object",
"required": ["topicArn", "region"],
"properties": {
"topicArn": { "type": "string", "pattern": "^arn:aws:sns:" },
"region": { "type": "string" }
}
}
""")
.build();
}
}
```
The `type` value is opaque to the wallet but must match the suffix of the message handler's bean name (see step 2). The `configSchema` is a JSON Schema validated by the wallet UI when an operator creates a channel of this type.
###### 2. Implement and name the message handler
```java
package com.example.wallet.integration.sns;
import com.credenco.webwallet.backend.integration.api.CloudEventEnvelope;
import com.credenco.webwallet.backend.integration.api.IntegrationChannel;
import org.springframework.beans.factory.annotation.Autowired;
import org.springframework.context.annotation.Bean;
import org.springframework.context.annotation.Configuration;
import org.springframework.messaging.Message;
import org.springframework.messaging.MessageHandler;
import software.amazon.awssdk.services.sns.SnsClient;
import software.amazon.awssdk.services.sns.model.PublishRequest;
@Configuration
public class SnsChannelAutoConfiguration {
@Bean(name = "integrationOutboundChannel.SNS")
public MessageHandler snsOutboundHandler(@Autowired SnsClient sns) {
return (Message message) -> {
CloudEventEnvelope envelope = (CloudEventEnvelope) message.getPayload();
IntegrationChannel channel = (IntegrationChannel) message.getHeaders().get("integrationChannel");
String topicArn = channel.config().get("topicArn").asText();
String body = envelope.toStructuredJson();
sns.publish(PublishRequest.builder()
.topicArn(topicArn)
.message(body)
.messageAttributes(envelope.toSnsAttributes())
.build());
};
}
}
```
The bean must be named `integrationOutboundChannel.` - the dispatcher resolves the handler by exactly this convention. If the handler throws, the dispatcher applies the standard retry-with-back-off behaviour.
###### 3. Operators configure the channel
Once your application starts with the registration above on the classpath, operators can create a channel of type `SNS` via the wallet UI. The form will validate their JSON against the `configSchema`. The channel's deliveries appear in the standard Deliveries view, just like webhook or Kafka deliveries.
The same pattern works for Google Pub/Sub, Azure Service Bus, NATS, an internal HTTP gateway, or any other transport you can reach from your JVM.
##### Provisioning the integration authorities in Keycloak
The four integration authorities are added to Keycloak by the wallet's standard realm-import process - but if you are upgrading an existing on-premise installation you may need to provision them manually.
In the realm where wallet roles live, create the following four authorities (under the roles that should grant them):
| Authority | Typical role |
|---|---|
| `WALLET_INTEGRATION_CHANNEL_READ` | Wallet operator (read-only). |
| `WALLET_INTEGRATION_CHANNEL_CRUD` | Wallet administrator. |
| `WALLET_INTEGRATION_DELIVERY_READ` | Wallet operator (read-only). |
| `WALLET_INTEGRATION_DELIVERY_CRUD` | Wallet administrator. |
A super-admin role with `GLOBAL_WALLET_CRUD` already implies all four. The wallet refreshes its authority cache on token refresh, so newly granted authorities are picked up at the next login or token renewal.
If you use the public realm-import bundle that ships with the wallet, the authorities are pre-declared - you only need to assign them to the roles that match your operating model.
##### Troubleshooting
###### Failed deliveries
When a delivery moves to the `FAILED` state the wallet retains the last response code, a truncated response body, and the error message from the underlying client. Open the delivery in the **Deliveries** tab to see the full request and the response.
Common causes and fixes:
| Symptom | Likely cause | Action |
|---|---|---|
| HTTP `401` on every webhook delivery | Receiver is rejecting the API key or Bearer token, or signature verification is failing on their side. | Confirm shared secret matches; double-check raw-body capture; for OAuth2, check the token endpoint and scope. |
| HTTP `403` | Receiver does not authorise this caller. | Check authorization on the receiver. |
| Connection timeout | Network ACL or firewall is dropping outbound traffic. | Verify wallet's egress rules and the receiver's ingress rules. |
| Kafka `LEADER_NOT_AVAILABLE` | Topic does not exist or broker is mid-rebalance. | Create the topic; let rebalance complete; then replay the failed deliveries. |
| Repeated DNS failures | Receiver hostname is not resolvable from the wallet's network. | Add the receiver to the wallet's resolver / hosts. |
###### Replaying
A `FAILED` delivery can be moved back to `PENDING` (and re-attempted from scratch) by selecting it in the Deliveries tab and clicking **Replay**. You can bulk-replay many deliveries at once. Replays reset `attempts = 0`, so the same retry budget applies.
###### ShedLock
Cleanup jobs (deleting old `DELIVERED` rows after the retention window, removing already-completed Modulith publications) run under [ShedLock](https://github.com/lukas-krecan/ShedLock) so they fire exactly once per cluster per scheduled tick, regardless of how many wallet replicas you run.
If the cleanup job is silent, check:
1. The `shedlock` table in the database - every cluster-wide scheduled job has a row here. Stale `lock_until` values point to a previous, now-dead replica that crashed mid-job; the lock will release automatically when its `lock_until` passes.
2. Wallet logs for warnings that mention `LockProvider` or `LockableTaskScheduler` - connectivity issues to the database surface here.
3. The `INTEGRATION` history events in the audit log - successful cleanup runs are recorded here for auditability.
A force-unlock is rarely required; in normal operation `lock_until` self-expires within minutes.
##### Where to next
- [Integrations overview](https://docs.credenco.com/docs/guide/integrations/intro/) for the cross-deployment basics.
- [On-premise installation](https://docs.credenco.com/docs/onpremise/installation/) for the full Helm-chart deployment guide.
- [On-premise IDP setup](https://docs.credenco.com/docs/onpremise/idp/) for Keycloak realm and role configuration.
## Explained
### DCQL explained: OpenID4VP query language
https://docs.credenco.com/docs/explained/explained-dcql/
#### DCQL explained: the OpenID4VP credential query language
The Digital Credentials Query Language, DCQL, is the JSON query format that OpenID4VP uses inside a presentation request. It lets a relying party describe which credentials and which claims within them it wants to see, in a way any compliant wallet can parse without a bespoke integration.
##### The problem DCQL solves
A business wallet can hold credentials in several formats: an SD-JWT VC company registration, an mdoc-encoded professional qualification, a W3C verifiable credential from an earlier pilot. A verifier that only needs to confirm a registration number and a legal name has no portable way to ask for exactly that, across formats, without either accepting the whole credential or hand-coding a separate request per format and per wallet vendor.
DCQL fixes the request side of that gap. It is a single JSON object, embedded in the OpenID4VP authorization request, that names one or more credential queries, each pinned to a format and a set of claim paths. A wallet evaluates the query against its stored credentials, works out which ones match, and only then asks the holder to approve releasing those specific claims. The verifier gets a predictable structure to parse regardless of which wallet the holder used.
```mermaid
sequenceDiagram
participant Verifier
participant Wallet
participant Holder
Note over Verifier: 1. Verifier - Sends an OpenID4VP request with a dcql_query
Verifier->>Wallet: dcql_query
Note over Wallet: 2. Wallet - Matches the query against stored credentials
Wallet->>Holder: consent
Note over Holder: 3. Holder - Approves releasing only the requested claims
Wallet->>Verifier: vp_token
Note over Verifier: 4. Verifier - Receives one presentation per credential query id
```
##### The shape of a DCQL query
A DCQL query is one JSON object with a credentials array and, optionally, a credential_sets array. Each entry in credentials is a credential query. Fields marked M are mandatory on that query.
```mermaid
flowchart TB
subgraph Q["dcql_query"]
direction TB
subgraph C["credentials[ ]"]
direction TB
CN["One credential query per credential you need"]
F["id + format Which credential, in which format"]
M["meta Type filter, such as vct_values"]
CL["claims[ ] Claim paths to disclose"]
CS["claim_sets[ ] Acceptable claim combinations"]
end
S["credential_sets[ ] Optional: which combinations of credential queries satisfy the request"]
end
style S stroke-dasharray: 5 5
```
| Field | Type | Mandatory |
|---|---|---|
| `id` | string | M |
| `format` | string, e.g. dc+sd-jwt, mso_mdoc, jwt_vc_json, jwt_vc_json-ld, ldp_vc (see OpenID4VP Appendix B) | M |
| `meta` | object, shape depends on format | |
| `claims` | array of claim queries | |
| `claim_sets` | array of arrays of claim ids | |
| `trusted_authorities` | array of objects with a type and values | |
Each entry in claims is itself an object: an id used to refer to it from claim_sets, and a path, an array locating the claim within the credential (for example `["legal_name"]` for a top-level SD-JWT claim, or `["org", "registration_number"]` for a nested one), and optionally values, a list of values the claim must match.
###### Worked example: a company registration check
:::info[Company registration]
`dc+sd-jwt`
The verifier says: this is what I want to receive
- ✓ Registration number: `reg_no`, `path: ["registration_number"]`
- ✓ Legal name: `legal_name`, `path: ["legal_name"]`
- ✓ Country of registration: `reg_country`, `path: ["registration_country"]`
:::
```json
{
"credentials": [
{
"id": "company_registration",
"format": "dc+sd-jwt",
"meta": {
"vct_values": ["urn:eudi:business:company-registration:1"]
},
"claims": [
{ "id": "reg_no", "path": ["registration_number"] },
{ "id": "legal_name", "path": ["legal_name"] },
{ "id": "reg_country", "path": ["registration_country"] }
]
}
]
}
```
###### Example response from the wallet
The wallet answers with a vp_token object keyed by the credential query id. Each value is an array of presentations. For dc+sd-jwt a presentation is the issuer-signed JWT, one disclosure per released claim, and a key binding JWT that ties it to the nonce and client of this request.
**What the wallet sends**
```json
{
"vp_token": {
"company_registration": [
"~~~~"
]
}
}
```
**Claims the verifier sees after validation**
```json
{
"vct": "urn:eudi:business:company-registration:1",
"registration_number": "12345678",
"legal_name": "Example Logistics B.V.",
"registration_country": "NL"
}
```
##### Asking for a fallback: claim_sets
claim_sets lists groups of claim ids, in order of preference. The wallet returns the first group it can fully satisfy from what the holder actually holds, instead of the verifier having to send two separate requests for a precise case and a fallback case.
###### Worked example: registration number, or a fallback to legal name only
```mermaid
flowchart LR
P1["1. Preferred"] --> C1["reg_no, legal_name"] --> R1["Returned when the credential carries both claims"]
P2["2. Fallback"] --> C2["legal_name"] --> R2["Returned only when the first set cannot be satisfied"]
P1 -.-> P2
style P2 stroke-dasharray: 5 5
style C2 stroke-dasharray: 5 5
style R2 stroke-dasharray: 5 5
```
```json
{
"credentials": [
{
"id": "company_registration",
"format": "dc+sd-jwt",
"meta": { "vct_values": ["urn:eudi:business:company-registration:1"] },
"claims": [
{ "id": "reg_no", "path": ["registration_number"] },
{ "id": "legal_name", "path": ["legal_name"] }
],
"claim_sets": [
["reg_no", "legal_name"],
["legal_name"]
]
}
]
}
```
Here the verifier prefers a registration number plus the legal name, but will accept the legal name on its own if the holder’s credential does not carry a registration number claim.
###### Example response: the fallback was used
**What the wallet sends**
```json
{
"vp_token": {
"company_registration": [
"~~"
]
}
}
```
**Claims the verifier sees after validation**
```json
{
"vct": "urn:eudi:business:company-registration:1",
"legal_name": "Example Logistics B.V."
}
```
The holder’s credential has no registration number, so the wallet satisfied the second claim set and released a single disclosure. The response does not say which set was used: the verifier reads that from the claims it receives.
##### Combining credentials: credential_sets
credential_sets works one level up from claim_sets. Each entry lists options, where every option is a group of credential query ids. The wallet has to satisfy one option of every required entry, which gives a verifier AND and OR logic across credentials in a single request.
```mermaid
flowchart LR
REQ["Required Company registration"] --- AND{{"AND"}}
AND --- ONE
subgraph ONE[" "]
direction LR
VAT["One of VAT registration"] --- OR{{"OR"}} --- BANK["One of Bank account attestation"]
end
style ONE stroke-dasharray: 5 5
```
```json
"credential_sets": [
{ "options": [["company_registration"]] },
{ "options": [["vat_registration"], ["bank_account"]] }
]
```
###### Example response: registration plus bank account
**What the wallet sends**
```json
{
"vp_token": {
"company_registration": [
"~~"
],
"bank_account": [
"~~"
]
}
}
```
**Claims the verifier sees after validation**
```json
{
"company_registration": {
"vct": "urn:eudi:business:company-registration:1",
"registration_number": "12345678",
"legal_name": "Example Logistics B.V."
},
"bank_account": {
"vct": "urn:eudi:business:bank-account:1",
"iban": "NL91ABNA0417164300",
"account_holder": "Example Logistics B.V."
}
}
```
The holder has no VAT registration credential, so the wallet chose the second option of the second set. Query ids that were not used, here vat_registration, are simply absent from vp_token.
##### Only trusted issuers: trusted_authorities
trusted_authorities narrows a credential query to credentials whose issuer is backed by an authority the verifier trusts. Each entry has a type and a list of values: aki for an authority key identifier, etsi_tl for an ETSI trusted list, or openid_federation for a federation trust anchor. The wallet only offers credentials that match.
###### Worked example: a registration from a listed issuer
```mermaid
flowchart LR
W["The verifier says: only from issuers on this trusted list type: etsi_tl https://ec.europa.eu/tools/lotl/eu-lotl.xml"]
YES["Registration credential from a listed issuer issuer is on the trusted list ✓ Matches the query"]
NO["Registration credential from an unlisted issuer issuer is not on the trusted list ✗ Does not match, not offered to the holder"]
W --> YES
W --> NO
style NO stroke-dasharray: 5 5
```
```json
{
"credentials": [
{
"id": "company_registration",
"format": "dc+sd-jwt",
"meta": { "vct_values": ["urn:eudi:business:company-registration:1"] },
"trusted_authorities": [
{
"type": "etsi_tl",
"values": ["https://ec.europa.eu/tools/lotl/eu-lotl.xml"]
}
],
"claims": [
{ "id": "reg_no", "path": ["registration_number"] },
{ "id": "legal_name", "path": ["legal_name"] }
]
}
]
}
```
###### Example response: only the listed issuer’s credential
**What the wallet sends**
```json
{
"vp_token": {
"company_registration": [
"~~~"
]
}
}
```
**Claims the verifier sees after validation**
```json
{
"vct": "urn:eudi:business:company-registration:1",
"registration_number": "12345678",
"legal_name": "Example Logistics B.V."
}
```
The holder also had a registration credential from an unlisted issuer, but the wallet did not offer it. trusted_authorities is a filter for the wallet, not a guarantee: the verifier still checks the issuer against the trusted list itself when it validates the presentation.
##### Matching a value: claims.values
A claim query can carry values, a list of strings, integers or booleans. The wallet only returns the claim when its type and value exactly match one of them, so a verifier can check a condition without asking for anything else first.
###### Worked example: only companies registered in the Netherlands or Belgium
```mermaid
flowchart LR
W["The verifier says: only a company registered in one of these countries reg_country values: #quot;NL#quot; #quot;BE#quot;"]
YES["Dutch company registration_country: #quot;NL#quot; ✓ Matches the query"]
NO["German company registration_country: #quot;DE#quot; ✗ Does not match, not offered to the holder"]
W --> YES
W --> NO
style NO stroke-dasharray: 5 5
```
```json
{
"credentials": [
{
"id": "company_registration",
"format": "dc+sd-jwt",
"meta": { "vct_values": ["urn:eudi:business:company-registration:1"] },
"claims": [
{ "id": "legal_name", "path": ["legal_name"] },
{
"id": "reg_country",
"path": ["registration_country"],
"values": ["NL", "BE"]
}
]
}
]
}
```
###### Example response: a Dutch company
**What the wallet sends**
```json
{
"vp_token": {
"company_registration": [
"~~~"
]
}
}
```
**Claims the verifier sees after validation**
```json
{
"vct": "urn:eudi:business:company-registration:1",
"legal_name": "Example Logistics B.V.",
"registration_country": "NL"
}
```
A German company’s credential has registration_country "DE", so it does not satisfy the query and the wallet has nothing to return for it. The verifier should still check the value in the validated claims rather than rely on the wallet’s filtering.
##### Format-specific constraints in meta
###### SD-JWT VC: vct_values
For dc+sd-jwt, meta.vct_values lists the credential type identifiers the verifier will accept. A query only matches a stored credential whose vct is one of the listed values, so a verifier that only trusts one issuer’s registration credential type lists exactly that identifier.
###### mso_mdoc: doctype_value and namespace
For mso_mdoc, meta.doctype_value pins the ISO 18013-5 DocType, and each claim path starts with the mdoc namespace the claim lives under rather than a plain field name, since mdoc groups claims by namespace instead of a flat object.
##### Where DCQL stands today
- DCQL is defined within the OpenID4VP specification itself, not as a separate document, and has been part of the draft since the mechanism was introduced to replace an earlier dependency on DIF Presentation Exchange for OpenID4VP requests.
- The EUDI Wallet Architecture and Reference Framework specifies OpenID4VP as the presentation protocol and, with it, DCQL as the query mechanism relying parties and wallets in the ecosystem are expected to support.
- Wallet and verifier reference implementations in the EUDI Wallet Reference Implementation program have converged on DCQL, so new business-wallet integrations built against OpenID4VP today should assume DCQL rather than Presentation Exchange as the query format for presentation requests.
##### Related terms
- DCQL
- OpenID4VP
- Presentation Exchange
- Selective Disclosure
- SD-JWT VC
- mdoc
- Verifier
- Verifiable Presentation
##### Frequently asked questions
###### How is DCQL different from DIF Presentation Exchange?
Both describe what a verifier wants from a wallet, but DCQL is scoped to OpenID4VP and defined directly in that specification, while Presentation Exchange is a separate DIF specification that also covers other protocols. DCQL is deliberately smaller: it has no input descriptor groups or submission requirements, and it expresses format-specific constraints such as an mdoc doctype or an SD-JWT VC type directly in a query object rather than through a generic JSON Schema filter. The EUDI Wallet ecosystem has standardised on DCQL for OpenID4VP presentations.
###### Can one DCQL query ask for more than one credential?
Yes. The credentials array can list several credential queries, each with its own id. A wallet that holds matches for every entry returns one presentation per entry. The optional credential_sets object on top of that can require particular combinations, for example accept either a company registration credential alone or a company registration credential together with a UBO declaration, without asking the holder twice.
###### What problem do claim_sets solve inside a single credential query?
A credential does not always carry every claim a verifier would like. claim_sets lists alternative groups of claim ids that would each satisfy the request on their own, ordered from most to least preferred. The wallet picks the first group it can fully satisfy from the claims the holder actually has, so a verifier can ask for a precise ID number where available and fall back to a coarser check, such as an over-18 flag, without sending two separate requests.
###### Is DCQL specific to the EUDI Wallet?
No. DCQL is part of the OpenID4VP core specification and any OpenID4VP implementation can use it. The EUDI Wallet ecosystem is a prominent adopter: the Architecture and Reference Framework specifies OpenID4VP with DCQL as the presentation mechanism relying parties must support, which is why it matters in particular for wallets and verifiers built for the European market.
###### Does DCQL itself perform selective disclosure?
No. DCQL only describes what is being asked for. Whether the wallet can reveal exactly those claims and nothing else depends on the credential format: an SD-JWT VC or an ISO mdoc both support disclosing a subset of their claims, so a DCQL claims array maps onto that support. DCQL against a format without selective disclosure would still work, but the holder would have to release the full credential to satisfy even a one-claim query.
##### Sources
1. [OpenID for Verifiable Presentations 1.0, Digital Credentials Query Language (DCQL) section](https://openid.net/specs/openid-4-verifiable-presentations-1_0.html)
2. [EUDI Wallet Architecture and Reference Framework](https://github.com/eu-digital-identity-wallet/eudi-doc-architecture-and-reference-framework)
3. [DIF Presentation Exchange 2.1.1 specification](https://identity.foundation/presentation-exchange/spec/v2.1.1)
:::note
This page is informational and does not constitute legal advice. For authoritative guidance consult the OpenID Foundation and the European Commission directly.
:::
### did:webvh explained: did:web with history
https://docs.credenco.com/docs/explained/explained-did-webvh/
#### did:webvh explained: did:web with a verifiable history
`did:webvh` — "`did:web` + Verifiable History" — is a DID method that publishes an identifier at an
HTTPS location exactly like `did:web`, but adds an append-only, cryptographically chained log of
every version the DID has ever had. Version 1.0 was released by the [Decentralized Identity
Foundation](https://identity.foundation/) on 7 August 2025. The method was previously called
`did:tdw`; that name is retired and the two are not interchangeable in a log.
##### The problem `did:web` leaves open
`did:web` is the easiest DID method to adopt: put a `did.json` file on a domain you already own,
serve it over TLS, done. No ledger, no fees, no new infrastructure. That simplicity is also the
whole of its security model, and it has four consequences.
- **No history.** The DID document is whatever the web server returns *right now*. Yesterday's
version is gone, and nothing ties it to today's.
- **A silent rewrite is undetectable.** Anyone who can write to the web root — a compromised CI
pipeline, a hijacked hosting account, an insider — can replace the signing key in `did.json`.
Every credential ever issued under that DID now appears to have been signed by the attacker's key,
and a verifier has no way to notice the substitution.
- **Trust bottoms out at DNS and TLS.** The identifier means "whoever controls this hostname today".
A lapsed domain registration transfers the identity with it.
- **The identifier is welded to the hostname.** Changing domain means a new DID, and every
credential issued under the old one stops resolving.
For a demo, an internal integration, or a short-lived verifier, that is a reasonable trade. For a
long-lived issuer whose credentials must still verify in five years, it is not.
`did:webvh` keeps the deployment model — one static file on a domain you control — and replaces the
security model. The identifier is derived from the *inception* of the DID rather than from the
hostname, and every subsequent change is an entry in a hash-chained log that a resolver replays and
verifies in full.
##### The identifier
A `did:webvh` DID carries a self-certifying identifier (SCID) as its first segment:
```abnf
webvh-method-specific-id = scid ":" webvh-domain *( ":" webvh-path-segment )
scid = 46(base58btc-char)
```
For example:
```
did:webvh:QmdmPkUdYzbr9txmx8gM2rsHPgr5L6m3gHjJGAf4vUFoGE:issuer.example.com:dids:hr
```
The SCID is a 46-character base58btc string: the hash of the DID's first log entry. Because it is a
hash of the inception event, it cannot be chosen, and it cannot be changed for the life of the DID.
This is what "self-certifying" means — the identifier commits to its own origin, so the domain name
is no longer the thing that makes the DID *this* DID.
:::warning[Cryptographic validity is not trust]
Verifying a `did:webvh` log proves the history is internally consistent and was signed by the keys
the controller committed to. It says nothing about who that controller is. Trust still has to come
from somewhere external — a trusted list, a trust registry, or the credentials published at the
DID's [`/whois`](#whois-publishing-credentials-about-the-did) endpoint.
:::
##### The DID log (`did.jsonl`)
The history lives in a [JSON Lines](https://jsonlines.org/) file, `did.jsonl`, with one JSON object
per line and one line per version of the DID. Each entry has five properties:
| Property | Contents |
|---|---|
| `versionId` | `-` — the version counter (starting at `1`, incrementing by exactly one) and the hash of this entry |
| `versionTime` | UTC ISO 8601 timestamp asserted by the controller, with an explicit `Z` or `+00:00` |
| `parameters` | The processing options in force from this entry onward (see [Parameters](#parameters)) |
| `state` | The DID document for this version |
| `proof` | A Data Integrity proof over the entry, signed by a key authorised to update the DID |
The chaining happens inside `entryHash`. The hash is computed over the entry *without* its proof,
and with the `versionId` field temporarily set to the **previous** entry's `versionId` — for the
first entry, to the SCID. Each entry therefore commits to its predecessor, and the file behaves as a
microledger: you cannot rewrite entry 3 without invalidating entries 4, 5 and 6.
```mermaid
flowchart LR
SCID["SCID hash of the inception entry"]
E1["Entry 1 versionId: 1-QmQ6FJ... state: DID document v1"]
E2["Entry 2 versionId: 2-QmXk7B... state: DID document v2"]
E3["Entry 3 versionId: 3-QmT9dR... state: DID document v3"]
SCID -->|hash input| E1
E1 -->|versionId is hash input| E2
E2 -->|versionId is hash input| E3
```
###### How the hashes are built
Both the SCID and every `entryHash` use the same function:
```
base58btc(multihash(JCS(entry), SHA-256))
```
- **JCS** is the JSON Canonicalization Scheme ([RFC 8785](https://www.rfc-editor.org/rfc/rfc8785)),
which produces one deterministic byte sequence for a given JSON object, so two implementations hash
the same thing.
- **multihash** prefixes the digest with its algorithm identifier and length, so the hash is
self-describing.
- For the SCID specifically, the input is the *preliminary* first entry, in which every place the
SCID will eventually appear still holds the literal placeholder `{SCID}`. Once the hash is
computed, the controller substitutes it everywhere.
Under `method: "did:webvh:1.0"` the only permitted hash algorithm is SHA-256 and the only permitted
Data Integrity cryptosuite — for both log-entry proofs and witness proofs — is `eddsa-jcs-2022`. A
resolver must check the proof's `cryptosuite` property explicitly; checking only `proofPurpose` is
not sufficient.
##### From DID to URL
The log is fetched over plain HTTPS. The transformation drops the SCID and maps the remaining
segments onto a path — which is why the SCID does not normally appear in the URL at all.
| DID | Log URL |
|---|---|
| `did:webvh:{SCID}:example.com` | `https://example.com/.well-known/did.jsonl` |
| `did:webvh:{SCID}:issuer.example.com` | `https://issuer.example.com/.well-known/did.jsonl` |
| `did:webvh:{SCID}:example.com:dids:issuer` | `https://example.com/dids/issuer/did.jsonl` |
| `did:webvh:{SCID}:example.com%3A3000:dids:issuer` | `https://example.com:3000/dids/issuer/did.jsonl` |
| `did:webvh:{SCID}:jp納豆.例.jp:用户` | `https://xn--jp-cd2fp15c.xn--fsq.jp/%E7%94%A8%E6%88%B7/did.jsonl` |
A port is carried in the DID as the percent-encoded separator `%3A`. Internationalised domains are
normalised with IDNA2008. IP addresses are rejected. The content type of `did.jsonl` should be
`text/jsonl`.
The same transformation locates the other files a `did:webvh` DID may publish. For witness proofs,
replace the final `did.jsonl` with `did-witness.json` and leave the rest of the URL — including any
`.well-known/` segment — untouched. For DID URL paths, including `whois.vp`, the `.well-known/`
segment is *omitted* and the path is appended to the web location instead: the log of
`did:webvh:{SCID}:example.com` lives at `https://example.com/.well-known/did.jsonl`, but its whois
presentation lives at `https://example.com/whois.vp`.
##### Resolution
A resolver fetches the log once and then replays it from the first line. Every entry is verified —
a resolver may **not** skip intermediate entries on the grounds that it only wants the latest
document.
```mermaid
sequenceDiagram
participant C as Client
participant R as did:webvh resolver
participant W as Web server
C->>R: 1. Resolve did:webvh:SCID:example.com:dids:issuer
R->>R: 2. Transform DID to HTTPS URL
R->>W: 3. GET https://example.com/dids/issuer/did.jsonl
W-->>R: 4. JSON Lines log, one entry per version
R->>R: 5. Entry 1 - verify SCID against the inception entry
R->>R: 6. Each entry - verify entryHash chains to its predecessor
R->>R: 7. Each entry - verify the eddsa-jcs-2022 proof against active updateKeys
R->>R: 8. Each entry - check versionTime is strictly increasing and not in the future
R-->>C: 9. Latest DID document plus resolution metadata
```
Concretely, for each entry the resolver checks that:
1. The active `parameters` are valid for the declared `method` version.
2. The Data Integrity proof is valid, has `proofPurpose: assertionMethod`, and was made with a key
in the currently active `updateKeys`.
3. The version number is exactly the previous one plus one — a gap terminates resolution — and the
`entryHash` after the dash recomputes correctly.
4. `versionTime` is strictly greater than the previous entry's. Equal timestamps are rejected, and so
is a timestamp more than a small tolerance (no more than five minutes is recommended) in the
future.
5. The SCID segment of `state.id` is byte-for-byte the SCID from the first entry — in *every* entry,
not just the first.
Because the resolver has the whole history, it can also answer questions about the past. The DID URL
query parameters `versionId` and `versionTime` select a historical version, and `did:webvh` adds
`versionNumber` for selecting by integer. That is what makes a signature from 2024 checkable in
2029: the verifier retrieves the key that was active at the time the credential was issued, and can
see that it was later rotated rather than silently replaced.
##### Parameters
The `parameters` object in each entry carries the configuration that governs this and all later
entries. A parameter left out of a later entry keeps its previous value; the JSON `null` value must
not be used to mean "default" or "off".
| Parameter | Type | Default | Notes |
|---|---|---|---|
| `method` | string | — | Required in the first entry. `did:webvh:1.0` is the current value. An unknown value must terminate resolution, never be downgraded |
| `scid` | string | — | Required in the first entry, forbidden in all later ones |
| `updateKeys` | array of multikey | — | Required in the first entry. The public keys authorised to sign log entries. Set to `[]` when deactivating |
| `nextKeyHashes` | array of string | `[]` | Hashes of the keys that may appear in the *next* entry's `updateKeys`. Non-empty means pre-rotation is active |
| `witness` | object | `{}` | `threshold` plus a list of witness `did:key` DIDs |
| `watchers` | array of URL | `[]` | URLs of services that have agreed to monitor this DID |
| `portable` | boolean | `false` | May only be set to `true` in the first entry |
| `deactivated` | boolean | `false` | Once `true`, no further updates are permitted |
| `ttl` | integer | `3600` | Seconds a resolver should cache the resolved DID, analogous to a DNS TTL |
##### Hardening options
The log alone protects against one attacker rewriting history. Two optional mechanisms raise the bar
further, and a third helps you notice when something went wrong anyway.
###### Pre-rotation
With `nextKeyHashes`, the controller commits in advance to the hashes of the keys that will be
allowed to sign the *next* entry. An attacker who steals the currently active update key still cannot
publish a valid update, because they do not hold a key whose hash was pre-committed.
The trap to know about: once pre-rotation is active, **both** `updateKeys` and `nextKeyHashes` must
be present explicitly in every subsequent entry, and *every* multikey in `updateKeys` — not just the
ones that look new — must hash to an entry in the previous `nextKeyHashes`. An entry that omits
`updateKeys` intending to inherit the previous value must be rejected; allowing inheritance would
bypass the commitment entirely. Pre-rotation is switched off by setting `nextKeyHashes` to `[]`.
###### Witnesses
Witnesses are third parties that co-sign each new version before it is published. The `witness`
parameter names them and sets a threshold:
```json
{
"witness": {
"threshold": 2,
"witnesses": [
{ "id": "did:key:z6Mkkc51mg2vpQzKWAbWQZupeGYhowaBjYkmvcKMTqteqHB4" },
{ "id": "did:key:z6MkuDdJdKLCgwZuQuEi9xG6LVgJJ9Tebr74CXPYPSumqgJs" },
{ "id": "did:key:z6MkoSWmQyp4fTk4ZQy4KUsss9dFX51XfEUzKKKj1J1JUsrF" }
]
}
}
```
Witness `id` values must be `did:key` DIDs and must be unique. Their proofs go in a separate file,
`did-witness.json`, keyed by `versionId`, which must be published *before* the updated log. The
threshold is counted over *distinct* witness ids, not over raw proof count, so duplicate proofs from
one witness do not help an attacker. A threshold rather than unanimity keeps one unresponsive witness
from blocking updates.
With witnesses in place, an attacker needs the controller's update key, write access to the web
server, **and** a threshold of witnesses before they can rewrite history undetected.
###### Watchers
Watchers are independent services that poll a DID and cache its log. They exist for three reasons:
to make resolution cheaper, to keep a DID resolvable after the controller's web server goes away,
and — most usefully — to notice when a controller republishes an altered log. The `watchers`
parameter lists the ones a controller collaborates with, and resolvers surface that list in the
resolution metadata, but anyone may watch any `did:webvh` DID without the controller's involvement.
Watchers expose a small HTTP API keyed by SCID rather than by URL, for example
`GET /log?scid=`, which is precisely what lets a watcher keep serving a DID that has
moved or disappeared.
##### Portability
A DID created with `portable: true` in its first entry can later move to a different domain or path
while keeping its identifier and its whole history. The move is just another log entry that changes
the host and path portion of `state.id`; the SCID segment stays byte-for-byte identical, and the
previous DID string is added to `alsoKnownAs`. Portability cannot be switched on later — an entry
that introduces `portable: true` after the first must be rejected — and setting it to `false` at any
point disables it permanently.
This is the direct answer to `did:web`'s domain lock-in: with portability enabled, losing or changing
a domain costs you a log entry rather than your identity.
:::warning[A prior domain in the history proves nothing]
Because a DID may name a domain that never actually hosted its log, resolvers and relying parties
must ignore prior domain components when judging a DID's history or trustworthiness. Only the
current hosting location and the verifiable history count.
:::
##### `whois`: publishing credentials about the DID
Every `did:webvh` DID implicitly supports a `/whois` path backed by a
[Linked Verifiable Presentation](https://identity.foundation/linked-vp/) service. Resolving
`/whois` fetches a Verifiable Presentation from `whois.vp` at the DID's web location:
```json
{
"@context": "https://identity.foundation/linked-vp/contexts/v1",
"id": "#whois",
"type": "LinkedVerifiablePresentation",
"serviceEndpoint": "/whois.vp"
}
```
The presentation is signed by the DID and must contain at least one Verifiable Credential whose
`credentialSubject.id` is the DID. Which credentials go in is entirely the controller's choice — a
chamber-of-commerce registration, a sector accreditation, an ISO certificate. A controller may
override the implicit service by declaring an explicit `#whois` service in the DID document.
This is the piece that turns cryptographic validity into something a relying party can act on. The
log tells you the history is intact; `whois` tells you who is standing behind it, in credentials you
can verify against issuers you already trust.
##### Publishing a parallel `did:web`
Because `did.jsonl` and `did.json` live at the same web location, a controller can publish both. The
procedure is: take the resolved `did:webvh` document, add the implicit `#files` and `#whois`
services if they are not already there, text-replace `did:webvh::` with `did:web:` throughout,
add the full `did:webvh` DID to `alsoKnownAs`, and publish the result as `did.json`.
The benefit is reach: resolvers that do not yet support `did:webvh` keep working, and a `did:web`
resolver that *does* know about `did:webvh` can follow `alsoKnownAs` to the verifiable history. The
cost is that anything relying on the parallel `did:web` DID gets `did:web`'s security properties, not
`did:webvh`'s — so the parallel DID is a migration aid, not a permanent arrangement.
##### `did:web` vs `did:webvh`
| Dimension | `did:web` | `did:webvh` |
|---|---|---|
| **Published file** | `did.json` | `did.jsonl` (plus an optional parallel `did.json`) |
| **Identifier derived from** | The hostname and path | The SCID — a hash of the inception entry |
| **History** | None. Only the current document exists | Every version, in an append-only hash-chained log |
| **Silent rewrite of the DID document** | Undetectable | Breaks the chain; resolution fails |
| **Key rotation** | Overwrite the key; nothing links old to new | An explicit, signed log entry that a verifier can replay |
| **Verifying a signature from years ago** | Impossible once the key is overwritten | Supported via the `versionId` / `versionTime` / `versionNumber` query parameters |
| **Protection if the web server is compromised** | None | Optional witnesses and pre-rotation |
| **Third-party monitoring** | Not defined | Watchers, keyed by SCID |
| **Changing domain** | New DID; old credentials stop resolving | A log entry, if `portable: true` was set at creation |
| **Deactivation** | Delete the file | Explicit `deactivated: true` parameter, or an empty `updateKeys` |
| **Trust signals about the controller** | Not defined | Implicit `/whois` Linked Verifiable Presentation |
| **Infrastructure needed** | A web server with TLS | A web server with TLS |
| **Resolver support** | Near-universal | Growing; DIF lists mature Python, TypeScript and Rust implementations |
| **Cost to verify** | One HTTPS GET | One HTTPS GET, plus replaying and verifying every log entry |
##### When to use which
Reach for **`did:web`** when the identifier is short-lived or low-stakes, when broad resolver support
matters more than auditability, or when you are prototyping and the DID will be thrown away. It is
also fine for a verifier-side identifier that signs nothing durable.
Reach for **`did:webvh`** when any of the following is true:
- You issue credentials with a long lifetime, and a verifier must still be able to check them after
you have rotated keys.
- You need an auditable record of key rotations — for regulatory reasons, or because your security
policy requires that a key change be evidenced rather than asserted.
- A compromise of your web hosting must not be enough on its own to take over the identity. Add
pre-rotation, and witnesses if the stakes justify the coordination.
- You may need to move the identifier to another domain without reissuing everything. Decide this at
creation time — `portable` cannot be switched on later.
- You want relying parties to be able to discover verifiable claims about you, via `/whois`, rather
than relying on the domain name as the only signal.
The practical migration path is to create `did:webvh` identifiers for new issuance while publishing
the parallel `did:web` document for compatibility, and to drop the parallel document once the
relying parties you care about have `did:webvh` resolvers.
##### `did:webvh` in the Business Wallet
The Credenco Business Wallet supports `did:webvh` as an identifier type alongside `did:web`.
- **Creating one.** `WEBVH` is a value of the identifier type on the public create-identifier API,
and appears in the identifier type list in the Business Wallet UI. The domain and path fields work
exactly as they do for `did:web`, so an identifier created on a
[wallet domain](https://docs.credenco.com/docs/guide/wallet-domain/) you have verified is published under your
own hostname.
- **The log.** The wallet generates the SCID, maintains `did.jsonl`, and appends a signed entry on
every change to the DID document. Entries are written with `method: "did:webvh:1.0"` and signed
with an Ed25519 update key using the `eddsa-jcs-2022` cryptosuite.
- **Resolution.** The log is served at `/public/did/{path}/did.jsonl` with content type `text/jsonl`.
A plain `did:web` identifier returns `404` at that URL, which is the expected way to tell the two
apart.
- **`did.json` at the same path.** The current DID document is also served at
`/public/did/{path}/did.json`. Note that this is the `did:webvh` document as-is: its `id` is the
`did:webvh:` DID, and the wallet does not perform the specification's parallel-`did:web` rewrite
(replacing `did:webvh::` with `did:web:` and adding `alsoKnownAs`). So it is a convenient
JSON view of the current version, not a resolvable `did:web` identifier.
- **`whois`.** When an identifier has linked credentials, the wallet builds a Verifiable
Presentation and serves it at `/public/did/{path}/whois` as `application/vp+jwt`, and writes a
matching `LinkedVerifiablePresentation` service entry into the DID document. Because that endpoint
is a VP-JWT at `/whois` rather than a W3C VCDM presentation at `whois.vp`, it is an explicit
`#whois` service that overrides the implicit one — which is exactly the override the
specification provides for. When there are no linked credentials, the endpoint returns `404` and
the service entry is removed.
:::info[Not yet supported]
Pre-rotation (`nextKeyHashes`), witnesses (`did-witness.json`), watchers and portability are part of
the `did:webvh` specification but are not implemented in the Business Wallet today. Identifiers are
created without them, which means `portable` is `false` and cannot be enabled later on an existing
identifier.
:::
##### Related terms
DID · DID document · `did:web` · SCID · JSON Lines · Data Integrity · JCS · multihash · multikey ·
pre-rotation · witness · watcher · Linked Verifiable Presentation
##### Frequently asked questions
###### Is `did:webvh` a ledger?
Not in the distributed sense. There is no consensus network and no shared state. It is a
*microledger*: a single-writer, append-only, hash-chained log that one controller publishes and
anyone can verify. The verifiability comes from the chain, not from replication — although witnesses
and watchers add independent parties who would notice a rewrite.
###### What happened to `did:tdw`?
`did:tdw` was the original name of this method; it was renamed to `did:webvh` before v1.0. The
`method` parameter in a log entry pins the exact specification version, and a resolver must reject
any value it does not recognise rather than guessing — so old `did:tdw` logs and 1.0 `did:webvh` logs
are not silently interchangeable.
###### Can I migrate an existing `did:web` to `did:webvh`?
Not as the same identifier. The SCID is a hash of the inception entry, so a `did:webvh` DID
necessarily starts a new history and is a different DID string. The realistic path is to create the
`did:webvh` identifier, publish a parallel `did:web` document at the same location for
compatibility, and reference the old identifier in `alsoKnownAs`. Credentials already issued under
the old `did:web` keep resolving as long as you keep serving its `did.json`.
###### How much slower is resolving a `did:webvh` DID?
It is still a single HTTPS GET; the extra cost is replaying the log, which grows with the number of
versions rather than with time. A resolver that has already verified a prefix of the log may resume
from its cached state instead of reprocessing everything, provided that cached state came from a full
verification. The `ttl` parameter lets the controller suggest how long a resolved DID may be cached,
defaulting to one hour.
###### What happens when a DID is deactivated?
Setting `deactivated: true` in the parameters stops all further updates, and a resolver must return
resolution metadata saying so rather than returning the document. A controller who wants the final
document to keep resolving can instead set `updateKeys` to `[]`, which makes further updates
impossible while leaving the document retrievable. Earlier versions stay reachable in both cases
through the `versionId`, `versionTime` and `versionNumber` query parameters.
##### Sources
1. [did:webvh v1.0 — DID Method Specification](https://identity.foundation/didwebvh/v1.0/)
2. [did:webvh specification repository](https://github.com/decentralized-identity/didwebvh)
3. [did:webvh information site, including worked examples](https://didwebvh.info/)
4. [DIF celebrates v1.0 release of did:webvh](https://blog.identity.foundation/dif-celebrates-v1-0-release-of-did-webvh/)
5. [RFC 8785 — JSON Canonicalization Scheme](https://www.rfc-editor.org/rfc/rfc8785)
6. [Data Integrity EdDSA Cryptosuites v1.0](https://www.w3.org/TR/vc-di-eddsa/)
7. [Linked Verifiable Presentation specification](https://identity.foundation/linked-vp/)
8. [did:web Method Specification](https://w3c-ccg.github.io/did-method-web/)
---
*This page is informational and does not constitute legal advice. For authoritative guidance consult
the did:webvh specification directly.*
### Digital Credentials API explained
https://docs.credenco.com/docs/explained/explained-digital-credentials-api/
#### Digital Credentials API explained: the browser as the wallet chooser
The W3C Digital Credentials API, usually shortened to DC API, lets a web page ask for a credential through the browser instead of through a link or a QR code. The page calls `navigator.credentials.get()` with a `digital` member, the browser and the operating system decide which wallets can answer, the holder picks one, and the answer comes back to the same page — no custom URI scheme, no QR code the site has to render itself, and no guessing about which wallets the holder has installed.
This page covers what that API carries, how [OpenID4VP](https://docs.credenco.com/docs/explained/explained-openid4vp-presentation/) and ISO 18013-7 ride on top of it, and the one security property that makes it worth the trouble: the browser tells the wallet which origin is asking, and the page cannot lie about it.
##### What the Digital Credentials API is
The API is deliberately thin. It is a *transport and chooser*, not a credential protocol: it knows how to reach a wallet and how to return an opaque blob, and it leaves the request and response formats to a protocol identified by a string.
```mermaid
sequenceDiagram
participant P as Verifier page
participant B as Browser and OS
participant W as Wallet
P->>B: protocol-specific request
Note over B: checks the protocol is allowed shows the wallet chooser attaches the Origin
B->>W: request + Origin
Note over W: parses the request asks the holder
W-->>B: opaque response
B-->>P: promise resolves in the calling tab
```
Three things the browser adds that a link or a QR code cannot:
- **The Origin.** The wallet is told which origin made the request, as authenticated by the browser. A page cannot claim to be someone else.
- **The chooser.** The platform, not the verifier, decides which wallets are offered, and the holder picks. A verifier never learns which wallets the holder did not pick.
- **Transient activation.** The call only works from a user gesture, so a page cannot silently probe for credentials in the background.
##### The problem it solves
Before the DC API, a web page had two ways to reach a wallet, and both leak.
| Invocation | What goes wrong |
|---|---|
| A custom URI scheme such as `openid4vp://` | Any app that registered the scheme can claim the request. The wallet has only the request itself to judge who sent it, and the holder may see an app chooser listing apps that are not wallets at all |
| A QR code the verifier renders | Works cross-device, but the verifier has to build the QR, the polling and the session plumbing, and nothing in the flow proves which site the holder is actually looking at |
Both also make wallet discovery a guessing game. A site that wants to reach EUDI wallets, an mDL holder and its own wallet either renders several buttons or picks one and loses the rest. Under the DC API the page states which protocols it can speak and the platform matches that against what the holder has.
##### Calling the API
The entry point is `navigator.credentials.get()` with a `digital` member holding one or more requests. Each request is a protocol identifier plus a `data` object whose shape that protocol defines.
```js
const protocol = "openid4vp-v1-unsigned";
// Must be called from a user gesture: the API requires transient activation.
button.addEventListener("click", async () => {
// Feature detection. An unknown protocol returns false rather than throwing.
if (typeof DigitalCredential === "undefined" ||
!DigitalCredential.userAgentAllowsProtocol(protocol)) {
showQrCodeFallback();
return;
}
let credential;
try {
credential = await navigator.credentials.get({
digital: {
requests: [
{ protocol, data: request }
]
}
});
} catch (err) {
// NotAllowedError: the holder cancelled or declined, or there was no transient
// activation. TypeError: none of the requested protocols is supported.
showQrCodeFallback();
return;
}
// credential.protocol says which request was answered.
// credential.data holds the protocol's response, opaque to the browser.
// A wallet-side protocol error arrives here, on a *resolved* promise.
if (credential.data.error) {
showError(credential.data.error);
return;
}
await fetch("/verify", {
method: "POST",
headers: { "Content-Type": "application/json" },
body: JSON.stringify(credential),
});
});
```
Three things in that sketch are easy to leave out and expensive to leave out. The call needs **transient activation**, so it has to hang off a real user gesture. The promise **rejects** when the holder cancels or declines (deliberately indistinguishable, both a `NotAllowedError`) and with a `TypeError` when none of the requested protocols is supported, so there has to be a `catch` or the fallback never runs. And a wallet-side protocol error arrives on a **resolved** promise, in `data.error` — see [The response](#the-response) — so a verifier that only handles the rejection path will POST an error object to its backend as if it were a presentation.
Listing more than one entry in `requests` lets a verifier offer the same ask over several protocols — an OpenID4VP request and an `org-iso-mdoc` request side by side — and let the platform pick the one the chosen wallet supports. `DigitalCredential.userAgentAllowsProtocol()` is the cheap way to find out what this browser will accept before building anything, and it is what a well-behaved verifier uses to fall back to a QR code rather than showing the holder an error.
`navigator.credentials.create()` is the mirror image for issuance, with `openid4vci-v1` as its protocol identifier. It is newer and less widely shipped than presentation.
:::info[Cross-origin calls]
The API is gated by the `digital-credentials-get` policy-controlled feature, and `digital-credentials-create` for issuance. A page that embeds a verification service in an iframe has to grant it explicitly with `
